大狗哥传奇

  • 首页

  • 关于

  • 标签

  • 分类

  • 归档

  • 搜索

spring ControllerAdvice源码分析

发表于 2019-08-06 更新于 2020-06-30 分类于 spring

版本说明

jdk:1.8.0_131
springboot:2.1.6.RELEAS
maven:3.6.1
database:mysql-5.7.14
lombok插件

源码分析

仅仅针对被@ControllerAdvice注解的且实现接口ResponseBodyAdvice的类,进行源码分析,了解一下当controller中被@ResponseBody注解的方法的返回值,是如何被解析成前端需要的值的。 至于RequestBodyAdvice和@ExceptionHandler等实现原理是差不多的。

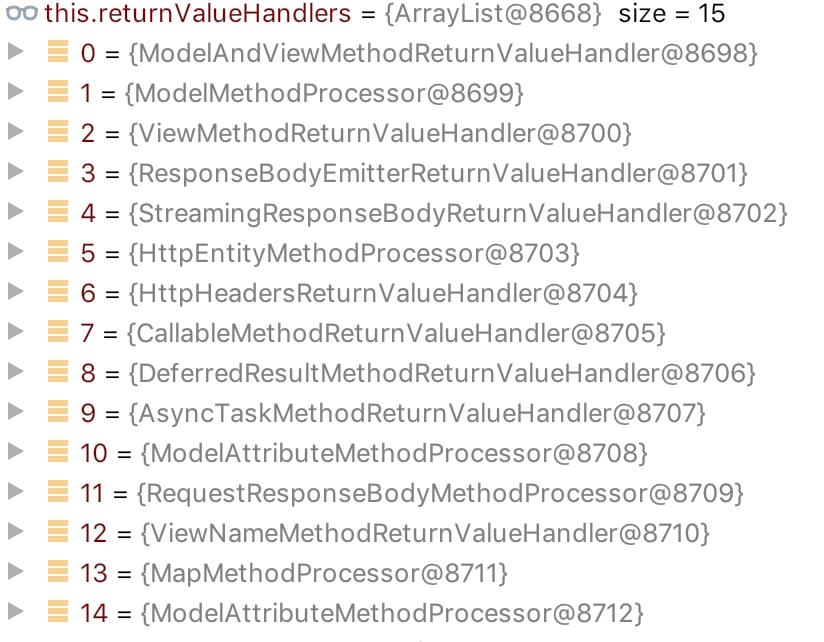
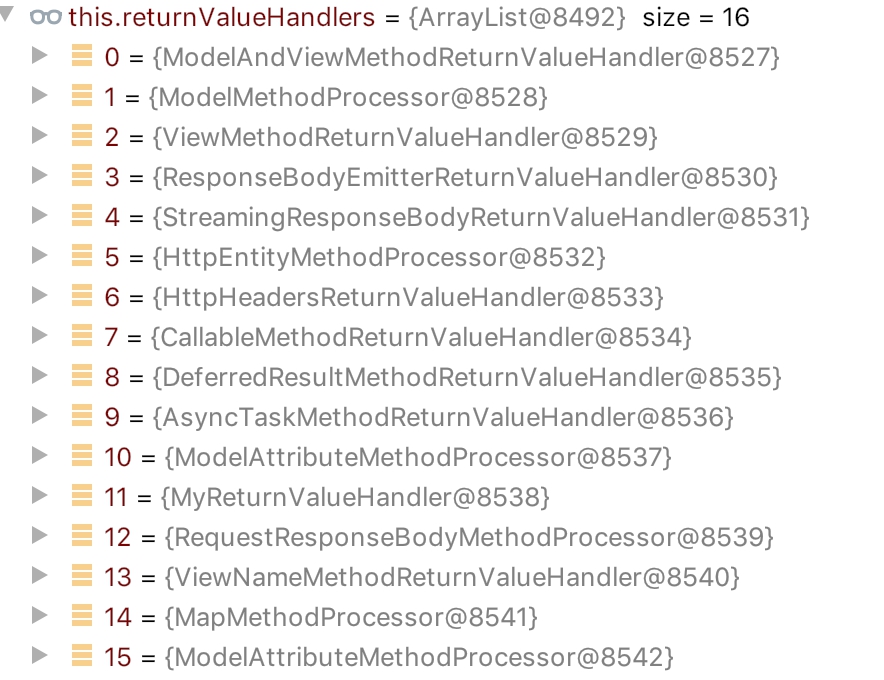
根据Spring自定义ReturnValueHandlers中的分析,我们了解了实际调用controller类中的被@ResponseBody注解方法时,实际使用RequestResponseBodyMethodProcessor处理器去处理。

我们查看下RequestResponseBodyMethodProcessor的handleReturnValue

1
2
3
4
5
6
7
8
9
10
11
@Override
public void handleReturnValue(@Nullable Object returnValue, MethodParameter returnType,
ModelAndViewContainer mavContainer, NativeWebRequest webRequest)
throws IOException, HttpMediaTypeNotAcceptableException, HttpMessageNotWritableException {

mavContainer.setRequestHandled(true);
ServletServerHttpRequest inputMessage = createInputMessage(webRequest);
ServletServerHttpResponse outputMessage = createOutputMessage(webRequest);

writeWithMessageConverters(returnValue, returnType, inputMessage, outputMessage);
}

writeWithMessageConverters节选片段

1
2
3
4
5
6
7
8
9
10
11
12
13
14
15
16
17
18
19
20
21
22
23
24
25
26
27
28
29
30
31
32
if (selectedMediaType != null) {
selectedMediaType = selectedMediaType.removeQualityValue();
for (HttpMessageConverter<?> converter : this.messageConverters) {
GenericHttpMessageConverter genericConverter = (converter instanceof GenericHttpMessageConverter ?
(GenericHttpMessageConverter<?>) converter : null);
if (genericConverter != null ?
((GenericHttpMessageConverter) converter).canWrite(targetType, valueType, selectedMediaType) :
converter.canWrite(valueType, selectedMediaType)) {
body = getAdvice().beforeBodyWrite(body, returnType, selectedMediaType,
(Class<? extends HttpMessageConverter<?>>) converter.getClass(),
inputMessage, outputMessage);
if (body != null) {
Object theBody = body;
LogFormatUtils.traceDebug(logger, traceOn ->
"Writing [" + LogFormatUtils.formatValue(theBody, !traceOn) + "]");
addContentDispositionHeader(inputMessage, outputMessage);
if (genericConverter != null) {
genericConverter.write(body, targetType, selectedMediaType, outputMessage);
}
else {
((HttpMessageConverter) converter).write(body, selectedMediaType, outputMessage);
}
}
else {
if (logger.isDebugEnabled()) {
logger.debug("Nothing to write: null body");
}
}
return;
}
}
}

this.messageConverters的循环调用,其实就是用合适的HttpMessageConverter来解析返回报文,默认情况下我们用的就是SpringBoot内容的MappingJackson2HttpMessageConverter处理器

MappingJackson2HttpMessageConverter的canWrite就是查看MediaType是否满足

1
2
3
4
5
6
7
8
9
10
11
protected boolean canWrite(@Nullable MediaType mediaType) {
if (mediaType == null || MediaType.ALL.equalsTypeAndSubtype(mediaType)) {
return true;
}
for (MediaType supportedMediaType : getSupportedMediaTypes()) {
if (supportedMediaType.isCompatibleWith(mediaType)) {
return true;
}
}
return false;
}

重点的是getAdvice()的加载

1
2
3
RequestResponseBodyAdviceChain getAdvice() {
return this.advice;
}

用Debug模式一步步回溯最终发现RequestMappingHandlerAdapter中

1
2
3
4
5
6
7
8
9
10
11
12
13
14
15
16
17
18
public void afterPropertiesSet() {
//扫描所有@ControllerAdvice
initControllerAdviceCache();

if (this.argumentResolvers == null) {
//
List<HandlerMethodArgumentResolver> resolvers = getDefaultArgumentResolvers();
this.argumentResolvers = new HandlerMethodArgumentResolverComposite().addResolvers(resolvers);
}
if (this.initBinderArgumentResolvers == null) {
List<HandlerMethodArgumentResolver> resolvers = getDefaultInitBinderArgumentResolvers();
this.initBinderArgumentResolvers = new HandlerMethodArgumentResolverComposite().addResolvers(resolvers);
}
if (this.returnValueHandlers == null) {
List<HandlerMethodReturnValueHandler> handlers = getDefaultReturnValueHandlers();
this.returnValueHandlers = new HandlerMethodReturnValueHandlerComposite().addHandlers(handlers);
}
}

节选initControllerAdviceCache

1
2
3
4
5
List<ControllerAdviceBean> adviceBeans = ControllerAdviceBean.findAnnotatedBeans(getApplicationContext());
...
if (!requestResponseBodyAdviceBeans.isEmpty()) {
this.requestResponseBodyAdvice.addAll(0, requestResponseBodyAdviceBeans);
}

节选方法getDefaultArgumentResolvers细节

1
resolvers.add(new RequestResponseBodyMethodProcessor(getMessageConverters(), this.requestResponseBodyAdvice));

RequestResponseBodyMethodProcessor构造方法最终指向父类AbstractMessageConverterMethodArgumentResolver,那么我们看到@ControllerAdvice注解的且实现接口ResponseBodyAdvice的类被加载到this.advice中

1
2
3
4
5
6
7
8
public AbstractMessageConverterMethodArgumentResolver(List<HttpMessageConverter<?>> converters,
@Nullable List<Object> requestResponseBodyAdvice) {

Assert.notEmpty(converters, "'messageConverters' must not be empty");
this.messageConverters = converters;
this.allSupportedMediaTypes = getAllSupportedMediaTypes(converters);
this.advice = new RequestResponseBodyAdviceChain(requestResponseBodyAdvice);
}

那么我们看下this.advice的类RequestResponseBodyAdviceChain方法beforeBodyWrite细节

1
2
3
4
5
6
7
8
9
10
11
12
13
14
15
16
17
18
19
20
21
22
23
@Override
@Nullable
public Object beforeBodyWrite(@Nullable Object body, MethodParameter returnType, MediaType contentType,
Class<? extends HttpMessageConverter<?>> converterType,
ServerHttpRequest request, ServerHttpResponse response) {

return processBody(body, returnType, contentType, converterType, request, response);
}

private <T> Object processBody(@Nullable Object body, MethodParameter returnType, MediaType contentType,
Class<? extends HttpMessageConverter<?>> converterType,
ServerHttpRequest request, ServerHttpResponse response) {

for (ResponseBodyAdvice<?> advice : getMatchingAdvice(returnType, ResponseBodyAdvice.class)) {
//决定自定义@ControllerAdvice是否启用
if (advice.supports(returnType, converterType)) {
//调用我们的返回值处理类
body = ((ResponseBodyAdvice<T>) advice).beforeBodyWrite((T) body, returnType,
contentType, converterType, request, response);
}
}
return body;
}

最后贴下@ControllerAdvice实现类

1
2
3
4
5
6
7
8
9
10
11
12
13
14
15
16
17
18
19
20
21
22
23
24
package com.li.springboot.controller;

import lombok.extern.slf4j.Slf4j;
import org.springframework.core.MethodParameter;
import org.springframework.http.MediaType;
import org.springframework.http.server.ServerHttpRequest;
import org.springframework.http.server.ServerHttpResponse;
import org.springframework.web.bind.annotation.ControllerAdvice;
import org.springframework.web.servlet.mvc.method.annotation.ResponseBodyAdvice;

@ControllerAdvice
@Slf4j
public class MyControllerAdvice implements ResponseBodyAdvice{
@Override
public boolean supports(MethodParameter returnType, Class converterType) {
return true;
}

@Override
public Object beforeBodyWrite(Object body, MethodParameter returnType, MediaType selectedContentType, Class selectedConverterType, ServerHttpRequest request, ServerHttpResponse response) {
log.debug("MyControllerAdvice beforeBodyWrite");
return body;
}
}

java tips

发表于 2019-08-06 更新于 2020-12-02 分类于 java

将常量放在接口中,通过继承该接口,调用常量

1
2
3
4
public interface ClassConstants{
int CONSUMER = 1;//接口中变量默认为 static final
int DISPLAY = 2;
}

查看 Class 是否是基本类型

1
clasz.isPrimitive();

查看类是否为基本类型或包装类型

1
2
import org.apache.commons.lang3.ClassUtils;
ClassUtils.isPrimitiveOrWrapper(klass)

读取 properties 中文乱码解决

1
properties.load(new InputStreamReader(AutoConfig.class.getResourceAsStream("/application.properties"),"utf-8"));

判断类是否为数组

1
klass.isArray();

判断类是否继承自

1
Father.class.isAssignableFrom(Son.class)

获取当前执行的方法名,通过方法内的内部类来实现的

1
new Object(){}.getClass().getEnclosingMethod().getName();

使用 shell

1
2
3
4
5
6
7
8
9
10
11
12
13
14
15
16
17
18
19
20
21
22
23
24
25
26
27
//获取当前系统名称,可根据不同系统调用不同的命令
String os = System.getProperty("os.name");
//命令行的参数
String [] para = new String[]{"-l"}
//执行命令
Process ls = Runtime.getRuntime().exec("ls",para, new File("/Users/li/Downloads"));


//获取命令执行结果的inputstream流
String getLs = new BufferedReader(new InputStreamReader(ls.getInputStream())).lines().collect(Collectors.joining(System.lineSeparator()));

//在目录下执行具体的命令
//因为java执行shell无法进行连续性的交互命令,通过封装的bash或者python脚本执行一系列命令是比较好的选择
Process process = Runtime.getRuntime().exec("python test.py", null, new File("/Users/li/Downloads"));
// 部分os需要先输出outputStream流,才能正确取得shell执行结果
Outputstream out = process.getOutputStream();
out.flush();
out.close();

//使用构造器模式
ProcessBuilder builder = new ProcessBuilder();
builder.command("more","test.py");
builder.directory(new File("/Users/li/Downloads"));
//重定向错误流,即System.Err
builder.redirectErrorStream(true);
Process process = builder.start();

基本类型零值

对基本数据类型来说,对于类变量static和全局变量,如果不显式地对其赋值而直接使用,则系统会为其赋予默认的零值,可以根据这个特性,直接用静态类常量来获取基本变量的初始值

1
2
3
4
public class Primitive {
public static int i; //默认值0
public static char c; //默认值'\u0000'
}

反射工具类

第三方反射工具类

1
2
3
4
5
<dependency>
<groupId>org.reflections</groupId>
<artifactId>reflections</artifactId>
<version>0.9.10</version>
</dependency>

扫描类在某个包下的所有子类

1
2
Reflections reflections = new Reflections("my.project");
Set<Class<? extends SomeType>> subTypes = reflections.getSubTypesOf(SomeType.class);

扫描在某个包下的被注解了某个注解的所有类

1
Set<Class<?>> annotated = reflections.getTypesAnnotatedWith(SomeAnnotation.class);

Comparator.comparing

可是使用 lambda 快速实现comparable

1
2
Comparator<Player> byRanking
= (Player player1, Player player2) -> player1.getRanking() - player2.getRanking();

类似Collectors提供了快捷的Comparator方法

1
2
3
4
Comparator<Player> byRanking = Comparator
.comparing(Player::getRanking);
Comparator<Player> byAge = Comparator
.comparing(Player::getAge);

批量反编译 jar 包

1
ls *.jar|xargs -I {} jadx {} -d src

问题

NoSuchMethodError一般是由版本冲突造成的

进制

1
2
3
4
5
int x = 0b11;// 二进制
int x = 0B11;// 二进制
int x = 0x11;// 十六进制
int x = 0X11;// 十六进制
int x = 011; // 八进制

Spring自定义ReturnValueHandlers

发表于 2019-08-05 更新于 2020-06-30 分类于 spring

版本说明

jdk:1.8.0_131
springboot:2.1.6.RELEAS
maven:3.6.1
database:mysql-5.7.14
lombok插件

源码分析

省略构建项目,junit 测试等步骤,只分析代码与实现。 根据spring静态资源加载源码浅析中的分析,我们可以知道 DispatcherServlet会拦截所有请求,寻找合适的mappedHandler去处理请求,并根据mappedHandler去找对应的适配器HandlerAdapter来实际请求controller的方法,针对接口来说一般使用的是RequestMappingHandlerAdapter

具体调用controller方法的细节我们不需要关注,这里我们仅仅关注RequestMappingHandlerAdapter是如何处理方法的返回值的。 节选部分DispatcherServlet的doDispatch方法

1
2
3
4
5
6
7
8
9
10
11
12
13
14
15
16
17
18
19
// 根据mappedHandler查找合适的适配器
HandlerAdapter ha = getHandlerAdapter(mappedHandler.getHandler());

// Process last-modified header, if supported by the handler.
String method = request.getMethod();
boolean isGet = "GET".equals(method);
if (isGet || "HEAD".equals(method)) {
long lastModified = ha.getLastModified(request, mappedHandler.getHandler());
if (new ServletWebRequest(request, response).checkNotModified(lastModified) && isGet) {
return;
}
}

if (!mappedHandler.applyPreHandle(processedRequest, response)) {
return;
}

// 实际调用controller方法的地方
mv = ha.handle(processedRequest, response, mappedHandler.getHandler());

RequestMappingHandlerAdapter的handle方法调用了内部的handleInternal方法

1
2
3
4
5
6
7
8
9
10
11
12
13
14
15
16
17
18
19
20
21
22
23
24
25
26
27
28
29
30
31
32
33
34
35
36
37
@Override
protected ModelAndView handleInternal(HttpServletRequest request,
HttpServletResponse response, HandlerMethod handlerMethod) throws Exception {

ModelAndView mav;
checkRequest(request);

// Execute invokeHandlerMethod in synchronized block if required.
if (this.synchronizeOnSession) {
HttpSession session = request.getSession(false);
if (session != null) {
Object mutex = WebUtils.getSessionMutex(session);
synchronized (mutex) {
mav = invokeHandlerMethod(request, response, handlerMethod);
}
}
else {
// No HttpSession available -> no mutex necessary
mav = invokeHandlerMethod(request, response, handlerMethod);
}
}
else {
// No synchronization on session demanded at all...
mav = invokeHandlerMethod(request, response, handlerMethod);
}

if (!response.containsHeader(HEADER_CACHE_CONTROL)) {
if (getSessionAttributesHandler(handlerMethod).hasSessionAttributes()) {
applyCacheSeconds(response, this.cacheSecondsForSessionAttributeHandlers);
}
else {
prepareResponse(response);
}
}

return mav;
}

我们再查看invokeHandlerMethod实现细节

1
2
3
4
5
6
7
8
9
10
11
12
13
14
15
16
17
18
19
20
21
22
23
24
25
26
27
28
29
30
31
32
33
34
35
36
37
38
39
40
41
42
43
44
45
46
47
48
49
50
51
52
53
54
55
protected ModelAndView invokeHandlerMethod(HttpServletRequest request,
HttpServletResponse response, HandlerMethod handlerMethod) throws Exception {

ServletWebRequest webRequest = new ServletWebRequest(request, response);
try {
WebDataBinderFactory binderFactory = getDataBinderFactory(handlerMethod);
ModelFactory modelFactory = getModelFactory(handlerMethod, binderFactory);

ServletInvocableHandlerMethod invocableMethod = createInvocableHandlerMethod(handlerMethod);
if (this.argumentResolvers != null) {
invocableMethod.setHandlerMethodArgumentResolvers(this.argumentResolvers);
}
//这里我们要注意下,后面实现的自定义MyResponseType注解就和这里有关
if (this.returnValueHandlers != null) {
invocableMethod.setHandlerMethodReturnValueHandlers(this.returnValueHandlers);
}
invocableMethod.setDataBinderFactory(binderFactory);
invocableMethod.setParameterNameDiscoverer(this.parameterNameDiscoverer);

ModelAndViewContainer mavContainer = new ModelAndViewContainer();
mavContainer.addAllAttributes(RequestContextUtils.getInputFlashMap(request));
modelFactory.initModel(webRequest, mavContainer, invocableMethod);
mavContainer.setIgnoreDefaultModelOnRedirect(this.ignoreDefaultModelOnRedirect);

AsyncWebRequest asyncWebRequest = WebAsyncUtils.createAsyncWebRequest(request, response);
asyncWebRequest.setTimeout(this.asyncRequestTimeout);

WebAsyncManager asyncManager = WebAsyncUtils.getAsyncManager(request);
asyncManager.setTaskExecutor(this.taskExecutor);
asyncManager.setAsyncWebRequest(asyncWebRequest);
asyncManager.registerCallableInterceptors(this.callableInterceptors);
asyncManager.registerDeferredResultInterceptors(this.deferredResultInterceptors);

if (asyncManager.hasConcurrentResult()) {
Object result = asyncManager.getConcurrentResult();
mavContainer = (ModelAndViewContainer) asyncManager.getConcurrentResultContext()[0];
asyncManager.clearConcurrentResult();
LogFormatUtils.traceDebug(logger, traceOn -> {
String formatted = LogFormatUtils.formatValue(result, !traceOn);
return "Resume with async result [" + formatted + "]";
});
invocableMethod = invocableMethod.wrapConcurrentResult(result);
}
//实际调用的地方
invocableMethod.invokeAndHandle(webRequest, mavContainer);
if (asyncManager.isConcurrentHandlingStarted()) {
return null;
}

return getModelAndView(mavContainer, modelFactory, webRequest);
}
finally {
webRequest.requestCompleted();
}
}

我们查看下invocableMethod.invokeAndHandle的细节

1
2
3
4
5
6
7
8
9
10
11
12
13
14
15
16
17
18
19
20
21
22
23
24
25
26
27
28
29
30
31
32
public void invokeAndHandle(ServletWebRequest webRequest, ModelAndViewContainer mavContainer,
Object... providedArgs) throws Exception {

Object returnValue = invokeForRequest(webRequest, mavContainer, providedArgs);
setResponseStatus(webRequest);

if (returnValue == null) {
if (isRequestNotModified(webRequest) || getResponseStatus() != null || mavContainer.isRequestHandled()) {
disableContentCachingIfNecessary(webRequest);
mavContainer.setRequestHandled(true);
return;
}
}
else if (StringUtils.hasText(getResponseStatusReason())) {
mavContainer.setRequestHandled(true);
return;
}

mavContainer.setRequestHandled(false);
Assert.state(this.returnValueHandlers != null, "No return value handlers");
try {
//处理返回结果
this.returnValueHandlers.handleReturnValue(
returnValue, getReturnValueType(returnValue), mavContainer, webRequest);
}
catch (Exception ex) {
if (logger.isTraceEnabled()) {
logger.trace(formatErrorForReturnValue(returnValue), ex);
}
throw ex;
}
}

this.returnValueHandlers.handleReturnValue的实现细节类HandlerMethodReturnValueHandlerComposite

1
2
3
4
5
6
7
8
9
10
11
12
13
14
15
16
17
18
19
20
21
22
23
24
25
26
@Override
public void handleReturnValue(@Nullable Object returnValue, MethodParameter returnType,
ModelAndViewContainer mavContainer, NativeWebRequest webRequest) throws Exception {
//查找合适的处理器
HandlerMethodReturnValueHandler handler = selectHandler(returnValue, returnType);
if (handler == null) {
throw new IllegalArgumentException("Unknown return value type: " + returnType.getParameterType().getName());
}
//处理器执行
handler.handleReturnValue(returnValue, returnType, mavContainer, webRequest);
}

@Nullable
private HandlerMethodReturnValueHandler selectHandler(@Nullable Object value, MethodParameter returnType) {
boolean isAsyncValue = isAsyncReturnValue(value, returnType);
//遍历所有处理器,只要找到就直接返回,所以得考虑下优先级关系
for (HandlerMethodReturnValueHandler handler : this.returnValueHandlers) {
if (isAsyncValue && !(handler instanceof AsyncHandlerMethodReturnValueHandler)) {
continue;
}
if (handler.supportsReturnType(returnType)) {
return handler;
}
}
return null;
}

默认的返回值处理器有以下

返回值处理器
返回值处理器

我们查看下典型的@ResponseBody的处理器RequestResponseBodyMethodProcessor的方法supportsReturnType就明白selectHandler是如何起作用的

1
2
3
4
5
@Override
public boolean supportsReturnType(MethodParameter returnType) {
return (AnnotatedElementUtils.hasAnnotation(returnType.getContainingClass(), ResponseBody.class) ||
returnType.hasMethodAnnotation(ResponseBody.class));
}

因为我们自定义的处理器是模仿@ResponseBody,那么我们只需要在returnValueHandlers中RequestResponseBodyMethodProcessor位置处插入我们自定义的处理器即可

那么首先我们需要了解下HandlerMethodReturnValueHandlerComposite的属性returnValueHandlers是如何被加载赋值的,通过查看调用关系,我们发现 returnValueHandlers 赋值的方法为addHandlers,此方法被两处调用

第一处,这里是加载 bean 时的初始化方法,即默认returnValueHandlers为getDefaultReturnValueHandlers的返回值

1
2
3
4
5
6
7
8
9
10
11
12
13
14
15
16
17
18
@Override
public void afterPropertiesSet() {
// Do this first, it may add ResponseBody advice beans
initControllerAdviceCache();

if (this.argumentResolvers == null) {
List<HandlerMethodArgumentResolver> resolvers = getDefaultArgumentResolvers();
this.argumentResolvers = new HandlerMethodArgumentResolverComposite().addResolvers(resolvers);
}
if (this.initBinderArgumentResolvers == null) {
List<HandlerMethodArgumentResolver> resolvers = getDefaultInitBinderArgumentResolvers();
this.initBinderArgumentResolvers = new HandlerMethodArgumentResolverComposite().addResolvers(resolvers);
}
if (this.returnValueHandlers == null) {
List<HandlerMethodReturnValueHandler> handlers = getDefaultReturnValueHandlers();
this.returnValueHandlers = new HandlerMethodReturnValueHandlerComposite().addHandlers(handlers);
}
}

第二处

1
2
3
4
5
6
7
8
9
public void setReturnValueHandlers(@Nullable List<HandlerMethodReturnValueHandler> returnValueHandlers) {
if (returnValueHandlers == null) {
this.returnValueHandlers = null;
}
else {
this.returnValueHandlers = new HandlerMethodReturnValueHandlerComposite();
this.returnValueHandlers.addHandlers(returnValueHandlers);
}
}

明显我们无法改变afterPropertiesSet的实现细节,那么继承WebMvcConfigurationSupport,重写RequestMappingHandlerAdapter方法,手动调用setReturnValueHandlers方法即可注入我们自定义的处理器。 但是我们需要取出默认的返回值处理器,避免其他返回值处理器不起作用,getDefaultReturnValueHandlers是私有方法,所以我们需要使用反射取值。然后将自定义处理器插入到RequestResponseBodyMethodProcessor之前即可, 这种方式会使@ControllerAdvice失效,慎用,更好的方式通过@ControllerAdvice实现同样的效果

1
2
3
4
5
6
7
8
9
10
11
12
13
14
15
16
17
18
19
20
21
22
23
24
25
26
27
28
29
30
31
32
33
34
35
36
37
38
39
40
41
42
43
44
45
46
47
48
49
50
51
52
53
54
55
56
57
58
59
60
61
62
63
64
65
66
67
68
69
70
71
72
73
74
75
76
77
78
79
80
81
82
83
84
85
86
package com.li.springboot.config;

import org.springframework.context.annotation.Configuration;
import org.springframework.web.method.support.HandlerMethodReturnValueHandler;
import org.springframework.web.servlet.config.annotation.ResourceHandlerRegistry;
import org.springframework.web.servlet.config.annotation.WebMvcConfigurationSupport;
import org.springframework.web.servlet.mvc.method.annotation.RequestMappingHandlerAdapter;
import org.springframework.web.servlet.mvc.method.annotation.RequestResponseBodyMethodProcessor;

import java.lang.reflect.Method;
import java.util.List;

@Configuration
public class WebMvc extends WebMvcConfigurationSupport {

@Override
public RequestMappingHandlerAdapter requestMappingHandlerAdapter() {
RequestMappingHandlerAdapter requestMappingHandlerAdapter = super.requestMappingHandlerAdapter();
try {
Method method = RequestMappingHandlerAdapter.class.getDeclaredMethod("getDefaultReturnValueHandlers");
method.setAccessible(true);
List<HandlerMethodReturnValueHandler> returnValueHandlers = (List<HandlerMethodReturnValueHandler>) method.invoke(requestMappingHandlerAdapter);
System.out.println("invoke " + returnValueHandlers);
int i = 0;
for (HandlerMethodReturnValueHandler handlerMethodReturnValueHandler : returnValueHandlers) {
if (handlerMethodReturnValueHandler instanceof RequestResponseBodyMethodProcessor) {
returnValueHandlers.add(i, new MyReturnValueHandler(getMessageConverters()));
break;
}
i++;
}
requestMappingHandlerAdapter.setReturnValueHandlers(returnValueHandlers);
} catch (Exception e) {
e.printStackTrace();
}
return requestMappingHandlerAdapter;
}
}

package com.li.springboot.config;

import com.li.springboot.annotation.MyResponseBody;
import org.springframework.core.MethodParameter;
import org.springframework.http.converter.HttpMessageConverter;
import org.springframework.stereotype.Component;
import org.springframework.web.bind.support.WebDataBinderFactory;
import org.springframework.web.context.request.NativeWebRequest;
import org.springframework.web.method.support.ModelAndViewContainer;
import org.springframework.web.servlet.mvc.method.annotation.AbstractMessageConverterMethodProcessor;

import java.util.HashMap;
import java.util.List;
import java.util.Map;

@Component
public class MyReturnValueHandler extends AbstractMessageConverterMethodProcessor {
protected MyReturnValueHandler(List<HttpMessageConverter<?>> converters) {
super(converters);
}

@Override
public boolean supportsParameter(MethodParameter parameter) {
//不需要支持请求参数
return false;
}

@Override
public Object resolveArgument(MethodParameter parameter, ModelAndViewContainer mavContainer, NativeWebRequest webRequest, WebDataBinderFactory binderFactory) throws Exception {
return null;
}

@Override
public boolean supportsReturnType(MethodParameter returnType) {
//有注解@MyResponseBody的使用该处理器
return returnType.getMethodAnnotation(MyResponseBody.class) != null;
}

@Override
public void handleReturnValue(Object returnValue, MethodParameter returnType, ModelAndViewContainer mavContainer, NativeWebRequest webRequest) throws Exception {
mavContainer.setRequestHandled(true);
Map map = new HashMap();
map.put("data",returnValue);
//替换返回值
writeWithMessageConverters(map, returnType, webRequest);
}
}

实现后我们可以看到返回值处理器的集合变化 返回值处理器2

spring静态资源加载源码浅析

发表于 2019-08-04 更新于 2020-06-30 分类于 spring

自定义资源处理器

DispatcherServlet会拦截所有请求,针对js,css等静态资源文件,我们不期望被controller拦截,通过重写WebMvcConfigurationSupport的addResourceHandlers方法,由拦截指定规则的请求 url。代码如下

1
2
3
4
5
6
7
8
9
10
11
12
13
14
15
package com.li.springboot.config;

import org.springframework.context.annotation.Configuration;
import org.springframework.web.servlet.config.annotation.EnableWebMvc;
import org.springframework.web.servlet.config.annotation.ResourceHandlerRegistry;
import org.springframework.web.servlet.config.annotation.WebMvcConfigurationSupport;

@Configuration
@EnableWebMvc
public class WebMvc extends WebMvcConfigurationSupport {
@Override
protected void addResourceHandlers(ResourceHandlerRegistry registry) {
registry.addResourceHandler("/static").addResourceLocations("classpath:/static");
}
}

源码分析

SpringBoot拦截 url,根据HandlerMapping找到对应的Handler去执行相关操作。

DispatcherServlet初始化时会调用初始化方法时会加载HandlerMapping

1
2
3
4
5
6
7
8
9
10
11
12
13
14
private void initHandlerMappings(ApplicationContext context) {
this.handlerMappings = null;

if (this.detectAllHandlerMappings) {
// 查找所有HandlerMapping实现类
Map<String, HandlerMapping> matchingBeans =
BeanFactoryUtils.beansOfTypeIncludingAncestors(context, HandlerMapping.class, true, false);
if (!matchingBeans.isEmpty()) {
this.handlerMappings = new ArrayList<>(matchingBeans.values());
// We keep HandlerMappings in sorted order.
AnnotationAwareOrderComparator.sort(this.handlerMappings);
}
}
...

WebMvcConfigurationSupport的方法resourceHandlerMapping中注解了@Bean,所以自定义的资源处理器类得以被加载

1
2
3
4
5
6
7
8
9
10
11
12
13
14
15
16
17
18
19
20
21
@Bean
@Nullable
public HandlerMapping resourceHandlerMapping() {
Assert.state(this.applicationContext != null, "No ApplicationContext set");
Assert.state(this.servletContext != null, "No ServletContext set");

ResourceHandlerRegistry registry = new ResourceHandlerRegistry(this.applicationContext,
this.servletContext, mvcContentNegotiationManager(), mvcUrlPathHelper());
// 我们重写的方法
addResourceHandlers(registry);

AbstractHandlerMapping handlerMapping = registry.getHandlerMapping();
if (handlerMapping == null) {
return null;
}
handlerMapping.setPathMatcher(mvcPathMatcher());
handlerMapping.setUrlPathHelper(mvcUrlPathHelper());
handlerMapping.setInterceptors(getInterceptors());
handlerMapping.setCorsConfigurations(getCorsConfigurations());
return handlerMapping;
}

重写的方法new了ResourceHandlerRegistration

1
2
3
4
5
public ResourceHandlerRegistration addResourceHandler(String... pathPatterns) {
ResourceHandlerRegistration registration = new ResourceHandlerRegistration(pathPatterns);
this.registrations.add(registration);
return registration;
}

返回到WebMvcConfigurationSupport方法resourceHandlerMapping的registry.getHandlerMapping()中,

1
2
3
4
5
6
7
8
9
10
11
12
13
14
15
16
17
18
19
20
21
22
23
24
25
26
27
28
29
30
31
32
33
protected AbstractHandlerMapping getHandlerMapping() {
if (this.registrations.isEmpty()) {
return null;
}

Map<String, HttpRequestHandler> urlMap = new LinkedHashMap<>();
for (ResourceHandlerRegistration registration : this.registrations) {
for (String pathPattern : registration.getPathPatterns()) {
//找到实际handler
ResourceHttpRequestHandler handler = registration.getRequestHandler();
if (this.pathHelper != null) {
handler.setUrlPathHelper(this.pathHelper);
}
if (this.contentNegotiationManager != null) {
handler.setContentNegotiationManager(this.contentNegotiationManager);
}
handler.setServletContext(this.servletContext);
handler.setApplicationContext(this.applicationContext);
try {
handler.afterPropertiesSet();
}
catch (Throwable ex) {
throw new BeanInitializationException("Failed to init ResourceHttpRequestHandler", ex);
}
urlMap.put(pathPattern, handler);
}
}

SimpleUrlHandlerMapping handlerMapping = new SimpleUrlHandlerMapping();
handlerMapping.setOrder(this.order);
handlerMapping.setUrlMap(urlMap);
return handlerMapping;
}

ResourceHandlerRegistration的getRequestHandler

1
2
3
4
5
6
7
8
9
10
11
12
13
14
15
protected ResourceHttpRequestHandler getRequestHandler() {
ResourceHttpRequestHandler handler = new ResourceHttpRequestHandler();
if (this.resourceChainRegistration != null) {
handler.setResourceResolvers(this.resourceChainRegistration.getResourceResolvers());
handler.setResourceTransformers(this.resourceChainRegistration.getResourceTransformers());
}
handler.setLocationValues(this.locationValues);
if (this.cacheControl != null) {
handler.setCacheControl(this.cacheControl);
}
else if (this.cachePeriod != null) {
handler.setCacheSeconds(this.cachePeriod);
}
return handler;
}

那么我们现在只需要搞清楚ResourceHttpRequestHandler中的方法是如何被调用即可。

SpringBoot或者SpringMVC的请求由DispatcherServlet拦截所有请求,实现了Servlet标准。那么我们从service方法入口即可

DispatcherServlet的父类FrameworkServlet重写了service方法

1
2
3
4
5
6
7
8
9
10
11
12
protected void service(HttpServletRequest request, HttpServletResponse response)
throws ServletException, IOException {

HttpMethod httpMethod = HttpMethod.resolve(request.getMethod());
if (httpMethod == HttpMethod.PATCH || httpMethod == null) {
//
processRequest(request, response);
}
else {
super.service(request, response);
}
}

processRequest方法中,实际由DispatcherServlet实现的方法doService去处理。而doService最终调用doDispatch方法

1
2
3
4
5
6
7
8
9
10
11
12
13
14
15
16
17
18
19
20
21
22
23
24
25
26
27
28
29
30
31
32
33
34
35
36
37
38
39
40
41
42
43
44
45
46
47
48
49
50
51
52
53
54
55
56
57
58
59
60
61
62
63
64
65
66
67
68
69
70
71
72
73
74
75
76
77
78
79
80
81
protected void doDispatch(HttpServletRequest request, HttpServletResponse response) throws Exception {
HttpServletRequest processedRequest = request;
HandlerExecutionChain mappedHandler = null;
boolean multipartRequestParsed = false;

WebAsyncManager asyncManager = WebAsyncUtils.getAsyncManager(request);

try {
ModelAndView mv = null;
Exception dispatchException = null;

try {
processedRequest = checkMultipart(request);
multipartRequestParsed = (processedRequest != request);

//查找合适的handlerMapping
mappedHandler = getHandler(processedRequest);
if (mappedHandler == null) {
noHandlerFound(processedRequest, response);
return;
}

// Determine handler adapter for the current request.
HandlerAdapter ha = getHandlerAdapter(mappedHandler.getHandler());

// Process last-modified header, if supported by the handler.
String method = request.getMethod();
boolean isGet = "GET".equals(method);
if (isGet || "HEAD".equals(method)) {
long lastModified = ha.getLastModified(request, mappedHandler.getHandler());
if (new ServletWebRequest(request, response).checkNotModified(lastModified) && isGet) {
return;
}
}

if (!mappedHandler.applyPreHandle(processedRequest, response)) {
return;
}

// ha实际使用HttpRequestHandlerAdapter,mappedHandler.getHandler()则为ResourceHttpRequestHandler
mv = ha.handle(processedRequest, response, mappedHandler.getHandler());

if (asyncManager.isConcurrentHandlingStarted()) {
return;
}

applyDefaultViewName(processedRequest, mv);
mappedHandler.applyPostHandle(processedRequest, response, mv);
}
catch (Exception ex) {
dispatchException = ex;
}
catch (Throwable err) {
// As of 4.3, we're processing Errors thrown from handler methods as well,
// making them available for @ExceptionHandler methods and other scenarios.
dispatchException = new NestedServletException("Handler dispatch failed", err);
}
processDispatchResult(processedRequest, response, mappedHandler, mv, dispatchException);
}
catch (Exception ex) {
triggerAfterCompletion(processedRequest, response, mappedHandler, ex);
}
catch (Throwable err) {
triggerAfterCompletion(processedRequest, response, mappedHandler,
new NestedServletException("Handler processing failed", err));
}
finally {
if (asyncManager.isConcurrentHandlingStarted()) {
// Instead of postHandle and afterCompletion
if (mappedHandler != null) {
mappedHandler.applyAfterConcurrentHandlingStarted(processedRequest, response);
}
}
else {
// Clean up any resources used by a multipart request.
if (multipartRequestParsed) {
cleanupMultipart(processedRequest);
}
}
}
}

我们查看具体查找mappedHandler的具体实现,

1
2
3
4
5
6
7
8
9
10
11
12
protected HandlerExecutionChain getHandler(HttpServletRequest request) throws Exception {
//handlerMappings的加载在上文中有详细解释,这里就加载了ResourceHttpRequestHandler
if (this.handlerMappings != null) {
for (HandlerMapping mapping : this.handlerMappings) {
HandlerExecutionChain handler = mapping.getHandler(request);
if (handler != null) {
return handler;
}
}
}
return null;
}

接着我们查看查找具体handlerAdapter的具体实现

1
2
3
4
5
6
7
8
9
10
11
12
protected HandlerAdapter getHandlerAdapter(Object handler) throws ServletException {
//和handlerMappings的加载代码细节一样,这里加载了HttpRequestHandlerAdapter
if (this.handlerAdapters != null) {
for (HandlerAdapter adapter : this.handlerAdapters) {
if (adapter.supports(handler)) {
return adapter;
}
}
}
throw new ServletException("No adapter for handler [" + handler +
"]: The DispatcherServlet configuration needs to include a HandlerAdapter that supports this handler");
}

handlerAdapter调用handle,对于HttpRequestHandlerAdapter来说,

1
2
3
4
5
6
7
8
@Override
@Nullable
public ModelAndView handle(HttpServletRequest request, HttpServletResponse response, Object handler)
throws Exception {

((HttpRequestHandler) handler).handleRequest(request, response);
return null;
}

那么根据doDispatch中传入的handler即则为ResourceHttpRequestHandler,我们可以看到资源文件的具体加载过程。

1
2
3
4
5
6
7
8
9
10
11
12
13
14
15
16
17
18
19
20
21
22
23
24
25
26
27
28
29
30
31
32
33
34
35
36
37
38
39
40
41
42
43
44
45
46
47
48
49
50
51
52
53
54
55
56
57
58
59
60
@Override
public void handleRequest(HttpServletRequest request, HttpServletResponse response)
throws ServletException, IOException {

// For very general mappings (e.g. "/") we need to check 404 first
Resource resource = getResource(request);
if (resource == null) {
logger.debug("Resource not found");
response.sendError(HttpServletResponse.SC_NOT_FOUND);
return;
}

if (HttpMethod.OPTIONS.matches(request.getMethod())) {
response.setHeader("Allow", getAllowHeader());
return;
}

// Supported methods and required session
checkRequest(request);

// Header phase
if (new ServletWebRequest(request, response).checkNotModified(resource.lastModified())) {
logger.trace("Resource not modified");
return;
}

// Apply cache settings, if any
prepareResponse(response);

// Check the media type for the resource
MediaType mediaType = getMediaType(request, resource);

// Content phase
if (METHOD_HEAD.equals(request.getMethod())) {
setHeaders(response, resource, mediaType);
return;
}

ServletServerHttpResponse outputMessage = new ServletServerHttpResponse(response);
if (request.getHeader(HttpHeaders.RANGE) == null) {
Assert.state(this.resourceHttpMessageConverter != null, "Not initialized");
setHeaders(response, resource, mediaType);
this.resourceHttpMessageConverter.write(resource, mediaType, outputMessage);
}
else {
Assert.state(this.resourceRegionHttpMessageConverter != null, "Not initialized");
response.setHeader(HttpHeaders.ACCEPT_RANGES, "bytes");
ServletServerHttpRequest inputMessage = new ServletServerHttpRequest(request);
try {
List<HttpRange> httpRanges = inputMessage.getHeaders().getRange();
response.setStatus(HttpServletResponse.SC_PARTIAL_CONTENT);
this.resourceRegionHttpMessageConverter.write(
HttpRange.toResourceRegions(httpRanges, resource), mediaType, outputMessage);
}
catch (IllegalArgumentException ex) {
response.setHeader("Content-Range", "bytes */" + resource.contentLength());
response.sendError(HttpServletResponse.SC_REQUESTED_RANGE_NOT_SATISFIABLE);
}
}
}

springboot静态资源定义mime类型

发表于 2019-08-02 更新于 2020-06-30 分类于 spring

问题描述

项目中需要访问静态资源文件xxx.ccxml,这个文件不属于标准的文件格式。浏览器访问时,默认下载该文件。我们是期望可以直接在页面上查看的。

背景知识

MIME(Multipurpose Internet Mail Extensions)多用途互联网邮件扩展类型。是设定某种扩展名的文件用一种应用程序来打开的方式类型,当该扩展名文件被访问的时候,浏览器会自动使用指定应用程序来打开。多用于指定一些客户端自定义的文件名,以及一些媒体文件打开方式。

详情可参考MIME 参考文档

解决方案

我们注册关于ccxml扩展类型的默认打开方式即可。

一般情况下,在tomcat目录下的conf/web.xml修改或新增

1
2
3
4
<mime-mapping>
<extension>ccxml</extension>
<mime-type>application/xml</mime-type>
</mime-mapping>

针对于SpringBoot的内置容器,提供了接口以供修改

Spring Boot 1:

1
2
3
4
5
6
7
8
9
10
11
@Configuration
public class HbbtvMimeMapping implements EmbeddedServletContainerCustomizer {

@Override
public void customize(ConfigurableEmbeddedServletContainer container) {
MimeMappings mappings = new MimeMappings(MimeMappings.DEFAULT);
mappings.add("ccxml", "application/xml; charset=utf-8");
container.setMimeMappings(mappings);
}

}

Spring Boot 2:

1
2
3
4
5
6
7
8
9
@Configuration
public class HbbtvMimeMapping implements WebServerFactoryCustomizer<ConfigurableServletWebServerFactory> {
@Override
public void customize(ConfigurableServletWebServerFactory factory) {
MimeMappings mappings = new MimeMappings(MimeMappings.DEFAULT);
mappings.add("ccxml", "application/xml; charset=utf-8");
factory.setMimeMappings(mappings);
}
}

Spring 加载静态资源的mime源码分析

针对SpringBoot2,一般我们使用的是tomcat容器,我们自定义的加载mimeType的类注入了ConfigurableServletWebServerFactory实现类中TomcatServletWebServerFactory,其方法configureContext将自定义的mimeType存储到集合中 节选片段

1
2
3
4
5
for (MimeMappings.Mapping mapping : getMimeMappings()) {
//getMimeMappings即为用自定义添加的扩展
//context实现类StandardContext
context.addMimeMapping(mapping.getExtension(), mapping.getMimeType());
}

StandardContext

1
2
3
4
5
6
7
8
9
10
@Override
public void addMimeMapping(String extension, String mimeType) {

synchronized (mimeMappings) {
//对外暴露的接口findMimeMapping
mimeMappings.put(extension.toLowerCase(Locale.ENGLISH), mimeType);
}
fireContainerEvent("addMimeMapping", extension);

}

根据spring静态资源加载源码浅析中的分析,找到ResourceHttpRequestHandler,实际执行方法handleRequest节选代码片段

1
2
3
4
5
6
MediaType mediaType = getMediaType(request, resource);

if (METHOD_HEAD.equals(request.getMethod())) {
setHeaders(response, resource, mediaType);
return;
}

我们先看下MediaType的加载,

1
2
3
4
protected MediaType getMediaType(HttpServletRequest request, Resource resource) {
return (this.contentNegotiationStrategy != null ?
this.contentNegotiationStrategy.getMediaTypeForResource(resource) : null);
}

this.contentNegotiationStrategy有方法initContentNegotiationStrategy来加载

1
2
3
4
5
6
7
8
9
10
11
12
13
14
protected PathExtensionContentNegotiationStrategy initContentNegotiationStrategy() {
Map<String, MediaType> mediaTypes = null;
if (getContentNegotiationManager() != null) {
PathExtensionContentNegotiationStrategy strategy =
getContentNegotiationManager().getStrategy(PathExtensionContentNegotiationStrategy.class);
if (strategy != null) {
mediaTypes = new HashMap<>(strategy.getMediaTypes());
}
}
//可以看出一般情况下加载ServletPathExtensionContentNegotiationStrategy
return (getServletContext() != null ?
new ServletPathExtensionContentNegotiationStrategy(getServletContext(), mediaTypes) :
new PathExtensionContentNegotiationStrategy(mediaTypes));
}

我们追踪PathExtensionContentNegotiationStrategy的getMediaTypeForResource方法中

1
2
3
4
5
6
7
8
9
10
11
12
13
14
15
public MediaType getMediaTypeForResource(Resource resource) {
MediaType mediaType = null;
//我们可以看到mimeType和servletcontext上下文有关
String mimeType = this.servletContext.getMimeType(resource.getFilename());
if (StringUtils.hasText(mimeType)) {
mediaType = MediaType.parseMediaType(mimeType);
}
if (mediaType == null || MediaType.APPLICATION_OCTET_STREAM.equals(mediaType)) {
MediaType superMediaType = super.getMediaTypeForResource(resource);
if (superMediaType != null) {
mediaType = superMediaType;
}
}
return mediaType;
}

那么我们看下具体的servletContext.getMimeType实现,针对SpringBoot2,一般我们使用的是tomcat容器, 我们可定位到ApplicationContext

1
2
3
4
5
6
7
8
9
10
11
12
13
14
15
@Override
public String getMimeType(String file) {

if (file == null)
return null;
int period = file.lastIndexOf('.');
if (period < 0)
return null;
String extension = file.substring(period + 1);
if (extension.length() < 1)
return null;
//此处context既是一开始提到的StandardContext,即可得到上文中我们自定义添加的mimetype
return context.findMimeMapping(extension);

}

最后可以看到response的ContentType和mediaType息息相关。

1
2
3
4
5
6
7
8
9
10
11
12
13
14
15
16
17
18
19
20
21
22
23
24
25
26
27
28
29
30
31
32
protected void setHeaders(HttpServletResponse response, Resource resource, @Nullable MediaType mediaType)
throws IOException {

long length = resource.contentLength();
if (length > Integer.MAX_VALUE) {
response.setContentLengthLong(length);
}
else {
response.setContentLength((int) length);
}

if (mediaType != null) {
//实际返回content-Type和MediaType有关
response.setContentType(mediaType.toString());
}
if (resource instanceof HttpResource) {
HttpHeaders resourceHeaders = ((HttpResource) resource).getResponseHeaders();
resourceHeaders.forEach((headerName, headerValues) -> {
boolean first = true;
for (String headerValue : headerValues) {
if (first) {
response.setHeader(headerName, headerValue);
}
else {
response.addHeader(headerName, headerValue);
}
first = false;
}
});
}
response.setHeader(HttpHeaders.ACCEPT_RANGES, "bytes");
}

vscode相关

发表于 2019-08-01 更新于 2020-12-02 分类于 vscode

vim 自动切换输入法

安装软件

1
curl -Ls https://raw.githubusercontent.com/daipeihust/im-select/master/install_mac.sh | sh

软件会默认安装到目录/user/local/bin/下, 无参数执行时就会输出默认输入法的字符

1
2
/usr/local/bin$ im-select
com.apple.keylayout.ABC

打开vscode的默认配置文件setting.json,新增如下配置

1
2
3
4
"vim.autoSwitchInputMethod.enable": true,
"vim.autoSwitchInputMethod.defaultIM": "com.apple.keylayout.ABC",
"vim.autoSwitchInputMethod.obtainIMCmd": "/usr/local/bin/im-select",
"vim.autoSwitchInputMethod.switchIMCmd": "/usr/local/bin/im-select {im}"

其中默认defaultIM的值为你需要自动切换的默认输入法

保存后自动运行

1.安装Code Runner

在settings.json中配置

1
2
3
"code-runner.executorMapByFileExtension": {
".scm": "scheme --quiet<",
}

有些情况下可能需要添加如下配置才生效

1
2
3
"code-runner.executorMap": {
"scheme": "scheme --quiet< \"$dir$fileName\""
}

2.安装Run on Save

在settings.json中配置

1
2
3
4
5
6
7
"runOnSave.commands": [
{
"match": "\\.scm$",
"command": "scheme --quiet < ${file}",
"runIn": "backend"
}
]

具体详情配置可参考插件的文档

最近打开文件

open recent file ⌃ R

括号匹配色

彩虹括号 使用 Bracket Pair Colorizer2

颜色方案(使用黑色主题)使用如下在settings.json中配置

1
2
3
4
5
6
7
8
9
10
"bracket-pair-colorizer-2.colors": [

"#289CF4",
"#FED02F",
"#2CDD18",
"#FF5FFF",
"#D10000",
"#D05355",
"#fff",
]

是否显示侧边栏

Toggle activitiy Bar Visibility 带图标的侧边工具栏

Toggle side Bar Visibility快捷键⌘b 具体工具栏的实际内容

合并当前行

join line ⌃ R

自定义代码片段

  1. Configure user Snippets
  2. 选择生效的语言
  3. 进行配置

scope 不是文件扩展名

1
2
3
4
5
6
7
8
"Print to console": {
"scope": "scheme",
"prefix": "log",
"body": [
"(write-line ($0))",
],
"description": "Log output to console"
}

我们可以使用$name,取变量的值,若没有值,可以使用${name:defaultText}默认值

1)文档相关:

变量 变量含义
TM_SELECTED_TEXT 当前选定的文本或空字符串
TM_CURRENT_LINE 当前行的内容
TM_CURRENT_WORD 光标下的单词内容或空字符串
TM_LINE_INDEX 基于零索引的行号
TM_LINE_NUMBER 基于单索引的行号
TM_FILENAME 当前文档的文件名
TM_FILENAME_BASE 当前文档没有扩展名的文件名
TM_DIRECTORY 当前文档的目录
TM_FILEPATH 当前文档的完整文件路径
CLIPBOARD 剪贴板的内容
WORKSPACE_NAME 已打开的工作空间或文件夹的名称

2 )当前日期和时间:

变量 变量含义
CURRENT_YEAR 当前年份
CURRENT_YEAR_SHORT 当前年份的最后两位数
CURRENT_MONTH 月份为两位数(例如'02')
CURRENT_MONTH_NAME 月份的全名(例如'June')(中文语言对应六月)
CURRENT_MONTH_NAME_SHORT 月份的简称(例如'Jun')(中文语言对应是 6 月)
CURRENT_DATE 这个月的哪一天
CURRENT_DAY_NAME 当天是星期几(例如'星期一')
CURRENT_DAY_NAME_SHORT 当天是星期几的简称(例如'Mon')(中文对应周一)
CURRENT_HOUR 24 小时时钟格式的当前小时
CURRENT_MINUTE 当前分
CURRENT_SECOND 当前秒

markdown图片插件

使用Paste Image

1
2
3
4
5
6
7
8
9
//图片的默认名称,当选中文字时,文字会作为默认的名称
"pasteImage.defaultName": "${currentFileNameWithoutExt}",
"pasteImage.namePrefix": "${currentFileNameWithoutExt}_",
"pasteImage.path": "${projectRoot}/source/images",
"pasteImage.basePath": "${projectRoot}/source",
"pasteImage.forceUnixStyleSeparator": true,
"pasteImage.prefix": "/",
//插入markdown的语法
"pasteImage.insertPattern": "![${imageFileName}](./images/${imageFileName})"

快捷键

ctrl + tab切换窗口

css 颜色选择器

鼠标悬停在颜色代码块上即可

修改 statusbar 颜色

1
2
3
4
5
6

"workbench.colorCustomizations": {
"statusBar.background" : "#1A1A1A",
"statusBar.noFolderBackground" : "#0A0A0D",
"statusBar.debuggingBackground": "#511f1f"
}

列出所有搜索内容

search : find in files

编译 markdown 频繁跳动

修改配置

1
"markdown.preview.scrollEditorWithPreview": false

感觉像每次保存时,预览窗口重新渲染,然后编辑区同步更新位置,然后就跳一下。关闭这个就不跳动了

gson使用手册

发表于 2019-08-01 更新于 2020-06-30 分类于 tips

基本类型

1
2
3
4
5
6
7
8
9
10
11
12
13
14
15
// Serialization
Gson gson = new Gson();
gson.toJson(1); // ==> 1
gson.toJson("abcd"); // ==> "abcd"
gson.toJson(new Long(10)); // ==> 10
int[] values = { 1 };
gson.toJson(values); // ==> [1]

// Deserialization
int one = gson.fromJson("1", int.class);
Integer one = gson.fromJson("1", Integer.class);
Long one = gson.fromJson("1", Long.class);
Boolean false = gson.fromJson("false", Boolean.class);
String str = gson.fromJson("\"abc\"", String.class);
String[] anotherStr = gson.fromJson("[\"abc\"]", String[].class);

类

1
2
3
4
5
6
7
8
9
10
11
12
13
14
15
class BagOfPrimitives {
private int value1 = 1;
private String value2 = "abc";
private transient int value3 = 3;
BagOfPrimitives() {
// no-args constructor
}
}

// Serialization
BagOfPrimitives obj = new BagOfPrimitives();
Gson gson = new Gson();
String json = gson.toJson(obj);

// ==> json is {"value1":1,"value2":"abc"}

注意事项

  1. 类的属性推荐使用private
  2. 默认情况下被transient修饰的属性会被忽略
  3. 序列化时为值null的属性将会被忽略
  4. 反序列化时,值null的属性将会被赋值为零值

数组

1
2
3
4
5
6
7
8
9
10
11
Gson gson = new Gson();
int[] ints = {1, 2, 3, 4, 5};
String[] strings = {"abc", "def", "ghi"};

// Serialization
gson.toJson(ints); // ==> [1,2,3,4,5]
gson.toJson(strings); // ==> ["abc", "def", "ghi"]

// Deserialization
int[] ints2 = gson.fromJson("[1,2,3,4,5]", int[].class);
// ==> ints2 will be same as ints

集合

1
2
3
4
5
6
7
8
9
10
Gson gson = new Gson();
Collection<Integer> ints = Lists.immutableList(1,2,3,4,5);

// Serialization
String json = gson.toJson(ints); // ==> json is [1,2,3,4,5]

// Deserialization
Type collectionType = new TypeToken<Collection<Integer>>(){}.getType();
Collection<Integer> ints2 = gson.fromJson(json, collectionType);
// ==> ints2 is same as ints

泛型

1
2
3
4
5
6
7
8
9
10
class Foo<T> {
T value;
}
Gson gson = new Gson();

Foo<Bar> foo = new Foo<Bar>();
Type fooType = new TypeToken<Foo<Bar>>() {}.getType();
gson.toJson(foo, fooType);

gson.fromJson(json, fooType);

使用TypeToken可指定泛型

内置解析器

java.net.URL可以匹配如下格式的值"https://github.com/google/gson/" java.net.URI 可以匹配如下格式的值"/google/gson/"

1
2
3
4
5
6
7
8
9
10
Gson gson = new Gson();
String json = "{\"url\": \"https://github.com/google/gson/\",\"uri\": \"/google/gson/\"}";
TestUrl testUrl = gson.fromJson(json, TestUrl.class);
// toString --> GsonTest.TestUrl(url=https://github.com/google/gson/, uri=/google/gson/)

@Data
public static class TestUrl{
private URL url;
private URI uri;
}

自定义序列化与反序列化

需要序列化的类UserBean

1
2
3
4
@Data
public class UserBean {
private String name;
}

序列化处理器,泛型为UserBean

1
2
3
4
5
6
7
8
9
10
 public class UserJsonSerializer implements JsonSerializer<UserBean>{

@Override
public JsonElement serialize(UserBean src, Type typeOfSrc, JsonSerializationContext context) {
//src 即是待序列化的实例对象
JsonObject userJson= new JsonObject();
userJson.addProperty("__name__",src.getName());
return userJson;
}
}

反序列化处理器,泛型为UserBean

1
2
3
4
5
6
7
8
9
10
11
12
13
 public class UserJsonDeserializer implements JsonDeserializer<UserBean>{

@Override
public UserBean deserialize(JsonElement json, Type typeOfT, JsonDeserializationContext context) throws JsonParseException {
UserBean userBean = new UserBean();
//json 即为待反序列化的字符串生成的json对象
JsonObject asJsonObject = json.getAsJsonObject();
if(asJsonObject.has("__name__")){
userBean.setName(String.valueOf(asJsonObject.get("__name__")));
}
return userBean;
}
}

测试程序,注册UserBean的TypeToken的序列化与反序列化处理器

1
2
3
4
5
6
7
8
9
10
11
GsonBuilder gsonBuilder = new GsonBuilder();
Type type= new TypeToken<UserBean>() {}.getType();
gsonBuilder.registerTypeAdapter(type,new UserJsonSerializer());
gsonBuilder.registerTypeAdapter(type,new UserJsonDeserializer());
Gson gson = gsonBuilder.create();
UserBean userBean = new UserBean();
userBean.setName("123");
String json = gson.toJson(userBean);
// {"__name__":"123"}
userBean = gson.fromJson(json, UserBean.class);
//UserBean(name="123")

使用 JsonSerializer 统一处理 null

1
2
3
4
5
6
7
8
9
10
11
12
13
14
15
16
17
18
19
20
21
22
23
24
25
26
27
28
29
30
31
32
33
34
35
36
37
38
39
40
41
42
43
44
45
46
47
48
49
50
51
52
53
54
55
56
57
58
59
60
61
62
63
64
65
66
67
68
69
70
71
72
73
74
75
76
77
78
79
package com.leaderli.demo.util;

import com.google.gson.*;
import org.junit.jupiter.api.Test;

import java.lang.reflect.Type;
import java.util.ArrayList;
import java.util.HashMap;
import java.util.HashSet;
import java.util.Map;

public class GsonTest {

private static class MapJsonSerializer implements JsonSerializer {

@Override
public JsonElement serialize(Object o, Type type, JsonSerializationContext jsonSerializationContext) {
return serialize(o,(Class)type);
}


private <T> JsonElement serialize(Object o, Class<T> type) {
if (Map.class.isAssignableFrom(type)) {
JsonObject jsonObject = new JsonObject();
Map<?, ?> map = (Map) o;
map.forEach((k, v) -> {
if (k == null) {
return;
}
String key = String.valueOf(k);
if (v == null) {
jsonObject.add(key, new JsonPrimitive(""));
} else {
jsonObject.add(key, serialize(v, v.getClass()));
}

});
return jsonObject;
} else if (Iterable.class.isAssignableFrom(type)) {
Iterable<?> iterable = (Iterable) o;
JsonArray array = new JsonArray();
iterable.forEach(e -> {
if (e == null) {
array.add(new JsonPrimitive(""));
} else {

array.add(serialize(e, e.getClass()));
}

});
return array;
} else {

return new JsonPrimitive(String.valueOf(o));
}
}
}

@Test
public void test() {

Gson gson = new GsonBuilder().registerTypeHierarchyAdapter(Map.class, new MapJsonSerializer()).create();

Map map = new HashMap();
map.put("str",null);
map.put("set",new HashSet<>());
ArrayList<Object> list = new ArrayList<>();
list.add(1);
list.add(null);
map.put("list", list);
Map temp= new HashMap();
temp.put("temp",null);
map.put("temp",temp);

System.out.println(gson.toJson(map));


}
}

{"str":"","temp":{"temp":""},"set":[],"list":["1",""]}

优化打印

1
2
3
4
5
Gson gson = new GsonBuilder().setPrettyPrinting().create();
Person person= new Person();
person.setAge(1);
person.setName("hello");
System.out.println(gson.toJson(person))

打印结果如下

1
2
3
4
{
"name": "hello",
"age": 1
}

mybatis入门

发表于 2019-07-31 更新于 2020-12-02 分类于 java

版本说明

jdk:1.8.0_131 springboot:2.1.6.RELEAS maven:3.6.1 database:mysql-5.7.1 mybatis:3.5.2 lombok插件

概述

基于官方文档的学习笔记。项目基于maven构建,项目主要介绍mybatis的使用,因此基本不使用Spring的相关代码

建表语句如下,建表语句来自git-mybatis-3,针对mysql进行部分修改

1
2
3
4
5
6
7
8
9
10
11
12
13
14
15
16
17
18
19
20
21
22
23
24
25
26
27
28
29
30
31
32
33
34
35
36
37
38
39
40
41
42
43
44
45
46
47
48
49
50
51
52
53
54
55
56
57
58
59
60
61
62
63
64
65
66
67
68
69
70
71
72
73
74
75
76
77
78
79
80
81
82
83
84
85
86
87
88
89
90
91
92
93
94
95
96
97
98
99
100
101
102
103
104
105
106
107
108
109
-- create your own database

DROP TABLE IF EXISTS comment;
DROP TABLE IF EXISTS post_tag;
DROP TABLE IF EXISTS tag;
DROP TABLE IF EXISTS post;
DROP TABLE IF EXISTS blog;
DROP TABLE IF EXISTS author;
DROP TABLE IF EXISTS node;

CREATE TABLE author (
id INT PRIMARY KEY AUTO_INCREMENT,
username VARCHAR(255) NOT NULL,
password VARCHAR(255) NOT NULL,
email VARCHAR(255) NOT NULL,
bio BLOB,
favourite_section VARCHAR(25)
)
AUTO_INCREMENT = 10000;

CREATE TABLE blog (
id INT PRIMARY KEY AUTO_INCREMENT,
author_id INT NOT NULL,
title VARCHAR(255)
);

CREATE TABLE post (
id INT PRIMARY KEY AUTO_INCREMENT,
blog_id INT,
author_id INT NOT NULL,
created_on TIMESTAMP,
section VARCHAR(25) NOT NULL,
subject VARCHAR(255) NOT NULL,
body BLOB NOT NULL,
draft INT NOT NULL,
FOREIGN KEY (blog_id) REFERENCES blog (id)
);

CREATE TABLE tag (
id INT PRIMARY KEY AUTO_INCREMENT,
name VARCHAR(255) NOT NULL
);

CREATE TABLE post_tag (
post_id INT NOT NULL,
tag_id INT NOT NULL,
PRIMARY KEY (post_id, tag_id)
);

CREATE TABLE comment (
id INT PRIMARY KEY AUTO_INCREMENT,
post_id INT NOT NULL,
name LONGTEXT NOT NULL,
comment LONGTEXT NOT NULL
);

CREATE TABLE node (
id INT NOT NULL,
parent_id INT,
PRIMARY KEY (id)
);


INSERT INTO author (id, username, password, email, bio, favourite_section)
VALUES (101, 'jim', '********', 'jim@ibatis.apache.org', '', 'NEWS');
INSERT INTO author (id, username, password, email, bio, favourite_section)
VALUES (102, 'sally', '********', 'sally@ibatis.apache.org', NULL, 'VIDEOS');

INSERT INTO blog (id, author_id, title) VALUES (1, 101, 'Jim Business');
INSERT INTO blog (id, author_id, title) VALUES (2, 102, 'Bally Slog');

INSERT INTO post (id, blog_id, author_id, created_on, section, subject, body, draft) VALUES
(1, 1, 101, '2008-01-01 00:00:01', 'NEWS', 'Corn nuts',
'I think if I never smelled another corn nut it would be too soon...', 1);
INSERT INTO `post` (id, blog_id, author_id, created_on, section, subject, body, draft)
VALUES (2, 1, 101, '2008-01-12 00.00.00', 'VIDEOS', 'Paul Hogan on Toy Dogs', 'That''s not a dog. THAT''s a dog!', 0);
INSERT INTO post (id, blog_id, author_id, created_on, section, subject, body, draft)
VALUES (3, 2, 102, '2007-12-05 00.00.00', 'PODCASTS', 'Monster Trucks', 'I think monster trucks are great...', 1);
INSERT INTO post (id, blog_id, author_id, created_on, section, subject, body, draft) VALUES
(4, 2, 102, '2008-01-12 00.00.00', 'IMAGES', 'Tea Parties', 'A tea party is no place to hold a business meeting...',
0);

INSERT INTO post (id, blog_id, author_id, created_on, section, subject, body, draft)
VALUES (5, NULL, 101, '2008-01-12 00.00.00', 'IMAGES', 'An orphaned post', 'this post is orphaned', 0);

INSERT INTO tag (id, name) VALUES (1, 'funny');
INSERT INTO tag (id, name) VALUES (2, 'cool');
INSERT INTO tag (id, name) VALUES (3, 'food');

INSERT INTO post_tag (post_id, tag_id) VALUES (1, 1);
INSERT INTO post_tag (post_id, tag_id) VALUES (1, 2);
INSERT INTO post_tag (post_id, tag_id) VALUES (1, 3);
INSERT INTO post_tag (post_id, tag_id) VALUES (2, 1);
INSERT INTO post_tag (post_id, tag_id) VALUES (4, 3);

INSERT INTO comment (id, post_id, name, comment) VALUES (1, 1, 'troll', 'I disagree and think...');
INSERT INTO comment (id, post_id, name, comment) VALUES (2, 1, 'anonymous', 'I agree and think troll is an...');
INSERT INTO comment (id, post_id, name, comment)
VALUES (4, 2, 'another', 'I don not agree and still think troll is an...');
INSERT INTO comment (id, post_id, name, comment) VALUES (3, 3, 'rider', 'I prefer motorcycles to monster trucks...');


INSERT INTO node (id, parent_id) VALUES (1, NULL);
INSERT INTO node (id, parent_id) VALUES (2, 1);
INSERT INTO node (id, parent_id) VALUES (3, 1);
INSERT INTO node (id, parent_id) VALUES (4, 2);
INSERT INTO node (id, parent_id) VALUES (5, 2);
INSERT INTO node (id, parent_id) VALUES (6, 3);
INSERT INTO node (id, parent_id) VALUES (7, 3);

pom 文件

1
2
3
4
5
6
7
8
9
10
11
12
13
14
15
16
17
18
19
20
21
22
23
24
25
26
27
28
<?xml version="1.0" encoding="UTF-8"?>
<project xmlns:xsi="http://www.w3.org/2001/XMLSchema-instance"
xmlns="http://maven.apache.org/POM/4.0.0"
xsi:schemaLocation="http://maven.apache.org/POM/4.0.0 http://maven.apache.org/xsd/maven-4.0.0.xsd">
<modelVersion>4.0.0</modelVersion>

<groupId>com.li</groupId>
<artifactId>mybatis</artifactId>
<version>1.0-SNAPSHOT</version>
<dependencies>
<dependency>
<groupId>org.mybatis</groupId>
<artifactId>mybatis</artifactId>
<version>3.5.2</version>
</dependency>
<dependency>
<groupId>junit</groupId>
<artifactId>junit</artifactId>
<version>4.11</version>
<scope>test</scope>
</dependency>
<dependency>
<groupId>org.projectlombok</groupId>
<artifactId>lombok</artifactId>
<version>1.18.4</version>
</dependency>
</dependencies>
</project>

mybatis配置文件

1
2
3
4
5
6
7
8
9
10
11
12
13
14
15
16
17
18
19
20
21
22
23
24
25
<?xml version="1.0" encoding="UTF-8" ?>
<!DOCTYPE configuration
PUBLIC "-//mybatis.org//DTD Config 3.0//EN"
"http://mybatis.org/dtd/mybatis-3-config.dtd">
<configuration>
<properties resource="config.properties">
</properties>
<typeAliases>
<package name="org.mybatis.example"/>
</typeAliases>
<environments default="development">
<environment id="development">
<transactionManager type="JDBC"/>
<dataSource type="POOLED">
<property name="driver" value="${driver}"/>
<property name="url" value="${url}"/>
<property name="username" value="${username}"/>
<property name="password" value="${password}"/>
</dataSource>
</environment>
</environments>
<mappers>
<package name="org.mybatis.example"/>
</mappers>
</configuration>

properties

定义配置文件地址,标签属性值可以${xxx}取配置文件的值

DataSource

dataSource标签用来定义一个标准的DataSource标准,mybatis内置了三种类型的DataSource

type="[UNPOOLED|POOLED|JNDI]"

UNPOOLED

每一次数据操作都新建。可做如下配置

driver
url > username
password
defaultTransactionIsolationLevel:数据库隔离级别
defaultNetworkTimeout 同时可以为driver设置属性driver.encoding=UTF8

POOLED

使用连接池来管理数据源,除了UNPOOLED的配置还可做如下配置

poolMaximumActiveConnections
poolMaximumIdleConnections
poolMaximumCheckoutTime
poolTimeToWait
poolMaximumLocalBadConnectionTolerance
poolPingQuery
poolPingEnabled
poolPingConnectionsNotUsedFor

JNDI

initial_context data_source

env.前缀的配置将被加载到InitialContext中 env.encoding=UTF8

1
2
3
<dataSource type="JNDI">
<property name="data_source" value="java:/comp/env/jdbc/mysql"/>
</dataSource>

自定义类型

type可指定为其他工厂类

1
2
3
4
5
6
<dataSource type="org.myproject.C3P0DataSourceFactory">
<property name="driver" value="${driver}"/>
<property name="url" value="${url}"/>
<property name="username" value="${username}"/>
<property name="password" value="${password}"/>
</dataSource>

env.encoding=UTF8

mappers

定位映射的SQL语句

1
2
3
4
5
6
<mappers>
<mapper url="file:/Users/BlogMapper.xml"/>
<mapper class="org.mybatis.example.BlogMapper"/>
<mapper resource="org.mybatis.example.BlogMapper.xml"/>
<package name="org.mybatis.example"/>
</mappers>

typeAliases

mybatis默认别名有如下

别名 class 类型
_byte byte
_long long
_short short
_int int
_integer int
_double double
_float float
_boolean boolean
string String
byte Byte
long Long
short Short
int Integer
integer Integer
double Double
float Float
boolean Boolean
date Date
decimal BigDecimal
bigdecimal BigDecimal
object Object
map Map
hashmap HashMap
list List
arraylist ArrayList
collection Collection
iterator Iterator

可指定其他别名

1
2
3
4
<typeAliases>
<typeAlias type="org.mybatis.example.Blog" alias="blog"/>
<package name="org.mybatis.example"/>
</typeAliases>

别名可供resultType或parameterType使用

typeHandlers

每当 MyBatis 在 PreparedStatement 上设置参数或从 ResultSet 中检索值时,都会使用 TypeHandler 以适合 Java 类型的方式检索值。 下表描述了默认的 TypeHandlers。

Type Handler java Types JDBC Types
BooleanTypeHandler java.lang.Boolean, boolean Any compatible BOOLEAN
ByteTypeHandler java.lang.Byte, byte Any compatible NUMERIC or BYTE
ShortTypeHandler java.lang.Short, short Any compatible NUMERIC or SMALLINT
IntegerTypeHandler java.lang.Integer, int Any compatible NUMERIC or INTEGER
LongTypeHandler java.lang.Long, long Any compatible NUMERIC or BIGINT
FloatTypeHandler java.lang.Float, float Any compatible NUMERIC or FLOAT
DoubleTypeHandler java.lang.Double, double Any compatible NUMERIC or DOUBLE
BigDecimalTypeHandler java.math.BigDecimal Any compatible NUMERIC or DECIMAL
StringTypeHandler java.lang.String CHAR, VARCHAR
ClobReaderTypeHandler java.io.Reader -
ClobTypeHandler java.lang.String CLOB, LONGVARCHAR
NStringTypeHandler java.lang.String NVARCHAR, NCHAR
NClobTypeHandler java.lang.String NCLOB
BlobInputStreamTypeHandler java.io.InputStream -
ByteArrayTypeHandler byte[] Any compatible byte stream type
BlobTypeHandler byte[] BLOB, LONGVARBINARY
DateTypeHandler java.util.Date TIMESTAMP
DateOnlyTypeHandler java.util.Date DATE
TimeOnlyTypeHandler java.util.Date TIME
SqlTimestampTypeHandler java.sql.Timestamp TIMESTAMP
SqlDateTypeHandler java.sql.Date DATE
SqlTimeTypeHandler java.sql.Time TIME
ObjectTypeHandler Any OTHER, or unspecified
EnumTypeHandler Enumeration Type VARCHAR any string compatible type, as the code is stored (not index).
EnumOrdinalTypeHandler Enumeration Type Any compatible NUMERIC or DOUBLE, as the position is stored (not the code itself).
SqlxmlTypeHandler java.lang.String SQLXML
InstantTypeHandler java.time.Instant TIMESTAMP
LocalDateTimeTypeHandler java.time.LocalDateTime TIMESTAMP
LocalDateTypeHandler java.time.LocalDate DATE
LocalTimeTypeHandler java.time.LocalTime TIME
OffsetDateTimeTypeHandler java.time.OffsetDateTime TIMESTAMP
OffsetTimeTypeHandler java.time.OffsetTime TIME
ZonedDateTimeTypeHandler java.time.ZonedDateTime TIMESTAMP
YearTypeHandler java.time.Year INTEGER
MonthTypeHandler java.time.Month INTEGER
YearMonthTypeHandler java.time.YearMonth VARCHAR or LONGVARCHAR
JapaneseDateTypeHandler java.time.chrono.JapaneseDate DATE

你可以通过继承org.apache.ibatis.type.TypeHandler或者使用org.apache.ibatis.type.BaseTypeHandler来使用非标准的TypeHandler

在配置文件typeHandlers中的typeHandler标签中配置jdbcType,可指定sql表字段类型,若实际java类注解了@MappedJdbcTypes,会无视配置文件
在配置文件typeHandlers中的typeHandler标签中配置javaType,可指定javaBean类型,若实际java类注解了@MappedTypes,会无视配置文件
示例如下:

1
2
3
4
5
6
7
8
9
10
11
12
13
14
15
16
17
18
19
20
21
22
23
24
25
26
27
28
29
30
31
32
33
34
35
36
37
package org.mybatis.example;

import org.apache.ibatis.type.BaseTypeHandler;
import org.apache.ibatis.type.JdbcType;
import org.apache.ibatis.type.MappedJdbcTypes;

import java.sql.CallableStatement;
import java.sql.PreparedStatement;
import java.sql.ResultSet;
import java.sql.SQLException;
/**
* includeNullJdbcType=true表示当sql字段类型未知也可使用
*/
@MappedJdbcTypes(value=JdbcType.VARCHAR,includeNullJdbcType=true)
@MappedTypes(String.class)
public class ExampleTypeHandler extends BaseTypeHandler<String> {

@Override
public void setNonNullParameter(PreparedStatement ps, int i, String parameter, JdbcType jdbcType) throws SQLException {
ps.setString(i, parameter+"_sql");
}

@Override
public String getNullableResult(ResultSet rs, String columnName) throws SQLException {
return rs.getString(columnName)+"_java";
}

@Override
public String getNullableResult(ResultSet rs, int columnIndex) throws SQLException {
return rs.getString(columnIndex)+":java";
}

@Override
public String getNullableResult(CallableStatement cs, int columnIndex) throws SQLException {
return cs.getString(columnIndex)+"#java";
}
}

在mybatis配置文件中若配置了<typehandlers>将会替换默认的数据库类型为VARCHAR,java类型为java.lang.String的转换处理器

1
2
3
4
5
<typeHandlers>
<typeHandler handler="org.mybatis.example.ExampleTypeHandler"/>
<!-- 扫描package目录下所有类型转换器-->
<package name="org.mybatis.example"/>
</typeHandlers>

上述配置实际上是调用 org.mybatis.spring.SqlSessionFactoryBean:setTypeHandlers 方法

也可临时指定

1
2
3
4
<resultMap id="blogMap" type="blog">
<result column="id" property="id"/>
<result column="title" typeHandler="exampleTypeHandler" property="title"/>
</resultMap>

可使用泛型,通过配置文件typeHandler的javaType觉得处理的java类型

1
2
3
4
5
6
7
8
public class GenericTypeHandler<E extends MyObject> extends BaseTypeHandler<E> {

private Class<E> type;

public GenericTypeHandler(Class<E> type) {
if (type == null) throw new IllegalArgumentException("Type argument cannot be null");
this.type = type;
}
1
2
3
<typeHandlers>
<typeHandler handler="org.mybatis.example.ExampleTypeHandler" javaType="String"/>
</typeHandlers>

plugins

mybatis可定义插件来对数据库操作的各个阶段以切面的方式进行处理。mybatis提供了四种类型的插件

在mybatis中增加配置,<property>的值注入到具体插件的setProperties方法的参数

1
2
3
4
5
<plugins>
<plugin interceptor="org.mybatis.example.ExamplePlugin">
<property name="someProperty" value="100"/>
</plugin>
</plugins>

插件需要继承org.apache.ibatis.plugin.Interceptor,其中注解Intercepts的值,表示切面的位置

type

Executor (update, query, flushStatements, commit, rollback, getTransaction, close, isClosed)
ParameterHandler (getParameterObject, setParameters)
ResultSetHandler (handleResultSets, handleOutputParameters)
StatementHandler (prepare, parameterize, batch, update, query)

method

type里的方法名

args

type里的方法的参数类型

metdho和args可以定位到一个具体的java方法。所以method和args的值参考type中的方法即可

1
2
3
4
5
6
7
8
9
10
11
12
13
14
15
16
17
18
19
20
21
22
23
24
25
26
27
28
29
30
31
32
package org.mybatis.example;

import org.apache.ibatis.cache.CacheKey;
import org.apache.ibatis.executor.Executor;
import org.apache.ibatis.mapping.BoundSql;
import org.apache.ibatis.mapping.MappedStatement;
import org.apache.ibatis.plugin.Interceptor;
import org.apache.ibatis.plugin.Intercepts;
import org.apache.ibatis.plugin.Invocation;
import org.apache.ibatis.plugin.Signature;
import org.apache.ibatis.session.ResultHandler;
import org.apache.ibatis.session.RowBounds;

import java.util.Properties;

@Intercepts({
@Signature(type = Executor.class, method = "query", args = {MappedStatement.class, Object.class, RowBounds.class,
ResultHandler.class, CacheKey.class, BoundSql.class}),
@Signature(type = Executor.class, method = "query", args = {MappedStatement.class, Object.class, RowBounds.class, ResultHandler.class})
})
public class ExamplePlugin implements Interceptor {
private Properties properties = new Properties();

public Object intercept(Invocation invocation) throws Throwable {
System.out.println("properties:"+properties);
return invocation.proceed();
}

public void setProperties(Properties properties) {
this.properties = properties;
}
}

通过自定义插件我们可以去分析下 #{},${}的区别

1
2
3
4
5
6
7
8
9
10
11
12
13
@Intercepts({
@Signature(type = Executor.class, method = "query", args = {MappedStatement.class, Object.class, RowBounds.class,
ResultHandler.class}),
})
public class ExamplePlugin implements Interceptor {

public Object intercept(Invocation invocation) throws Throwable {
MappedStatement mappedStatement = (MappedStatement) invocation.getArgs()[0];
BoundSql boundSql = mappedStatement.getBoundSql(Map.class);
System.out.println("boundSql:" + boundSql.getSql());
return invocation.proceed();
}
}
1
2
sqlSession.selectOne(
"org.mybatis.example.BlogMapper.selectBlog", 1 );

#{},${}的实际输出,后者有被sql注入的可能性

1
2
3
boundSql:select *
from Blog
where id = ?
1
2
3
boundSql:select *
from Blog
where id = 1

transactionManager

略,一般由spring去控制

environments

可配置多环境的数据源

1
2
3
4
5
<environments default="development">
<environment id="development">
...
</environment>
</environments>

可指定id的数据源,若未指定则使用default的数据源

1
2
SqlSessionFactory factory = new SqlSessionFactoryBuilder().build(reader, environment);
SqlSessionFactory factory = new SqlSessionFactoryBuilder().build(reader, environment, properties);

mapping xml

详细信息科参考官方文档 mybatis的核心在于映射的SQL

SELECT

1
2
3
<select id="selectBlog" parameterType="int" resultType="hashmap" >
select * from Blog where id = #{id}
</select>

#{id}这个通知mybatis创建一个PreparedStatement参数,在预编译阶段实际sql语句会被替换为

select * from Blog where id = ?

实际执行代码类型如下

1
2
3
String selectPerson = "SELECT * FROM PERSON WHERE ID=?";
PreparedStatement ps = conn.prepareStatement(selectPerson);
ps.setInt(1,id);

id SQL映射唯一标识
parameterType 请求参数class类型
resultType 返回结果集类型
resultMap 扩展的返回类型的id
flushCache 是否清空二级缓存,默认不清空
useCache 是否开启二级缓存,默认不缓存
timeout 请求超时时间
fetchSize 返回最大条数,默认不限制
statementType 可选STATEMENT,PREPARED或CALLABLE,决定使用的是 Statement,PreparedStatement或CallableStatement,默认的是PREPARED
resultSetType
databaseId databaseIdProvider 多种数据库引擎支持
resultOrdered
resultSets

insert, update and delete

id SQL映射唯一标识
parameterType 请求参数class类型
flushCache 是否清空二级缓存,默认不清空
timeout 请求超时时间
statementType 可选STATEMENT,PREPARED或CALLABLE,决定使用的是 Statement,PreparedStatement或CallableStatement,默认的是PREPARED
useGeneratedKeys 是否使用数据库自增主键
keyProperty 用于指定传入的java成员变量
keyColumn 用于指定数据库表的主键字段
databaseId databaseIdProvider 多种数据库引擎支持

返回主键

在配置了useGeneratedKeys时,如何取得返回的主键

1
2
3
 <insert id="insertBlog" useGeneratedKeys="true" keyProperty="java_id" keyColumn="id">
insert into blog( title,author_id) values (#{title},#{author_id})
</insert>
1
2
3
4
5
6
7
SqlSession sqlSession = sqlSessionFactory.openSession();
Map map = new HashMap();
map.put("title", "title3");
map.put("author_id", "102");
int insert = sqlSession.insert("org.mybatis.example.BlogMapper.insertBlog", map);
System.out.println(map);
sqlSession.commit();

{title=title3, author_id=102, java_id=6}

可以看到返回主键写入到请求的pojo中了

mybatis还提供了其他方式进行主键的生成

<selectKey> keyProperty 指定存储主键的字段 keyColumn 用于指定数据库表的主键字段
order Before或者After,若是Before,则先生成主键,执行insert。而设置为After,则先insert,再讲返回的主键插入的写入请求的pojo中
resultType 返回主键类型
statementType 可选STATEMENT,PREPARED或CALLABLE,决定使用的是 Statement,PreparedStatement或CallableStatement,默认的是PREPARED

批量插入

1
2
3
4
5
6
<insert id="insertBlog" useGeneratedKeys="true" keyProperty="id">
insert into blog( title,author_id) values
<foreach item="item" collection="list" separator=",">
(#{item.title}, #{item.author_id})
</foreach>
</insert>

SQL

可被其他SQL映射语句重复使用

1
2
3
4
5
6
7
8
9
<sql id="userColumns"> ${alias}.id,${alias}.username,${alias}.password </sql>

<select id="selectUsers" resultType="map">
select
<include refid="userColumns"><property name="alias" value="t1"/></include>,
<include refid="userColumns"><property name="alias" value="t2"/></include>
from some_table t1
cross join some_table t2
</select>

Parameters

${}或#{}

${}会被直接替换为值,而#{}则进入prepared阶段

使用介绍

1
2
@Select("select * from user where ${column} = #{value}")
User findByColumn(@Param("column") String column, @Param("value") String value);

#{}高阶

可以指定某个属性使用独立的处理器,该处理器可以不用注册,但是需要使用全名,如果使用简称则需要已经注册的

#{age,javaType=int,jdbcType=NUMERIC,typeHandler=MyTypeHandler}

指定double的精度

#{height,javaType=double,jdbcType=NUMERIC,numericScale=2}

ResultMap

通过自定义映射关系来处理复杂的返回结果集

属性 id 主键 type 返回class类型 autoMapping 自动匹配的模式。查询的ResultSet转换pojo时,会自动查找同名属性(忽略大小写)

NONE表示不启用自动映射 PARTIAL表示只对非嵌套的 resultMap 进行自动映射 FULL表示对所有的 resultMap 都进行自动映射

1
2
3
4
5
6
7
8
9
10
11
12
13
14
15
16
17
18
19
20
21
22
23
24
25
26
27
28
<resultMap id="detailedBlogResultMap" type="Blog">
<constructor>
<idArg column="blog_id" javaType="int"/>
</constructor>
<result property="title" column="blog_title"/>
<association property="author" javaType="Author">
<id property="id" column="author_id"/>
<result property="username" column="author_username"/>
<result property="password" column="author_password"/>
<result property="email" column="author_email"/>
<result property="bio" column="author_bio"/>
<result property="favouriteSection" column="author_favourite_section"/>
</association>
<collection property="posts" ofType="Post">
<id property="id" column="post_id"/>
<result property="subject" column="post_subject"/>
<association property="author" javaType="Author"/>
<collection property="comments" ofType="Comment">
<id property="id" column="comment_id"/>
</collection>
<collection property="tags" ofType="Tag" >
<id property="id" column="tag_id"/>
</collection>
<discriminator javaType="int" column="draft">
<case value="1" resultType="DraftPost"/>
</discriminator>
</collection>
</resultMap>

id & result

映射基本类型,id表示主键

property pojo成员变量
column 数据库字段
javaType 成员变量class类型
jdbcType 数据库字段类型
typeHandler 使用具体的处理器去处理

支持的数据库类型

BIT FLOAT CHAR TIMESTAMP OTHER UNDEFINED >TINYINT REAL VARCHAR BINARY BLOB NVARCHAR >SMALLINT DOUBLE LONGVARCHAR VARBINARY CLOB NCHAR >INTEGER NUMERIC DATE LONGVARBINARY BOOLEAN NCLOB >BIGINT DECIMAL TIME NULL CURSOR ARRAY

constructor

为type有参构造器传递参数,分为<idArg>(主键)和<arg>,默认构造器参数根据顺序进行传参。

property pojo成员变量
column 数据库字段
javaType 成员变量class类型
jdbcType 数据库字段类型
typeHandler 使用具体的处理器去处理 select 其他映射语句的 id,根据其查询值注入构造器参数中 resultMap 引入其他resultMap > name 根据名称指定具体参数值,无视参数顺序。

association

一定要注意集合类型的长度

property pojo成员变量
column 数据库字段
javaType 成员变量class类型
jdbcType 数据库字段类型
typeHandler 使用具体的处理器去处理 select 其他映射语句的 id,根据其查询值注入到成员变量中 resultMap 引入其他resultMap >fetchType 可设置为lazy或eager是否延迟加载 columnPrefix 当涉及到多表查询时,多表的字段相同,那么sql语句就需要使用as来区分字段。 例如:

1
2
3
4
5
6
7
8
9
10
11
12
<select id="selectBlog" resultMap="blogResult">
select
B.id as blog_id,
B.title as blog_title,
B.author_id as blog_author_id,
P.id as post_id,
P.subject as post_subject,
P.body as post_body,
from Blog B
left outer join Post P on B.id = P.blog_id
where B.id = #{id}
</select>

一般情况下我们

1
2
3
4
5
6
7
8
9
<resultMap id="blogResult" type="Blog">
<id property="id" column="blog_id" />
<result property="title" column="blog_title"/>
<collection property="posts" ofType="Post">
<id property="id" column="post_id"/>
<result property="subject" column="post_subject"/>
<result property="body" column="post_body"/>
</collection>
</resultMap>

我们可以使用columnPrefix来处理

1
2
3
4
5
6
7
8
9
10
11
<resultMap id="blogResult" type="Blog">
<id property="id" column="blog_id" />
<result property="title" column="blog_title"/>
<collection property="posts" ofType="Post" resultMap="blogPostResult" columnPrefix="post_"/>
</resultMap>

<resultMap id="blogPostResult" type="Post">
<id property="id" column="id"/>
<result property="subject" column="subject"/>
<result property="body" column="body"/>
</resultMap>

discriminator

1
2
3
4
5
6
7
8
9
10
11
12
13
14
<resultMap id="vehicleResult" type="Vehicle">
<id property="id" column="id" />
<result property="vin" column="vin"/>
<result property="year" column="year"/>
<result property="make" column="make"/>
<result property="model" column="model"/>
<result property="color" column="color"/>
<discriminator javaType="int" column="vehicle_type">
<case value="1" resultMap="carResult"/>
<case value="2" resultMap="truckResult"/>
<case value="3" resultMap="vanResult"/>
<case value="4" resultMap="suvResult"/>
</discriminator>
</resultMap>

根据column的值决定哪种<case>执行

cache

略过,由spring去控制

Dynamic SQL

SpringBoot

maven 依赖

1
2
3
4
5
<dependency>
<groupId>org.mybatis.spring.boot</groupId>
<artifactId>mybatis-spring-boot-starter</artifactId>
<version>2.1.0</version>
</dependency>

官方文档

可在springboot配置文件application.properties(或application.yml).中配置Mybatis使用mybatis前缀作为配置

config-location mybatis配置文件目录 mapper-locations mapper文件目录地址 type-aliases-package 别名包名,不同目录可用,; \t\n分割 type-handlers-package 类型转换器包名,不同目录可用,; \t\n分割 configuration-properties 指定properties配置文件,可被mybatis配置文件和mapper文件中作为占位符使用 configuration.* 等同于mybatis配置文件中的settings

可使用ConfigurationCustomizer来自定制细节

1
2
3
4
5
6
7
8
9
10
11
12
@Configuration
public class MyBatisConfig {
@Bean
ConfigurationCustomizer mybatisConfigurationCustomizer() {
return new ConfigurationCustomizer() {
@Override
public void customize(Configuration configuration) {
// customize ...
}
};
}
}

mybatis会自动检测继承mybatis接口的bean
Interceptor
TypeHandler
LanguageDriver (Requires to use together with mybatis-spring 2.0.2+)
DatabaseIdProvider

1
2
3
4
5
6
7
8
9
10
11
@Configuration
public class MyBatisConfig {
@Bean
MyInterceptor myInterceptor() {
return MyInterceptor();
}
@Bean
MyTypeHandler myTypeHandler() {
return MyTypeHandler();
}
}

动态规划

发表于 2019-07-31 更新于 2020-06-30 分类于 算法

题目

假设你正在爬楼梯。需要 n 阶你才能到达楼顶。 每次你可以爬 1 或 2 个台阶。你有多少种不同的方法可以爬到楼顶呢? 注意:给定 n 是一个正整数。

示例 1: >输入: 2 输出: 2

解释: 有两种方法可以爬到楼顶。

1 阶 + 1 阶 2 阶

示例 2: >输入: 3 输出: 3

解释: 有三种方法可以爬到楼顶。

1 阶 + 1 阶 + 1 阶 1 阶 + 2 阶 2 阶 + 1 阶

思路

使用动态规划的思路去解决问题。对于指定n阶的楼梯,最后一次爬楼梯,要嘛是1阶,要嘛就是2阶,那么总共就有爬n−1n-1n−1阶和n−2n-2n−2阶的楼梯

状态转移方程式

F(1)=1F(1) = 1F(1)=1
F(2)=2F(2) = 2F(2)=2
F(n)=F(n−1)+F(n−2)F(n) = F(n-1)+F(n-2)F(n)=F(n−1)+F(n−2)

根据状态转移方程式,我们可以很容易的得出代码如下

1
2
3
4
5
6
7
8
9
10
11
12
13
14
15
16
17

class Solution {

public int climbStairs(int n) {
if (n < 3) {
return n;
}
int f1 = 1;
int f2 = 2;
for (int i = 3; i <=n; i++) {
int t = f2;
f2 = f2 + f1;
f1 = t;
}
return f2;
}
}

springboot-jpa

发表于 2019-07-30 更新于 2020-06-30 分类于 spring

版本说明

jdk:1.8.0_131 springboot:2.1.6.RELEAS maven:3.6.1 database:mysql-5.7.14 lombok插件

概述

项目基于 maven,pom 配置如下

1
2
3
4
5
6
7
8
9
10
11
12
13
14
15
16
17
18
19
20
21
22
23
24
25
26
27
28
29
30
31
32
33
34
35
36
37
38
39
40
41
42
43
44
45
46
47
48
49
50
51
52
53
54
55
56
57
58
59
60
61
62
63
64
65
66
67
68
69
70
71
72
73
74
75
76
77
78
79
80
81
82
83
84
85
86
87
88
89
90
91
92
<?xml version="1.0" encoding="UTF-8"?>
<project xmlns:xsi="http://www.w3.org/2001/XMLSchema-instance" xmlns="http://maven.apache.org/POM/4.0.0"
xsi:schemaLocation="http://maven.apache.org/POM/4.0.0 http://maven.apache.org/xsd/maven-4.0.0.xsd">
<modelVersion>4.0.0</modelVersion>
<parent>
<groupId>org.springframework.boot</groupId>
<artifactId>spring-boot-starter-parent</artifactId>
<version>2.1.6.RELEASE</version>
<relativePath/> <!-- lookup parent from repository -->
</parent>
<groupId>com.li</groupId>
<artifactId>springboot</artifactId>
<version>0.0.1-SNAPSHOT</version>
<name>springboot</name>
<description>Demo project for Spring Boot</description>

<properties>
<java.version>1.8</java.version>
</properties>

<dependencies>
<dependency>
<groupId>org.springframework.boot</groupId>
<artifactId>spring-boot-starter-web</artifactId>
</dependency>
<dependency>
<groupId>org.springframework.boot</groupId>
<artifactId>spring-boot-starter-jdbc</artifactId>
</dependency>
<dependency>
<groupId>org.springframework.boot</groupId>
<artifactId>spring-boot-starter-data-jpa</artifactId>
</dependency>
<dependency>
<groupId>com.github.ulisesbocchio</groupId>
<artifactId>jasypt-spring-boot</artifactId>
<version>2.1.1</version>
</dependency>
<dependency>
<groupId>log4j</groupId>
<artifactId>log4j</artifactId>
<version>1.2.17</version>
</dependency>
<dependency>
<groupId>org.projectlombok</groupId>
<artifactId>lombok</artifactId>
<optional>true</optional>
</dependency>
<dependency>
<groupId>org.springframework.boot</groupId>
<artifactId>spring-boot-starter-test</artifactId>
</dependency>
<dependency>
<groupId>mysql</groupId>
<artifactId>mysql-connector-java</artifactId>
</dependency>
<dependency>
<groupId>javax.inject</groupId>
<artifactId>javax.inject</artifactId>
<version>1</version>
<scope>test</scope>
</dependency>
<dependency>
<groupId>org.aspectj</groupId>
<artifactId>aspectjweaver</artifactId>
<version>1.9.4</version>
</dependency>
<dependency>
<groupId>org.apache.commons</groupId>
<artifactId>commons-lang3</artifactId>
</dependency>
<dependency>
<groupId>com.google.code.gson</groupId>
<artifactId>gson</artifactId>
<version>2.8.5</version>
</dependency>
</dependencies>

<build>
<plugins>
<plugin>
<groupId>org.springframework.boot</groupId>
<artifactId>spring-boot-maven-plugin</artifactId>
</plugin>
<plugin>
<artifactId>maven-clean-plugin</artifactId>
<version>3.1.0</version>
</plugin>
</plugins>
</build>

</project>

部分代码使用lombok进行简化

表实体类

1
2
3
4
5
6
7
8
9
10
11
12
13
14
15
16
17
18
19
package com.li.springboot.bean;

import lombok.Data;

import javax.persistence.Column;
import javax.persistence.Entity;
import javax.persistence.Id;

@Proxy(lazy = false)
@Entity(name = "log")
@Data
public class Log {
@Id
private String id;
private String log;
private String time;
@Column(name = "user_id")
private String userID;
}

@Id表示主键 @Entity标记当前类为一个表,若指定属性name,则实际表名使用name的值,否则使用类名。 @Column中的name同样也是指定表的字段名。

表操作类

1
2
3
4
5
6
7
8
9
package com.li.springboot.dao;

import com.li.springboot.bean.Log;
import org.springframework.data.jpa.repository.JpaRepository;
import org.springframework.stereotype.Repository;

@Repository
public interface LogDao extends JpaRepository<Log, String> {
}
1
2
3
4
5
6
7
8
9
10
11
12
13
14
15
16
17
18
19
package com.li.springboot.controller;

import com.li.springboot.bean.Log;
import com.li.springboot.dao.LogDao;
import org.springframework.beans.factory.annotation.Autowired;
import org.springframework.web.bind.annotation.PathVariable;
import org.springframework.web.bind.annotation.RequestMapping;
import org.springframework.web.bind.annotation.RestController;

@RestController
public class LogController {
@Autowired
LogDao logDao;

@RequestMapping("/{id}")
public Log log(@PathVariable String id) {
return logDao.getOne(id);
}
}

JpaRepository的泛型,分别指定表实体类和表主键,JpaRepository包含常用的数据库操作,LogDao可直接使用。

数据库连接信息配置

1
2
3
4
5
6
7
8
9
10
11
12
13
spring:
datasource:
url: jdbc:mysql://localhost:3306/app
username: root
password: "{cipher}cm9vdA"
driver-class-name: com.mysql.cj.jdbc.Driver
jpa:
show-sql: true
logging:
level:
root: error
com:
li: debug

其他,略

测试

1
2
3
4
5
6
7
8
9
10
11
12
13
14
15
16
17
18
19
20
21
22
23
24
25
26
27
28
29
30
31
32
33
package com.li.springboot.controller;

import com.google.gson.Gson;
import com.li.springboot.bean.Log;
import lombok.extern.slf4j.Slf4j;
import org.junit.Test;
import org.junit.runner.RunWith;
import org.springframework.beans.factory.annotation.Autowired;
import org.springframework.boot.test.autoconfigure.web.servlet.AutoConfigureMockMvc;
import org.springframework.boot.test.context.SpringBootTest;
import org.springframework.test.context.junit4.SpringRunner;
import org.springframework.test.web.servlet.MockMvc;

import static org.springframework.test.web.servlet.request.MockMvcRequestBuilders.get;
import static org.springframework.test.web.servlet.result.MockMvcResultHandlers.print;

@RunWith(SpringRunner.class)
@SpringBootTest
@AutoConfigureMockMvc
@Slf4j
public class LogControllerTest {
@Autowired
MockMvc mockMvc;

@Test
public void test() throws Exception {
mockMvc.perform(get("/1")).andDo(print()).andExpect(result -> {
Log log = new Gson().fromJson(result.getResponse().getContentAsString(), Log.class);
assert log !=null;
});
}

}
1…12131415

lijun

与其感慨路难行,不如马上就出发
145 日志
30 分类
117 标签
© 2019 – 2020 lijun