大狗哥传奇

  • 首页

  • 关于

  • 标签

  • 分类

  • 归档

  • 搜索

简单逻辑学

发表于 2019-07-29 更新于 2020-06-30 分类于 逻辑学

为什么学习逻辑学

提升口语表达能力 你所说的就是你所想的,若对事物没有一个清晰明了的认知,就更不可能用语言去精准的描述它。不要求说话说得多么好听,但求能够清楚有力的表达自己想要说的。

费曼学习法 能够用简单的语言向别人解释一个知识的时候,就是掌握知识的时候。而逻辑学就是关于如何精准描述事物的学科。

如何学习逻辑学

思维导图 思维导图是用简单的词语高度抽象概括知识的一个工具,而抽象的过程既是逻辑化的一个过程。 博客 写作的过程即是讲自己所想所思转变为文字的过程,在编写博客的过程中,始终遵循简单逻辑学和金字塔原理的理论思想,不断加强自己的概括抽象能力。

概述

逻辑学是关于如何进行清晰有效的思维。逻辑学是揭露客观事实真相的一门学问。

心里上的准备

  1. 保持注意力,世上没有两片相同的树叶,每个事务都是唯一的,我们需要保持警惕。

  2. 事实客观存在,不因人的主观认知而改变,而人的主观认知会随着对客观事实的理解加深而愈加接近客观事实。

  3. 主观认知愈加接近客观事实,就越容易清晰准确的用语言去描述它。

  4. 语言只能描述人的主观认知,而不是客观事实。

如何进行有效的沟通

  1. 不要假设听众了解你的潜台词。

  2. 使用完整的语句表达自己的观点。

  3. 避免使用猜测,不准确的表述形式。

  4. 站在听众的角度,以他们能理解的方式去陈述。

  5. 避免使用歧义,模糊的表达。

逻辑学第一原则

  1. 客观事实的定义,苹果就是苹果,不是橙子,不是香蕉,也不是梨子。

  2. 客观事实要嘛存在要嘛不存在,不存在中间状态

  3. 客观事实存在有充足的理由

  4. 在同样的角度下,不可能同时是同时不是

其他原则

  1. 有些事务无法被清晰的定义。

  2. 有些事务我们不知道是如何发生的,但是我们知道一定是有原因的

  3. 尽量缩短逻辑链

  4. 区分主次

  5. 用自己的语言去解释

  6. 用明确的肯定的语言描述

  7. 抽象概括观点

docker基础

发表于 2019-07-22 更新于 2020-06-30 分类于 docker

指南

安装

官方安装文档

docker --version 查看版本号 docker info 查看 docker 详细信息

概述

image

容器是由镜像文件加载启动的。镜像是一个可执行文件,包含运行应用程序所需要的所有资源,包括 代码,运行环境,环境变量,配置文件等。 可通过docker images查看所有镜像

1
2
3
REPOSITORY                                             TAG                 IMAGE ID            CREATED             SIZE
jenkins/jenkins 2.138.4 b8efbb99cea6 7 months ago 701MB
registry.cn-hangzhou.aliyuncs.com/helowin/oracle_11g latest 3fa112fd3642 3 years ago 6.85GB

可通过docker pull <image:TAG>下载镜像,不显示指定TAG则下载latest版本的,当使用docker run <image>时若本地镜像没有则会自动下载远程镜像

container

容器是镜像的运行实例,容器共享宿主机的kernel内核,独立进程运行,不占用其他任何可执行文件的内存。

部分命令

1
2
3
4
5
6
7
8
9
10
11
12
13
14
15
16
17
18
19
## List Docker CLI commands
docker
docker container --help

## Display Docker version and info
docker --version
docker version
docker info

## Execute Docker image
docker run hello-world

## List Docker images
docker image ls

## List Docker containers (running, all, all in quiet mode)
docker container ls
docker container ls --all
docker container ls -aq

容器

创建自己的容器

通过Dockerfile定义镜像 新建一个空目录,cd进入目录,编辑Dockerfile文件

1
2
3
4
5
6
7
8
9
10
11
12
13
14
15
16
17
18
19
20
# Use an official Python runtime as a parent image
FROM python:2.7-slim

# Set the working directory to /app
WORKDIR /app

# Copy the current directory contents into the container at /app
COPY . /app

# Install any needed packages specified in requirements.txt
RUN pip install --trusted-host pypi.python.org -r requirements.txt

# Make port 80 available to the world outside this container
EXPOSE 80

# Define environment variable
ENV NAME World

# Run app.py when the container launches
CMD ["python", "app.py"]

根据上述Dockerfile新建requirements.txt和app.py

1
2
Flask
Redis
1
2
3
4
5
6
7
8
9
10
11
12
13
14
15
16
17
18
19
20
21
22
23
24
from flask import Flask
from redis import Redis, RedisError
import os
import socket

# Connect to Redis
redis = Redis(host="redis", db=0, socket_connect_timeout=2, socket_timeout=2)

app = Flask(__name__)

@app.route("/")
def hello():
try:
visits = redis.incr("counter")
except RedisError:
visits = "<i>cannot connect to Redis, counter disabled</i>"

html = "<h3>Hello {name}!</h3>" \
"<b>Hostname:</b> {hostname}<br/>" \
"<b>Visits:</b> {visits}"
return html.format(name=os.getenv("NAME", "world"), hostname=socket.gethostname(), visits=visits)

if __name__ == "__main__":
app.run(host='0.0.0.0', port=80)

执行docker build -t=friendlyhello . 等待编译完成后通过docker image ls可查看到已经编译好的镜像

1
2
3
REPOSITORY                                             TAG                 IMAGE ID            CREATED             SIZE
friendlyhello latest 9f7c2034a1f3 27 seconds ago 148MB
python 2.7-slim 5caa018c2dc0 9 days ago 137MB

执行docker run -d -p 4000:80 friendlyhello,以后台进程的方式运行容器

可通过http://localhost:4000访问首页

版本控制 docker tag image username/repository:tag

部分命令

1
2
3
4
5
6
7
8
9
10
11
12
13
14
15
16
docker build -t friendlyhello .  # Create image using this directory's Dockerfile
docker run -p 4000:80 friendlyhello # Run "friendlyhello" mapping port 4000 to 80
docker run -d -p 4000:80 friendlyhello # Same thing, but in detached mode
docker container ls # List all running containers
docker container ls -a # List all containers, even those not running
docker container stop <hash> # Gracefully stop the specified container
docker container kill <hash> # Force shutdown of the specified container
docker container rm <hash> # Remove specified container from this machine
docker container rm $(docker container ls -a -q) # Remove all containers
docker image ls -a # List all images on this machine
docker image rm <image id> # Remove specified image from this machine
docker image rm $(docker image ls -a -q) # Remove all images from this machine
docker login # Log in this CLI session using your Docker credentials
docker tag <image> username/repository:tag # Tag <image> for upload to registry
docker push username/repository:tag # Upload tagged image to registry
docker run username/repository:tag # Run image from a registry

启动容器

1
2
3
4
#-p 映射端口    <宿主端口:容器端口>
docker run -p 4001:8080 friendlyhello
#-d 以守护进程启动
docker run -d -p 4001:8080 friendlyhello

进入容器

进入容器,并以bash作为shell docker exec -it 6bcaf729d3d4 bash

6bcaf729d3d4容器 id,可通过docker ps查看

1
2
CONTAINER ID        IMAGE               COMMAND                  CREATED             STATUS              PORTS                               NAMES
6bcaf729d3d4 jenkins "/bin/tini -- /usr/l…" 31 seconds ago Up 29 seconds 50000/tcp, 0.0.0.0:8002->8080/tcp jenkins

以 root 权限登录 sudo docker exec -ti -u root 6bcaf729d3d4 bash

删除容器

1
2
3
docker container rm <containerID>
#删除所有
docker container rm `docker container ls -a -q`

服务化

下载镜像

docker pull name:tag name镜像名 tag镜像版本

若速度较慢,可以配置阿里云镜像加速 镜像加速参考文档

删除镜像

docker images查看所有镜像 dockder rmi 'image_id'删除镜像 删除所有镜像

1
docker rmi -f `docker images -q`

保存镜像

当在镜像启动的容器中做了修改,比如下载了软件,做了配置等。我们可以将容器保存为镜像。 docker commit [OPTIONS] CONTAINER [REPOSITORY[:TAG]] 示例 docker commit a8eb6111cf26 li-ubuntu 后续我们就可以使用新的镜像名称来启动应用了 docker run -it li-ubuntu /bin/bash

导出镜像

1
docker save -o update1.tar update

加载离线镜像

1
docker load -i update1.tar

安装离线镜像

1
2


查看日志

1
2
3
4
5
6
7
8
docker logs [OPTIONS] CONTAINER
Options:
--details 显示更多的信息
-f, --follow 跟踪实时日志
--since string 显示自某个timestamp之后的日志,或相对时间,如42m(即42分钟)
--tail string 从日志末尾显示多少行日志, 默认是all
-t, --timestamps 显示时间戳
--until string 显示自某个timestamp之前的日志,或相对时间,如42m(即42分钟)

查看指定时间后的日志,只显示最后 100 行:

1
docker logs -f -t --since="2018-02-08" --tail=100 CONTAINER_ID`

查看最近 30 分钟的日志:

1
docker logs --since 30m CONTAINER_ID

查看某时间之后的日志:

1
docker logs -t --since="2018-02-08T13:23:37" CONTAINER_ID

查看某时间段日志:

1
docker logs -t --since="2018-02-08T13:23:37" --until "2018-02-09T12:23:37" CONTAINER_ID

挂载宿主目录

-v可重复使用,指定多个目录

1
docker run -d -p 8002:8080 -v ~/jenkins:/var/jenkins_home -v /Library/Java/JavaVirtualMachines/jdk1.8.0_131.jdk/Contents/Home:/mnt/java -v /usr/local/Cellar/maven/3.6.1:/mnt/maven -v /Users/li/.m2:/mnt/.m2 --name jenkins --restart=always jenkins/jenkins:2.138.4

/Library/Java/JavaVirtualMachines/jdk1.8.0_131.jdk/Contents/Home:/mnt/java挂载jdk

容器内 vim 安装

进入容器中使用vi提示不存在

apt-get update更新软件包管理工具,这个命令的作用是:同步 /etc/apt/sources.list 和 /etc/apt/sources.list.d 中列出的源的索引,这样才能获取到最新的软件包。 apt-get install vim安装 vi

开启ssh登录

  1. 安装服务端apt-get install openssh-server
  2. 启动ssh服务,使用命令service ssh start或者/ect/init.d/ssh start
  3. 关闭ssh服务,service ssh stop

jenkins远程发布

发表于 2019-07-22 更新于 2020-06-30 分类于 工具

版本说明

省略 docker 安装过程

docker version

1
2
3
4
5
6
7
8
9
10
11
12
13
14
15
16
17
18
Client:
Version: 18.06.1-ce
API version: 1.38
Go version: go1.10.3
Git commit: e68fc7a
Built: Tue Aug 21 17:21:31 2018
OS/Arch: darwin/amd64
Experimental: false

Server:
Engine:
Version: 18.06.1-ce
API version: 1.38 (minimum version 1.12)
Go version: go1.10.3
Git commit: e68fc7a
Built: Tue Aug 21 17:29:02 2018
OS/Arch: linux/amd64
Experimental: true

java -version

1
2
3
java version "1.8.0_131"
Java(TM) SE Runtime Environment (build 1.8.0_131-b11)
Java HotSpot(TM) 64-Bit Server VM (build 25.131-b11, mixed mode)

安装 Jenkins 镜像

1
docker pull jenkins/jenkins:2.138.1-slim

拉取的是 2.138.1-slim 版本的 jenkins,可通过命令查看下载的版本

docker images

1
2
REPOSITORY                                             TAG                 IMAGE ID            CREATED             SIZE
jenkins latest cd14cecfdb3a 12 months ago 696MB

启动 Jenkins

1
docker run -d -p 8002:8080 -v ~/jenkins:/var/jenkins_home -v /Library/Java/JavaVirtualMachines/jdk1.8.0_131.jdk/Contents/Home:/mnt/java -v /usr/local/Cellar/maven/3.6.1:/mnt/maven --name jenkins --restart=always jenkins/jenkins:2.138

8002:8080 本地 8002 端口映射容器 8080 端口

查看启动日志 docker logs -f jenkins 可以看到jenkins的默认admin密码

1
2
3
4
5
6
Jenkins initial setup is required. An admin user has been created and a password generated.
Please use the following password to proceed to installation:

8b34af422fa24794bdb86d3e299162bd

This may also be found at: /var/jenkins_home/secrets/initialAdminPassword

界面访问127.0.0.1:8002,自动跳转至登录界面,首次进线输入默认密码,登录后安装推荐插件。

jenkins 插件镜像

页面依次点击/Manage Jenkins/Manage Plugins/Advanced 镜像地址:

1
https://mirrors.tuna.tsinghua.edu.cn/jenkins/updates/update-center.json
jenkins插件镜像
jenkins插件镜像

idea

发表于 2019-07-21 更新于 2020-12-02 分类于 tips

为了方便在各个平台使用,统一定义快捷键

mac 上使用 command 键替代 alt

可以自定义一组快捷命令,Quick List

快捷键 解释
F1 quick list
F2 next highlight error
F3 toggle bookmark
F4 run
F5 debug
ALT 1 project view
ALT 2 structure view
ALT 3 favorite view
ALT 4 run view
ALT 5 debug view
ALT F3 show bookmark
ALT b goto to declration
ALT e recent files
ALT n generate ,new file
ALT w close active tab
ALT up jump to navigation bar
ALT down jump to source
ALT left goto previous splitter
ALT right goto next splitter
SHIFT F6 rename

其他快捷方式

  1. 窗口视图回车键进入代码

调试

IDEA 开发 web 项目时,建议使用debug启动模式,这样可以随时打断点调试项目

  1. 使用异常类型断点,在抛出异常时快速进入报错点

  2. 断点设置condition,仅当满足条件时触发断点

  3. 断点可设置依赖关系,仅在前置断点触发后再触发

  4. evaluate Expression可编写代码进行测试

  5. 使用watches监听属性的变化

  6. variables直接修改属性值,进行调试

  7. 指定线程下触发断点

  8. 移动到下个断点

  9. option + 左键 查看变量

输入

多尝试用自定义模板官方自定义模板内容函数

快捷键

==⇧⌘F12== 最小化工具窗口

gradle

gradle编译特别慢,需要在idea设置中设置HTTP Proxy

跳转源码

jump to source快捷键为⎋(esc)或⌘+↓

回到Project视图源码处

select in project view默认没有快捷键

自动分屏到右边

move right

在分屏中切换

⌥tab

切换 tab

switcher 快捷键为⌃⇥

⇧⌘[上个 tab ⇧⌘]下个 tab

debug 模式下,开启变量提示

show values inline

当前行行数高亮

line number on caret row

live templates

ifn快速判断当前行数变量是否为 null

1
2
3
if (var == null) {

}

Hippie completion

自动输入前面或后面的单词⌥/ ⌥⇧/

Smart Type

智能补全,比如说提示使用何种lambda ⇧ space

自动补全根据使用频率

sort suggestions alphabetically

quick Definitions

弹出窗口快速查看代码⌥q

quick documentation

弹出窗口快速查看文档⌥F1

为报错文件设置提醒色

File Color

使用favorite

custome live template

可以选中代码后,抽取为template

keymap abbrevation

添加快捷方式的缩写,方便使用find action查找

recent location

最近访问的路径⌘⇧e

paster form history

idea记录了最近复制过(⌘c)的文本

adjust code style setting

选中代码后,使用可以查卡到选中代码所使用的格式选项,可以去调整它,`⌥⏎

breadcrumbs

使用面包屑导航显示代码类,方法

隐藏目录

Editor|File Types|Ignore files and folders

相关问题

objc[1474]: Class JavaLaunchHelper is implemented in both /Library/Java/JavaVirtualMachines/jdk1.8.0_144.jdk/Contents/Home/bin/java (0x10b59a4c0) and /Library/Java/JavaVirtualMachines/jdk1.8.0_144.jdk/Contents/Home/jre/lib/libinstrument.dylib (0x10b6764e0). One of the two will be used. Which one is undefined.

IDEA菜单Help>>Edit Custom Properties 在打开的idea.properties里加上

1
idea.no.launcher=true

文件打开方式

idea 若使用某种方式打开文件后,file type中的编辑器类型下,会有相关联的文件后缀。

标记当前段落不格式化

code style|enable formatter markers in comments

springboot数据库密码加密

发表于 2019-07-19 更新于 2020-06-30 分类于 spring

方案一

SpringBoot在配置文件application中配置的关于数据库连接信息,在实际使用时是转换为DataSource类,那么只要将SpringBoot实现的DataSource继承类中, 将实际密文解密即可。通过查看源码可得知,SpringBoot中DataSource实现类为HikariDataSource,那么我们通过BeanPostProcessor在实例化HikariDataSource时, 替换密文即可。代码如下

1
2
3
4
5
6
spring:
datasource:
url: jdbc:mysql://localhost:3306/app
username: root
password: cm9vdA==
driver-class-name: com.mysql.jdbc.Driver
1
2
3
4
5
6
7
8
9
10
11
12
13
@Bean
public static BeanPostProcessor beanPostProcessor() {
return new BeanPostProcessor() {
@Override
public Object postProcessAfterInitialization(Object bean, String beanName) throws BeansException {
if (bean instanceof HikariDataSource) {
HikariDataSource hikariDataSource = (HikariDataSource) bean;
hikariDataSource.setPassword(new String(Base64Utils.decode(hikariDataSource.getPassword().getBytes())));
}
return null;
}
};
}

方案二

使用 jasypt

1
2
3
4
5
<dependency>
<groupId>com.github.ulisesbocchio</groupId>
<artifactId>jasypt-spring-boot-starter</artifactId>
<version>2.1.1</version>
</dependency>

开启

1
2
3
@EnableEncryptableProperties
public class SpringbootApplication {
}

自定义处理器解密处理器

1
2
3
4
5
6
spring:
datasource:
url: jdbc:mysql://localhost:3306/app
username: root
password: "{cipher}cm9vdA"
driver-class-name: com.mysql.cj.jdbc.Driver
1
2
3
4
5
6
7
8
9
10
11
12
13
14
15
16
17
18
19
20
21
22
23
24
25
26
27
28
29
30
31
32
33
34

public static final String ENCODED_PASSWORD_HINT = "{cipher}";

@Bean
public static EncryptablePropertyDetector encryptablePropertyDetector() {
return new EncryptablePropertyDetector() {

@Override
public boolean isEncrypted(String s) {
if (null != s) {
return s.startsWith(ENCODED_PASSWORD_HINT);
}
return false;
}

@Override
public String unwrapEncryptedValue(String s) {
return s.substring(ENCODED_PASSWORD_HINT.length());
}
};
}

@Bean
public static EncryptablePropertyResolver encryptablePropertyResolver() {
return new EncryptablePropertyResolver() {
@Override
public String resolvePropertyValue(String s) {
if (null != s && s.startsWith(ENCODED_PASSWORD_HINT)) {
return new String(Base64Utils.decode(s.substring(ENCODED_PASSWORD_HINT.length()).getBytes()));
}
return s;
}
};
}

方案三

根据方案二的实现原理,使用BeanFactoryPostProcessor实现一个自动解密配置文件的处理器

1
2
3
4
5
6
spring:
datasource:
url: jdbc:mysql://localhost:3306/app
username: root
password: "{cipher}cm9vdA"
driver-class-name: com.mysql.cj.jdbc.Driver
1
2
3
4
@Bean
public static EncryptationAwarePropertyPlaceholderConfigurer enableEncryptablePropertySourcesPostProcessor(ConfigurableEnvironment environment) {
return new DecodeBeanFactoryPostProcessor(environment);
}
1
2
3
4
5
6
7
8
9
10
11
12
13
14
15
16
17
18
19
20
21
22
23
24
25
26
27
28
29
public class DecodeBeanFactoryPostProcessor implements BeanFactoryPostProcessor {


private ConfigurableEnvironment environment;

public DecodeBeanFactoryPostProcessor(ConfigurableEnvironment environment) {
this.environment = environment;
}


@Override
public void postProcessBeanFactory(ConfigurableListableBeanFactory beanFactory) throws BeansException {
MutablePropertySources propertySources = environment.getPropertySources();
StreamSupport.stream(propertySources.spliterator(), false).forEach(ps -> {
//示例代码,仅仅处理application.yml相关的解码操作
if (ps.getName().equals("applicationConfig: [classpath:/application.yml]")) {
Map<Object, Object> source = (Map) ps.getSource();
source.keySet().forEach(k -> {
Object value = source.computeIfPresent(k, (key, v) -> {
String cipher = v.toString();
if (cipher.startsWith("{cipher}")) {
return new String(Base64Utils.decode(cipher.substring("{cipher}".length()).getBytes()));
}
return v;
});
});
}
});
}

其中需要注意的是,DecodeBeanFactoryPostProcessor的实例化需要在ApplicationContext加载成功后再去实例化,确保ConfigurableEnvironment已被正确初始化

maven入门

发表于 2019-07-15 更新于 2020-12-02 分类于 java

省略下载安装过程

配置

maven 默认目录在${user.home}/.m2/ settings.xml配置文件为 maven 的全局配置

镜像

maven 默认中央仓库访问速度较慢,可通过配置阿里云的镜像加速访问。当需要禁止访问中央仓库时,也可通过配置镜像将中央仓库指定为远程仓库

阿里云镜像地址:

http://maven.aliyun.com/nexus/content/groups/public/

在${user.home}/.m2/settings.xml中新增如下配置

1
2
3
4
5
6
7
8
9
10
11
12
<settings>
...
<mirrors>
<mirror>
<id>UK</id>
<name>UK Central</name>
<url>http://uk.maven.org/maven2</url>
<mirrorOf>central</mirrorOf>
</mirror>
</mirrors>
...
</settings>
  1. <mirrorOf>central</mirrorOf> 里是要替代的仓库的 id。
  2. <mirrorOf>*</mirrorOf> 匹配所有仓库
  3. <mirrorOf>external:*</mirrorOf> 匹配所有远程仓库,使用localhost的除外,使用file://协议的除外。也就是说,匹配所有不在本机上的远程仓库。
  4. <mirrorOf>repo1,repo2</mirrorOf> 匹配仓库 repo1 和 repo2,使用逗号分隔多个远程仓库。
  5. <mirrorOf>*,!repo1</miiroOf> 匹配所有远程仓库,repo1 除外,使用感叹号将仓库从匹配中排除。

POM

pom 是最基础的组件,是 maven 用来构建项目的基础配置文件,其中包括许多默认属性。

Super POM

所有的 pom 文件都继承自Super POM,除非你设置了不继承。

下面是 Maven 3.5.4 版本的Super POM摘要

1
2
3
4
5
6
7
8
9
10
11
12
13
14
15
16
17
18
19
20
21
22
23
24
25
26
27
28
29
30
31
32
33
34
35
36
37
38
39
40
41
42
43
44
45
46
47
48
49
50
51
52
53
54
55
56
57
58
59
60
61
62
63
64
65
66
67
68
69
70
71
72
73
74
75
76
77
78
79
80
81
82
83
84
85
86
87
88
89
90
91
92
93
94
95
96
97
98
99
100
101
102
103
104
105
106
107
108
109
110
111
112
113
114
115
116
117
118
119
<project>
<modelVersion>4.0.0</modelVersion>
<repositories>
<repository>
<id>central</id>
<name>Central Repository</name>
<url>https://repo.maven.apache.org/maven2</url>
<layout>default</layout>
<snapshots>
<enabled>false</enabled>
</snapshots>
</repository>
</repositories>
<pluginRepositories>
<pluginRepository>
<id>central</id>
<name>Central Repository</name>
<url>https://repo.maven.apache.org/maven2</url>
<layout>default</layout>
<snapshots>
<enabled>false</enabled>
</snapshots>
<releases>
<updatePolicy>never</updatePolicy>
</releases>
</pluginRepository>
</pluginRepositories>
<build>
<directory>${project.basedir}/target</directory>
<outputDirectory>${project.build.directory}/classes</outputDirectory>
<finalName>${project.artifactId}-${project.version}</finalName>
<testOutputDirectory>${project.build.directory}/test-classes</testOutputDirectory>
<sourceDirectory>${project.basedir}/src/main/java</sourceDirectory>
<scriptSourceDirectory>${project.basedir}/src/main/scripts</scriptSourceDirectory>
<testSourceDirectory>${project.basedir}/src/test/java</testSourceDirectory>
<resources>
<resource>
<directory>${project.basedir}/src/main/resources</directory>
</resource>
</resources>
<testResources>
<testResource>
<directory>${project.basedir}/src/test/resources</directory>
</testResource>
</testResources>
<pluginManagement>
<!-- NOTE: These plugins will be removed from future versions of the super POM -->
<!-- They are kept for the moment as they are very unlikely to conflict with lifecycle mappings (MNG-4453) -->
<plugins>
<plugin>
<artifactId>maven-antrun-plugin</artifactId>
<version>1.3</version>
</plugin>
<plugin>
<artifactId>maven-assembly-plugin</artifactId>
<version>2.2-beta-5</version>
</plugin>
<plugin>
<artifactId>maven-dependency-plugin</artifactId>
<version>2.8</version>
</plugin>
<plugin>
<artifactId>maven-release-plugin</artifactId>
<version>2.5.3</version>
</plugin>
</plugins>
</pluginManagement>
</build>
<reporting>
<outputDirectory>${project.build.directory}/site</outputDirectory>
</reporting>
<profiles>
<!-- NOTE: The release profile will be removed from future versions of the super POM -->
<profile>
<id>release-profile</id>
<activation>
<property>
<name>performRelease</name>
<value>true</value>
</property>
</activation>
<build>
<plugins>
<plugin>
<inherited>true</inherited>
<artifactId>maven-source-plugin</artifactId>
<executions>
<execution>
<id>attach-sources</id>
<goals>
<goal>jar-no-fork</goal>
</goals>
</execution>
</executions>
</plugin>
<plugin>
<inherited>true</inherited>
<artifactId>maven-javadoc-plugin</artifactId>
<executions>
<execution>
<id>attach-javadocs</id>
<goals>
<goal>jar</goal>
</goals>
</execution>
</executions>
</plugin>
<plugin>
<inherited>true</inherited>
<artifactId>maven-deploy-plugin</artifactId>
<configuration>
<updateReleaseInfo>true</updateReleaseInfo>
</configuration>
</plugin>
</plugins>
</build>
</profile>
</profiles>
</project>

配置 mvn 的 jdk 版本

可统一在settings.xml中新增如下配置

1
2
3
4
5
6
7
8
9
10
11
12
13
14
15
16
17
18
19
20
21
<?xml version="1.0" encoding="UTF-8"?>
<settings
xmlns="http://maven.apache.org/SETTINGS/1.0.0"
xmlns:xsi="http://www.w3.org/2001/XMLSchema-instance"
xsi:schemaLocation="http://maven.apache.org/SETTINGS/1.0.0 http://maven.apache.org/xsd/settings-1.0.0.xsd">
<localRepository>${user.home}/.m2/repository</localRepository>
<profiles>
<profile>
<id>jdk</id>
<activation>
<activeByDefault>true</activeByDefault>
<jdk>1.8</jdk>
</activation>
<properties>
<maven.compiler.source>1.8</maven.compiler.source>
<maven.compiler.target>1.8</maven.compiler.target>
<maven.compiler.compilerVersion>1.8</maven.compiler.compilerVersion>
</properties>
</profile>
</profiles>
</settings>

也在项目 pom 中增加配置

1
2
3
4
5
6
7
8
9
10
11
12
13
14
15
16
17
18
19
<?xml version="1.0" encoding="UTF-8"?>
<project xmlns="http://maven.apache.org/POM/4.0.0"
xmlns:xsi="http://www.w3.org/2001/XMLSchema-instance"
xsi:schemaLocation="http://maven.apache.org/POM/4.0.0 http://maven.apache.org/xsd/maven-4.0.0.xsd">
<modelVersion>4.0.0</modelVersion>

<groupId>com.leaderli</groupId>
<artifactId>vxml-test</artifactId>
<version>1.0-SNAPSHOT</version>
<properties>
<project.build.sourceEncoding>UTF-8</project.build.sourceEncoding>
<maven.compiler.source>1.8</maven.compiler.source>
<maven.compiler.target>1.8</maven.compiler.target>
</properties>
<dependencies>
...
</dependencies>

</project>

属性

内置属性

  • ${basedir}表示项目根目录,即包含pom.xml文件的目录;

  • ${version}表示项目版本。

  • ${project.basedir}同${basedir};

pom 属性

使用 pom 属性可以引用到 pom.xml 文件对应元素的值,继承自Super POM

  • ${project.build.sourceDirectory}:项目的主源码目录,默认为src/main/java/
  • ${project.build.testSourceDirectory}:项目的测试源码目录,默认为/src/test/java/
  • ${project.build.directory}:项目构建输出目录,默认为target/
  • ${project.outputDirectory}:项目主代码编译输出目录,默认为target/classes/
  • ${project.testOutputDirectory}:项目测试代码编译输出目录,默认为target/testclasses/
  • ${project.groupId}:项目的groupId
  • ${project.artifactId}:项目的artifactId
  • ${project.version}:项目的version,于${version}等价
  • ${project.build.finalName}:项目打包输出文件的名称,默认 为${project.artifactId}${project.version}

自定义属性

在pom.xml文件的<properties>标签下定义的 Maven 属性,在其他地方使用${property}使用该属性值。

文件属性

与 pom 属性同理,用户使用以settings开头的属性引用settings.xml文件中的 XML 元素值${settings.localRepository}表示本地仓库的地址;

Java 系统属性

所有的 Java 系统属性都可以使用 Maven 属性引用,使用mvn help:system命令可查看所有的 Java 系统属性;System.getProperties()可得到所有的 Java 属性;${user.home}表示用户目录;

环境变量属性

所有的环境变量都可以用以env.开头的 Maven 属性引用使用mvn help:system命令可查看所有环境变量;${env.JAVA_HOME}表示 JAVA_HOME 环境变量的值;

手动指定变量

我们可以在打包时使用-D指定变量,例如mvn package -Denv=uat

编译资源文件

1
2
3
4
5
6
7
8
9
10
11
12
13
14
15
16
17
18
19
20
21
22
23
24
25
<project xmlns="http://maven.apache.org/POM/4.0.0"
xmlns:xsi="http://www.w3.org/2001/XMLSchema-instance"
xsi:schemaLocation="http://maven.apache.org/POM/4.0.0
https://maven.apache.org/xsd/maven-4.0.0.xsd">
<build>
...
<resources>
<resource>
<targetPath>META-INF/plexus</targetPath>
<filtering>false</filtering>
<directory>${basedir}/src/main/plexus</directory>
<includes>
<include>configuration.xml</include>
</includes>
<excludes>
<exclude>**/*.properties</exclude>
</excludes>
</resource>
</resources>
<testResources>
...
</testResources>
...
</build>
</project>
  • targetPath 编译目录,默认位置为classes目录
  • directory 项目资源目录

生命周期和阶段

maven 通过指定的生命周期部署和发布项目。每个生命周期都包含一系列 phase,当执行指定 phase 时,所有前置的 phase 都会被执行。

主要有下述三个生命周期

  1. Clean Lifecycle

    主要用来清理 target

    Phase Description
    pre-clean execute processes needed prior to the actual project cleaning
    clean remove all files generated by the previous build
    post-clean execute processes needed to finalize the project cleaning
  2. Default Lifecycle

    默认的生命周期,用于进行编译,打包,发布等 | Phase | Description | | :-| :--------------------------------------------------------------------------------------------------------------------------------------------------------------- | | validate | validate the project is correct and all necessary information is available. | | initialize | initialize build state, e.g. set properties or create directories. | | generate-sources| generate any source code for inclusion in compilation. | | process-sources | process the source code, for example to filter any values. | | generate-resources| generate resources for inclusion in the package. | | process-resources| copy and process the resources into the destination directory, ready for packaging. | | compile | compile the source code of the project. | | process-classes| post-process the generated files from compilation, for example to do bytecode enhancement on Java classes. | | generate-test-sources| generate any test source code for inclusion in compilation. | | process-test-sources| process the test source code, for example to filter any values. | | generate-test-resources| create resources for testing. | | process-test-resources| copy and process the resources into the test destination directory. | | test-compile| compile the test source code into the test destination directory | | process-test-classes| post-process the generated files from test compilation, for example to do bytecode enhancement on Java classes. | | test | run tests using a suitable unit testing framework. These tests should not require the code be packaged or deployed. | | prepare-package| perform any operations necessary to prepare a package before the actual packaging. This often results in an unpacked, processed version of the package. | | package | take the compiled code and package it in its distributable format, such as a JAR. | | pre-integration-test| perform actions required before integration tests are executed. This may involve things such as setting up the required environment. | | integration-test| process and deploy the package if necessary into an environment where integration tests can be run. | | post-integration-test| perform actions required after integration tests have been executed. This may including cleaning up the environment. | | verify | run any checks to verify the package is valid and meets quality criteria. | | install | install the package into the local repository, for use as a dependency in other projects locally. | | deploy | done in an integration or release environment, copies the final package to the remote repository for sharing with other developers and projects. |

  3. Site Lifecycle 用于生成相关的文档 | Phase | Description | | :---------- | :------------------------------------------------------------------------------------------- | | pre-site | execute processes needed prior to the actual project site generation | | site | generate the project's site documentation | | post-site | execute processes needed to finalize the site generation, and to prepare for site deployment | | site-deploy | deploy the generated site documentation to the specified web server |

phase

执行指定阶段及该阶段的所有前置阶段的插件。

goal

每个 phase 都包含一系列 goal,每个 goal 执行指定的任务,当执行 phase 时,绑定在该 phase 的 goal 都会被执行

我们可以使用命令来查看绑定在 phase 上的 goal

1
2
3
4
5
$ mvn help:describe -Dcmd=compile

# 示例输出
compile' is a phase corresponding to this plugin:
org.apache.maven.plugins:maven-compiler-plugin:3.1:compile

maven 插件是一个 goal 的组合,这写 goals 可以指定到不同的 phase 上。

我们可以通过命令查看 plugin 支持的 goal

1
2
3
4
5
6
7
8
9
10
11
12
13
14
15
16
<build>
<plugins>
<plugin>
<artifactId>maven-failsafe-plugin</artifactId>
<version>${maven.failsafe.version}</version>
<executions>
<execution>
<goals>
<goal>integration-test</goal>
<goal>verify</goal>
</goals>
</execution>
</executions>
</plugin>
</plugins>
</build>

上述表示执行integration-test和verify这两个 goal,

1
2
3
4
5
6
7
8
9
10
11
12
13
14
15
16
17
18
19
20
# 我们可以通过命令查看插件支持的 goal
# mvn <plugin>:help

$ mvn failsafe:help
This plugin has 3 goals:

failsafe:help
Display help information on maven-failsafe-plugin.
Call mvn failsafe:help -Ddetail=true -Dgoal=<goal-name> to display parameter
details.

failsafe:integration-test
Run integration tests using Surefire.

failsafe:verify
Verify integration tests ran using Surefire.

# 运行执行的goal
# mvn <plugin>:<goal>
$ mvn failsafe:verify

goal可只运行指定goal的插件,而不会调用前置

调试默认

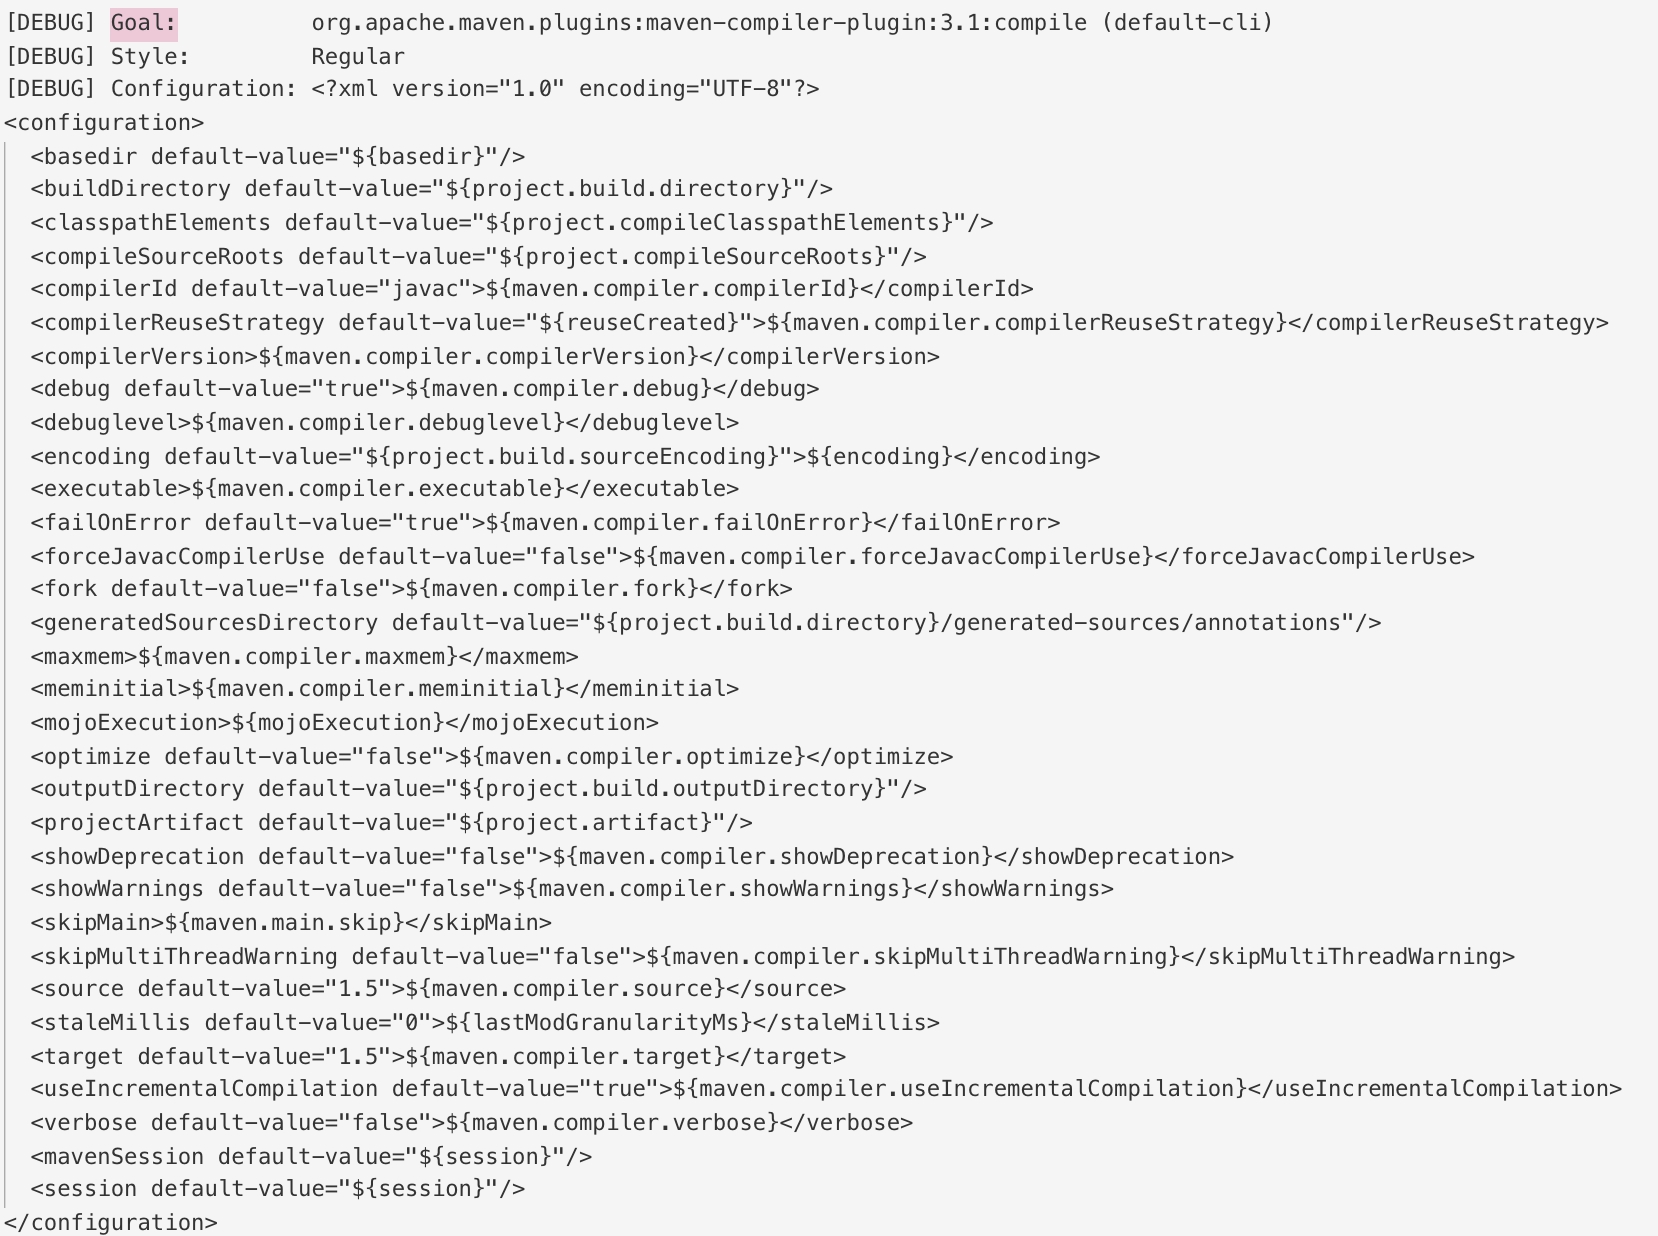
mvn compile -X 可以查看compile插件的所有细节,包括默认配置,比如日志如下 详细日志

插件介绍

插件的pom会指定默认phase,goal:插件的官方文档

clean

1
2
3
4
5
6
7
8
<build>
...
<plugin>
<artifactId>maven-clean-plugin</artifactId>
<version>3.1.0</version>
</plugin>
...
</build>

clean 插件主要清理编译生成的文件,默认的编译目录配置在以下属性中

project.build.directory > project.build.outputDirectory > project.build.testOutputDirectory > project.reporting.outputDirectory

compiler

1
2
3
4
5
6
7
8
9
10
11
12
13
14
 <plugin>
<groupId>org.apache.maven.plugins</groupId>
<artifactId>maven-compiler-plugin</artifactId>
<version>3.8.1</version>
<configuration>
<compilerVersion>1.8</compilerVersion>
<source>1.8</source>
<target>1.8</target>
<compilerArgs>
<arg>-verbose</arg>
<arg>-Xlint:all,-options,-path</arg>
</compilerArgs>
</configuration>
</plugin>

compilerArgs javac 参数
source 源码 jdk 版本
target 编译 jdk 版本
其他详细参数介绍请查看 :compiler:compile 参数介绍

通过 debug 模式运行 compile,可以看到 compile 编译的源目录以及目标目录

1
2
3
<buildDirectory default-value="${project.build.directory}"/>
<classpathElements default-value="${project.compileClasspathElements}"/>
<compileSourceRoots default-value="${project.compileSourceRoots}"/>

${project.build.directory} 在Super POM中有定义,默认值为${project.basedir}/target
${project.compileSourceRoots} 默认值为${project.basedir}/${project.build.sourceDirectory}通过查看 maven 源码:

1
2
3
4
5
6
7
8
9
10
11
package org.apache.maven.project;
public class MavenProject implements Cloneable {
...
private List<String> compileSourceRoots = new ArrayList<>();
...
public void addCompileSourceRoot( String path )
{
addPath( getCompileSourceRoots(), path );
}
...
}
1
2
3
4
5
6
7
8
9
10
11
12
13
14
15
package org.apache.maven.project;
@Component( role = ProjectBuilder.class )
public class DefaultProjectBuilder
implements ProjectBuilder
{
...
if ( project.getFile() != null )
{
Build build = project.getBuild();
project.addScriptSourceRoot( build.getScriptSourceDirectory() );
project.addCompileSourceRoot( build.getSourceDirectory() );
project.addTestCompileSourceRoot( build.getTestSourceDirectory() );
}
...
}
1
2
3
4
5
6
7
8
9
10
11
package org.apache.maven.project;
@Deprecated
@Component( role = PathTranslator.class )
public class DefaultPathTranslator implements PathTranslator {
...
if ( build != null )
{
build.setDirectory( alignToBaseDirectory( build.getDirectory(), basedir ) );
build.setSourceDirectory( alignToBaseDirectory( build.getSourceDirectory(), basedir ) );
...
}
1
2
3
4
5
6
7
8
9
10
11
12
13
14
15
16
17
18
19
20
21
22
23
24
25
26
27
28
29
30
31
32
33
34
35
36
37
package org.apache.maven.model.interpolation;

public abstract class AbstractStringBasedModelInterpolator
implements ModelInterpolator
{
static
{
List<String> translatedPrefixes = new ArrayList<>();

// MNG-1927, MNG-2124, MNG-3355:
// If the build section is present and the project directory is non-null, we should make
// sure interpolation of the directories below uses translated paths.
// Afterward, we'll double back and translate any paths that weren't covered during interpolation via the
// code below...
translatedPrefixes.add( "build.directory" );
translatedPrefixes.add( "build.outputDirectory" );
translatedPrefixes.add( "build.testOutputDirectory" );
translatedPrefixes.add( "build.sourceDirectory" );
translatedPrefixes.add( "build.testSourceDirectory" );
translatedPrefixes.add( "build.scriptSourceDirectory" );
translatedPrefixes.add( "reporting.outputDirectory" );

TRANSLATED_PATH_EXPRESSIONS = translatedPrefixes;
}
}
...

protected List<? extends InterpolationPostProcessor> createPostProcessors( final Model model, final File projectDir, final ModelBuildingRequest config )
{
List<InterpolationPostProcessor> processors = new ArrayList<>( 2 );
if ( projectDir != null ){
processors.add( new PathTranslatingPostProcessor( PROJECT_PREFIXES, TRANSLATED_PATH_EXPRESSIONS,projectDir, pathTranslator ) );
}
processors.add( new UrlNormalizingPostProcessor( urlNormalizer ) );
return processors;
}
...

resources

编译时拷贝资源文件,不需要显式的调用插件

1
2
3
4
5
6
7
8
9
<build>
<finalName>${project.artifactId}</finalName>
<resources>
<resource>
<targetPath>${project.build.directory}/META-INF</targetPath>
<directory>${basedir}/resources</directory>
</resource>
</resources>
</build>

targetPath编译后目录,默认是以${project.build.outputDirectory}为前缀的
directory 源资源目录,默认是以${basedir}为前缀的
finalName 打包后的项目名,默认为${project.artifactId}-${project.version}

dependency

解决打包依赖的 jar 包

1
2
3
4
5
6
7
8
9
10
11
12
13
14
15
16
17
  <plugin>
<groupId>org.apache.maven.plugins</groupId>
<artifactId>maven-dependency-plugin</artifactId>
<version>2.10</version>
<executions>
<execution>
<id>copy-dependencies</id>
<phase>package</phase>
<goals>
<goal>copy-dependencies</goal>
</goals>
<configuration>
<outputDirectory>${project.build.directory}/lib</outputDirectory>
</configuration>
</execution>
</executions>
</plugin>

outputDirectory表示依赖 jar 默认输出目录,默认是${basedir}
goal:copy-dependencies 相关配置详细

antrun

执行脚本

1
2
3
4
5
6
7
8
9
10
11
12
13
14
15
16
17
18
 <plugin>
<artifactId>maven-antrun-plugin</artifactId> <!-- 拷贝插件 -->
<executions>
<execution>
<id>copy</id>
<phase>package</phase> <!-- maven生命周期 -->
<configuration>
<tasks> <!-- 其他语法自行百度maven-antrun-plugin插件的相关用法-->
<echo message="${project.build.directory}"/>
<echo message="${output.jar.director}"/>
</tasks>
</configuration>
<goals>
<goal>run</goal>
</goals>
</execution>
</executions>
</plugin>

tasks具体语法参考 ant 官方文档

依赖冲突

Maven 采用“最近获胜策略(nearest wins strategy)”的方式处理依赖冲突,即如果一个项目最终依赖于相同 artifact 的多个版本,在依赖树中离项目最近的那个版本将被使用

1.当前模块直接引入合适版本的依赖

2.使用 dependency:tree -Dverbose"查看是否有冲突的依赖,根据输出的依赖关系图查看是否包含conflict,然后根据需要排除不需要引入的版本 通过依赖排除

1
2
3
4
5
6
7
8
9
10
11
<dependency>
<groupId>jaxen</groupId>
<artifactId>jaxen</artifactId>
<version>1.2.0</version>
<exclusions>
<exclusion>
<groupId>xml-apis</groupId>
<artifactId>xml-apis</artifactId>
</exclusion>
</exclusions>
</dependency>

dependencyManagement

示例说明,

在父模块中:

1
2
3
4
5
6
7
8
9
<dependencyManagement>
<dependencies>
<dependency>
<groupId>mysql</groupId>
<artifactId>mysql-connector-java</artifactId>
<version>5.1.44</version>
</dependency>
</dependencies>
</dependencyManagement>

那么在子模块中只需要<groupId>和<artifactId>即可,如:

1
2
3
4
5
6
<dependencies>
<dependency>
<groupId>mysql</groupId>
<artifactId>mysql-connector-java</artifactId>
</dependency>
</dependencies>

说明: 使用 dependencyManagement 可以统一管理项目的版本号,确保应用的各个项目的依赖和版本一致,不用每个模块项目都弄一个版本号,不利于管理,当需要变更版本号的时候只需要在父类容器里更新,不需要任何一个子项目的修改;如果某个子项目需要另外一个特殊的版本号时,只需要在自己的模块 dependencies 中声明一个版本号即可。子类就会使用子类声明的版本号,不继承于父类版本号。 dependencyManagement 不会引入包,仅控制版本

与 dependencies 区别

  1. Dependencies 相对于 dependencyManagement,所有生命在 dependencies 里的依赖都会自动引入,并默认被所有的子项目继承。
  2. dependencyManagement 里只是声明依赖,并不自动实现引入,因此子项目需要显示的声明需要用的依赖。如果不在子项目中声明依赖,是不会从父项目中继承下来的;只有在子项目中写了该依赖项,并且没有指定具体版本,才会从父项目中继承该项,并且 version 和 scope 都读取自父 pom;另外如果子项目中指定了版本号,那么会使用子项目中指定的 jar 版本。

模块

maven 的模块是在父类 pom 中定义聚合关系,其本质仅仅是一次性批量按顺序执行所有子模块的 mvn 命令而已 我们已一个简单的示例来说明

1
2
3
4
5
6
7
8
9
10
11
12
13
14
15
<?xml version="1.0" encoding="UTF-8"?>
<project
xmlns="http://maven.apache.org/POM/4.0.0"
xmlns:xsi="http://www.w3.org/2001/XMLSchema-instance"
xsi:schemaLocation="http://maven.apache.org/POM/4.0.0 https://maven.apache.org/xsd/maven-4.0.0.xsd">
<modelVersion>4.0.0</modelVersion>
<groupId>com.leaderli</groupId>
<artifactId>maven-parent</artifactId>
<version>1</version>
<packaging>pom</packaging>
<modules>
<module>maven-child1</module>
<module>maven-child2</module>
</modules>
</project>
1
2
3
4
5
6
7
8
9
10
11
12
13
14
15
16
17

<?xml version="1.0" encoding="UTF-8"?>
<project
xmlns="http://maven.apache.org/POM/4.0.0"
xmlns:xsi="http://www.w3.org/2001/XMLSchema-instance"
xsi:schemaLocation="http://maven.apache.org/POM/4.0.0 https://maven.apache.org/xsd/maven-4.0.0.xsd">
<modelVersion>4.0.0</modelVersion>
<groupId>com.leaderli</groupId>
<artifactId>maven-child1</artifactId>
<version>1</version>
<packaging>pom</packaging>
<parent>
<groupId>com.leaderli</groupId>
<artifactId>maven-parent</artifactId>
<version>1</version>
</parent>
</project>
1
2
3
4
5
6
7
8
9
10
11
12
13
14
15
16
<?xml version="1.0" encoding="UTF-8"?>
<project
xmlns="http://maven.apache.org/POM/4.0.0"
xmlns:xsi="http://www.w3.org/2001/XMLSchema-instance"
xsi:schemaLocation="http://maven.apache.org/POM/4.0.0 https://maven.apache.org/xsd/maven-4.0.0.xsd">
<modelVersion>4.0.0</modelVersion>
<groupId>com.leaderli</groupId>
<artifactId>maven-child2</artifactId>
<version>1</version>
<packaging>pom</packaging>
<parent>
<groupId>com.leaderli</groupId>
<artifactId>maven-parent</artifactId>
<version>1</version>
</parent>
</project>

当我们在父类 pom 中执行打包命令mvn install时,其实就是依次在maven-parent,maven-child1,maven-child2上执行mvn install的过程

SpringBoot打包

SpringBoot打包会生成两个文件

MyApplication-0.0.1-SNAPSHOT.war (可运行行文件) MyApplication-0.0.1-SNAPSHOT.war.original(不可运行文件,用以发布在容器下)

强制刷新本地缓存

mvn dependency:purge-local-repository

打包源码

1
2
3
4
5
6
7
8
9
10
11
12
13
14
15
16
<plugin>
<groupId>org.apache.maven.plugins</groupId>
<artifactId>maven-source-plugin</artifactId>
<version>3.0.0</version>
<!-- 绑定source插件到Maven的生命周期,并在生命周期后执行绑定的source的goal -->
<executions>
<execution>
<!-- 绑定source插件到Maven的生命周期 -->
<phase>compile</phase>
<!--在生命周期后执行绑定的source插件的goals -->
<goals>
<goal>jar-no-fork</goal>
</goals>
</execution>
</executions>
</plugin>

执行 mvn install,maven 会自动将 source install 到 repository 。 执行 mvn deploy,maven 会自动将 source deploy 到 remote-repository 。 执行 mvn source:jar,单独打包源码。

profiles

1
2
3
4
5
6
7
8
9
10
11
12
13
14
15
16
17
18
19
20
21
22
23
24
25
26
27
28
29
30
31
32
33
34
35
36
37
38
39
40
41
42
43
44
45
46
47
48
49
50
51
52
53
54
55
56
57
58
<?xml version="1.0" encoding="UTF-8"?>
<project
xmlns="http://maven.apache.org/POM/4.0.0"
xmlns:xsi="http://www.w3.org/2001/XMLSchema-instance"
xsi:schemaLocation="http://maven.apache.org/POM/4.0.0 http://maven.apache.org/xsd/maven-4.0.0.xsd">
<modelVersion>4.0.0</modelVersion>
<groupId>com.leaderli</groupId>
<artifactId>vxml-test</artifactId>
<version>1.0-SNAPSHOT</version>
<properties>
<config1>uat.properites</config1>
<config2>pdu.properties</config2>
</properties>
<profiles>
<profile>
<id>uat</id>
<activation>
<activeByDefault>true</activeByDefault>
</activation>
<properties>
<config>${config1}</config>
</properties>
</profile>
<profile>
<id>pdu</id>
<properties>
<config>${config2}</config>
</properties>
</profile>
</profiles>
<dependencies></dependencies>
<build>
<plugins>
<plugin>
<artifactId>maven-antrun-plugin</artifactId>
<!-- 拷贝插件 -->
<executions>
<execution>
<id>rename</id>
<phase>prepare-package</phase>
<!-- 在打包前执行-->
<goals>
<goal>run</goal>
</goals>
<configuration>
<tasks>
<!-- 其他语法自行百度maven-antrun-plugin插件的相关用法-->
<copy
file="${project.build.directory}/${project.artifactId}/WEB-INF/classes/${config}"
tofile="${project.build.directory}/${project.artifactId}/WEB-INF/classes/config.properties"/>
</tasks>
</configuration>
</execution>
</executions>
</plugin>
</plugins>
</build>
</project>

我们在执行命令时使用

1
2
3
4
#默认uat profile
mvn clean package
#指定pdu profile
mvn clean package -P pdu

profile 支持激活的方式

1
2
3
4
5
6
7
8
9
10
11
12
13
14
15
16
17
18
19
20
21
22
<!--配置默认激活-->
<activeByDefault>true</activeByDefault>
<!--通过jdk版本-->
<jdk>1.5</jdk>
<jdk>[1.5,)</jdk>
<!--根据当前操作系统-->
<os>
<name>Windows XP</name>
<family>Windows</family>
<arch>x86</arch>
<version>5.1.2600</version>
</os>
<!--通过系统环境变量-->
<property>
<name>env</name>
<value>test</value>
</property>
<!--通过文件的存在或缺失-->
<file>
<missing>target/generated-sources/axistools/wsdl2java/wdl</missing>
<exists/>
</file>

linux相关问题

发表于 2019-07-14 更新于 2020-12-02 分类于 linux

root 用户无法加载 bash_profile

在尝试通过使用su root登录到 root 用户,/var/root/.bash_profile的环境变量始终无法加载。 通过查看su的文档 su会以当前登录用户的 session 去切换用户,而su -会重新登录

The su command is used to become another user during a login session. Invoked without a username, su defaults to becoming the superuser. The optional argument - may be used to provide an environment similar to what the user would expect had the user logged in directly.

同时

-, -l, --login
Provide an environment similar to what the user would expect had the user logged in directly.

使用su - root则可正常加载环境配置

下述问题也是这样的原因,可以通过上述方式去解决

autojump_add_to_database command not found

yum 安装一直超时

比如有如下提示

Couldn't determine mirror, try again later 络

  1. 确认下是否能链接到网络
  2. 确认下 yum 的源是否失效了

make 一直循环

如果系统时间比软件的发布时间要早,make 就会进入死循环。 使用date -s '<date>'修改为最新的时间即可

make 缺少相关组件

cache.h:21:18: fatal error: zlib.h: No such file or directory

下载https://zlib.net/zlib-1.2.11.tar.gz软件

1
2
3
4
5
6
7
#下载
wget https://zlib.net/zlib-1.2.11.tar.gz
tar -xvf lib-1.2.11.tar.gz
cd zlib-1.2.11
./configure
make -j4
make install

./执行脚本头文件不存在

!#/usr/bin/python3: No such file or directory

因为复制粘贴!#/usr/bin/python3时带上了不可见的换行或其他字符

通过命令$ head -1 yourscript | od -c文件的头文件的

  • 0000000 # ! / b i n / b a s h \r \n
  • 0000000 357 273 277 # ! / b i n / b a s h \n
  • 0000000 # ! / b i n / b a s h \n(这样的才是正确的输出)

od 指令会读取所给予的文件的内容,并将其内容以八进制字码呈现出来

spring tips

发表于 2019-07-10 更新于 2020-12-02 分类于 spring

spring bean 多个 id

1
2
3
4
5
6
7
8
9
10
11
12
13
@Service("Service-A")
public class SampleService {
public String doSomething() { return "Foo"; }
}

@Configuration
public class SampleConfig {

@Bean(name = {"Service-B", "Service-C"})
public SampleService createMirroredService(@Autowired SampleService service) {
return service;
}
}

作用域代理——proxyMode 属性

将一个短生命周期作用域 bean 注入给长生命周期作用域 bean,我们期望长生命周期 bean 的属性保持与短生命周期 bean 同样。例如

1
2
3
4
5
6
7
8
9
10
11
@Component
@Scope(value = BeanDefinition.SCOPE_PROTOTYPE,proxyMode = ScopedProxyMode.TARGET_CLASS)
public class Prototype {
}

@Component
@Scope(BeanDefinition.SCOPE_SINGLETON)
public class Singleton {
@Autowired
private Prototype prototype;
}

保证每次prototype都是最新的,需要在Prototype类上定义proxyMode

延迟加载 bean

1
2
3
4
5
6
7
8
9
10
11
12
13
14
//...
import javax.inject.Inject;
import javax.inject.Provider;

public class InjectTest{

@Inject
Provider<InjectBean> provider;

public void test() {
InjectBean bean = provider.get();
}

}

使用@Autowire也是可以的,重要是使用了Provider

基于注解的切面

1
2
3
4
5
6
7
8
9
10
11
12
13
14
15
16
import org.aspectj.lang.ProceedingJoinPoint;
import org.aspectj.lang.annotation.Around;
import org.aspectj.lang.annotation.Aspect;
import org.aspectj.lang.reflect.MethodSignature;
import org.springframework.stereotype.Component;

@Aspect
@Component
public class AnnotationAspect {

@Around("@annotation(Log)")
public void log1(ProceedingJoinPoint point){
MethodSignature s = (MethodSignature) point.getSignature();
Log annotation = s.getMethod().getAnnotation(Log.class);
}
}

所有注解了@Log的方法都会被切

Spring注入文件

1
2
3
4
5
6
7
8
9
import org.springframework.core.io.Resource;

@Value("classpath:rootxml.js")
private Resource cert;

@Test
public void test() throws ScriptException, IOException {
System.out.println(StreamUtils.copyToString(cert.getInputStream(), StandardCharsets.UTF_8));
}

@Autowired

@Autowired(required = false)若Spring容器中没有对应的BeanDefinition时不会注入值,可赋值一个默认值避免空指针的情况。

定时任务

Spring的@Scheduled  可使用crontab语法,但是不同于unix的标准语法,它第一位是秒

1
2
3
4
@Scheduled(cron = "1 22 22 * * *")
public void log() {
logger.info("--------------------" + index++);
}

cron规则一定是 6 位以空白字符间隔的字符串,其中每位代表的含义如下

1
2
3
4
5
6
7
8
秒     分   小时    日    月    星期
0-59 0-59 0-23 1-31 1-12 0-6

记住几个特殊符号的含义:
* 代表取值范围内的数字
*/x 代表每x
x-y 代表从x到y
, 分开几个离散的数字

@Primary

@Primary:自动装配时当出现多个 Bean 候选者时,被注解为@Primary 的 Bean 将作为首选者,否则将抛出异常

maven相关

发表于 2019-07-09 更新于 2020-12-02 分类于 tips

idea 中无法直接下载源代码

可在项目目录下手动执行命令下载

1
mvn dependency:resolve -Dclassifier=sources

maven 父类 pom

定义父类pom

1
2
3
4
5
<groupId>com.li</groupId>
<artifactId>springboot</artifactId>
<version>1.0</version>
<name>springboot</name>
<packaging>pom</packaging>

执行install或depoly发布到仓库中

其他项目引用

1
2
3
4
5
6
<parent>
<groupId>com.li</groupId>
<artifactId>springboot</artifactId>
<version>1.0</version>
<relativePath/>
</parent>

eclipse 中 maven 项目不自动编译

执行clean,再compile即可。

跳过测试

1
mvn package -DskipTests=true

english

发表于 2019-07-09 更新于 2020-12-02 分类于 english

前缀

mis 坏,错误,否定

后缀

less 表示无...的、不...的

ness 加载形容词之后,构成抽共享名词,表示性质,情况,状态

英文标点符号

句点:英国英语(BrE):Full Stop;美国英语(AmE):Period,“ . ” 问号:Question Mark,“ ? ” 感叹号:Exclamation Mark,“ ! ” 逗号:Comma,“ , ” 冒号:Colon,“ : ” 省略号:Ellipsis (众数:Ellipses),“ ... ” 分号:Semicolon,“ ; ” 连字符:Hyphen,“ - ” 连接号:En Dash,“ – ” 破折号:Em Dash,“ — ” 括号:Parentheses,    小括号(圆括号)“ ( ) ”(parenthesis; round brackets);    中括号“ [ ] ”(square brackets);    大括号“ { } ”(brackets; braces) 引号:Quotation Marks,    双引号“ " ”(quote);    单引号“ ' ”(single quotation marks) 缩写及所有格符号:Apostrophe,“ ' ”

常用变量

英文 中文
CaseSensitive 大小写敏感
CaseInSensitive 大小不写敏感
factor 系数
tutorial 指导
Escape character 转义字符

单词表

英文 中文
fine-grained 细粒度
a repertoire of characters 字符集
1…131415

lijun

与其感慨路难行,不如马上就出发
145 日志
30 分类
117 标签
© 2019 – 2020 lijun