大狗哥传奇

  • 首页

  • 关于

  • 标签

  • 分类

  • 归档

  • 搜索

java多线程

发表于 2020-04-25 更新于 2020-06-30 分类于 java

线程状态

新建(NEW)

新创建了一个线程对象。实现 Runnable 接口和继承 Thread 可以得到一个线程类,new 一个实例出来,线程就进入初始状态。

可运行(RUNNABLE)

线程对象创建后,由其他线程(比如 main 线程)调用了 start 方法,该状态的线程位于可运行线程池中,等待被线程调度选中,获取 CPU 的使用权。

1. 可运行状态只说你有资格运行,CPU 调度程序没有挑选到,永远处于可运行状态。
2. 调用线程的 start 方法,此线程进入可运行状态。
3. 当前线程的 sleep()方法,其他线程 join 方法结束,此线程进入可运行状态。
4. 锁池的线程获取到对象锁,此线程进入可运行状态。
5. 当前线程时间片用完了,或者调用线程的 yield 方法,当前线程进入可运行状态。

运行(RUNNING)

可运行状态的线程获取了 CPU 时间片(timeslice),执行程序代码。线程调度程序从可运行线程池中挑选一个线程作为作为当前线程所处的状态,这也是线程进入运行状态的唯一方法。

阻塞(BLOCKED)

阻塞状态是指线程由于某种原因放弃了 CPU 使用权,也即让出了 CPU 时间片,暂时停止运行。直到线程再次进入可运行(RUNNABLE)状态,才有机会再次获得 CPU 时间片转到运行(RUNNING)状态。阻塞的情况分三种:

1. 等待阻塞:运行(RUNNING)状态的线程执行 wait()方法,JVM 会把该线程放入等待队列(waitting queue)中,同时释放对象的同步锁。
2. 同步阻塞:运行(RUNNING)状态的线程在获取对象的同步锁时,若该线程的同步锁被别的线程占用,则 JVM 会把该线程放入锁池(LOCK POOL)中。
3. 其他阻塞:运行(RUNNING)状态的线程执行 sleep 或 join 方法,JVM 会把该线程设置为阻塞(BLOCKED)状态,当 sleep 超时,join 等待线程终止或超时,该线程重新转入可运行(RUNNABLE)状态。

死亡(DEAD)

线程 run 方法结束,main 方法结束,或者异常原因退出了 run 方法,则该线程结束生命周期,死亡的线程不可再次复生。在一个死去的线程上调用 start 方法,会抛出 java.lang.IllegalThreadStateException 异常。

线程状态图 线程状态及切换_2020-04-25-13-31-15.png

线程锁竞争过程

概述

线程锁竞争过程如图 java多线程_2020-04-25-13-37-56.png

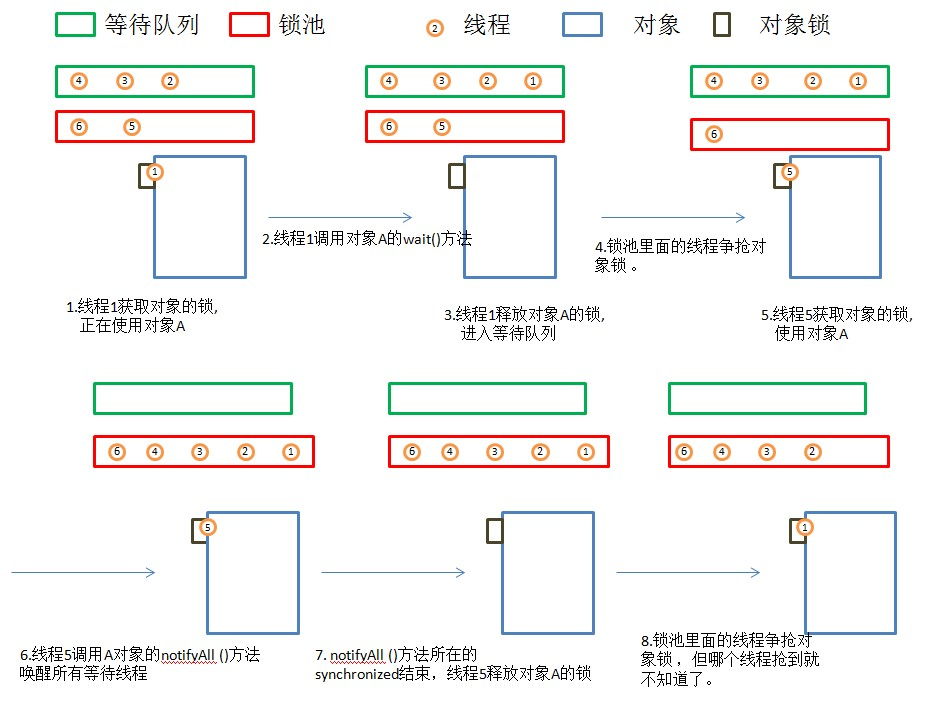
  1. 当前线程想调用 A 的同步方法时,发现对象 A 被别的线程占有,此时当前线程会进入锁池状态。锁池里面存放的都是想争夺对象 A 的线程。
  2. 当线程 1 被另外一个线程唤醒时,会进入锁池争夺对象 A 的锁。
  3. 锁池是在同步的环境下才有的概念,一个对象对应一个锁池。

多线程的几个方法的比较

  1. Thread.sleep(long millis),一定是当前线程调用次方法,当前线程进入阻塞状态,但不释放对象锁,millis 时间到后,自动进入可运行状态。作用:给其它线程执行机会的最佳方式。
  2. Thread.yield(),一定是当前线程调用次方法,当前线程放弃 CPU 时间片,由运行状态变成可运行状态。yield 不会导致阻塞,也无法保证下一次 CPU 不去挑选该线程执行。
  3. t.join(long millis),当前线程==(正在 CPU 时间片执行的线程==)里调用其它线程的 join 方法,当前线程进入阻塞状态,但不会释放对象锁,当其它线程执行结束,或 millis 时间到,当前线程进入可运行状态。
  4. obj.wait(),当前线程调用对象的 wait 方法,当前对象释放对象锁,进入等待队列(阻塞状态)。等待其它线程调用 notify 或 notifyAll,或者 wait(long timeout)timeout 时间到自动释放唤醒,进入锁池争夺对象锁。
  5. obj.notify()唤醒在此对象监视器上等待的单个线程,选择是任意性的。notifyAll 会唤醒在此对象监视器上等待的所有线程。

关于中断

  1. 它不会像 stop 方法一样中断一个正在运行的线程。线程会不时的监测中断标识,以判断程序是否应该被中断(中断标识值是否为 true)。中断只会影响 wait sleep join 状态的线程,被中断后会抛出 java.lang.IllegalThreadStateException 异常。
  2. synchronized 在获取锁的过程中是不能被中断的。
  3. 中断是一种状态,interrupt()方法只是讲讲这个状态设置为 true,所以说正常执行的代码如果不去检测中断标识,是不会被终止运行的。而 wait 等阻塞方法,会去检测并抛出异常。如果正常运行的代码添加 while(!interrupted()),则同样可以在中断后离开代码体。

Java wait() notify()方法使用实例讲解

1. wait()、notify()和 notifyAll()方法是本地方法,并且为 final 方法,无法被重写。
2. 调用某个对象的 wait()方法能让当前线程阻塞,并且当前线程必须拥有此对象的 monitor(即锁,或者叫管程)
3. 调用某个对象的 notify()方法能够唤醒一个正在等待这个对象的 monitor 的线程,如果有多个线程都在等待这个对象的 monitor,则只能唤醒其中一个线程;
4. 调用 notifyAll()方法能够唤醒所有正在等待这个对象的 monitor 的线程;

​ 在 java 中,是没有类似于 PV 操作、进程互斥等相关的方法的。JAVA 的进程同步是通过 synchronized()来实现的,需要说明的是,Java 的 synchronized()方法类似于操作系统概念中的互斥内存块,在 Java 中的 Object 类对象中,都是带有一个内存锁的,在有线程获取该内存锁后,其它线程无法访问该内存,从而实现 Java 中简单的同步、互斥操作。明白这个原理,就能理解为什么 synchronized(this)与 synchronized(static XXX)的区别了,synchronized 就是针对内存区块申请内存锁,this 关键字代表类的一个对象,所以其内存锁是针对相同对象的互斥操作,而 static 成员属于类专有,其内存空间为该类所有成员共有,这就导致 synchronized()对 static 成员加锁,相当于对类加锁,也就是在该类的所有成员间实现互斥,在同一时间只有一个线程可访问该类的实例。如果需要在线程间相互唤醒就需要借助 Object 类的 wait()方法及 nofity()方法。

说了这么一堆,可能似懂非懂,那么接下来用一个例子来说明问题,用多线程实现连续的 1,2,1,2,1,2,1,2,1,2 输出。

1
2
3
4
5
6
7
8
9
10
11
12
13
14
15
16
17
18
19
20
21
22
23
24
25
26
27
28
29
30
31
32
33
34
35

class NumberPrint implements Runnable{
private int number;
public byte res[];
public static int count = 5;
public NumberPrint(int number, byte a[]){
this.number = number;
res = a;
}
public void run(){
synchronized (res){
while(count-- > 0){
try {
res.notify();//唤醒等待res资源的线程,把锁交给线程(该同步锁执行完毕自动释放锁)
System.out.println(" "+number);

res.wait();//释放CPU控制权,释放res的锁,本线程阻塞,等待被唤醒。
System.out.println("------线程"+Thread.currentThread().getName()+"获得锁,wait()后的代码继续运行:"+number);
} catch (InterruptedException e) {
// TODO Auto-generated catch block
e.printStackTrace();
}
}//end of while
return;
}//synchronized

}
}
public class WaitNotify {
public static void main(String args[]){
final byte a[] = {0};//以该对象为共享资源
new Thread(new NumberPrint((1),a),"1").start();
new Thread(new NumberPrint((2),a),"2").start();
}
}

输出结果:

1 2 ------线程 1 获得锁,wait()后的代码继续运行:1 1 ------线程 2 获得锁,wait()后的代码继续运行:2 2 ------线程 1 获得锁,wait()后的代码继续运行:1 1 ------线程 2 获得锁,wait()后的代码继续运行:2

下面解释为什么会出现这样的结果:

首先 1、2 号线程启动,这里假设 1 号线程先运行 run 方法获得资源(实际上是不确定的),获得对象 a 的锁,进入 while 循环(用于控制输出几轮):

1、此时对象调用它的唤醒方法 notify(),意思是这个同步块执行完后它要释放锁,把锁交给等待 a 资源的线程;

2、输出 1;

3、该对象执行等待方法,意思是此时此刻起拥有这个对象锁的线程(也就是这里的 1 号线程)释放 CPU 控制权,释放锁,并且线程进入阻塞状态,后面的代码暂时不执行,因未执行完同步块,所以 1 也没起作用;

4、在这之前的某时刻线程 2 运行 run 方法,但苦于没有获得 a 对象的锁,所以无法继续运行,但 3 步骤之后,它获得了 a 的锁,此时执行 a 的唤醒方法 notify(),同理,意思是这个同步块执行完后它要释放锁,把锁交给等待 a 资源的线程;

5、输出 2;

6、执行 a 的等待方法,意思是此时此刻起拥有这个对象锁的线程(也就是这里的 2 号线程)释放 CPU 控制权,释放锁,并且线程进入阻塞状态,后面的代码暂时不执行,因未执行完同步块,所以 2 号线程的 4 步骤的唤醒方法也没起作用;

7、此时 1 号线程执行到 3 步骤,发现对象锁没有被使用,所以继续执行 3 步骤中 wait 方法后面的代码,于是输出:------线程 1 获得锁,wait()后的代码继续运行:1;

8、此时 while 循环满足条件,继续执行,所以,再执行 1 号线程的唤醒方法,意思是这个同步块执行完后它要释放锁;

9、输出 1;

10、执行等待方法,线程 1 阻塞,释放资源锁;

11、此时线程 2 又获得了锁,执行到步骤 6,继续执行 wait 方法后面的代码,所以输出:------线程 2 获得锁,wait()后的代码继续运行:2;

12、继续执行 while 循环,输出 2;

··· ···

通过上述步骤,相信大家已经明白这两个方法的使用了,但该程序还存在一个问题,当 while 循环不满足条件时,肯定会有线程还在等待资源,所以主线程一直不会终止。当然这个程序的目的仅仅为了给大家演示这两个方法怎么用。

总结:

​ wait()方法与 notify()必须要与 synchronized(resource)一起使用。也就是 wait 与 notify 针对已经获取了 resource 锁的线程进行操作,从语法角度来说就是 Obj.wait(),Obj.notify 必须在 synchronized(Obj){...}语句块内。从功能上来说 wait()线程在获取对象锁后,主动释放 CPU 控制权,主动释放对象锁,同时本线程休眠。直到有其它线程调用对象的 notify()唤醒该线程,才能继续获取对象锁,并继续执行。相应的 notify()就是对对象锁的释放操作。【因此,我们可以发现,wait 和 notify 方法均可释放对象的锁,但 wait 同时释放 CPU 控制权,即它后面的代码停止执行,线程进入阻塞状态,而 notify 方法不立刻释放 CPU 控制权,而是在相应的 synchronized(){}语句块执行结束,再自动释放锁。】释放锁后,JVM 会在等待 resoure 的线程中选取一线程,赋予其对象锁,唤醒线程,继续执行。这样就提供了在线程间同步、唤醒的操作。Thread.sleep()与 Object.wait()二者都可以暂停当前线程,释放 CPU 控制权,主要的区别在于 Object.wait()在释放 CPU 同时,释放了对象锁的控制,而在同步块中的 Thread.sleep()方法并不释放锁,仅释放 CPU 控制权。

volatile

多线程的内存模型,main memory(主存),working memory(线程栈),在处理数据时,线程会把值从主存 load 到本地栈,完成操作后,再 save 回去。(volatile 关键字的作用就是在一个 CPU 时间片内,针对变量的操作都触发一次完整的 load 和 save)。针对多线程使用的变量如果不是 volatile 或 final 修饰的,可能发生不可预料的后果(某个线程修改了变量,但之后的线程 load 到的是变量修改前的数据)。其实本质上来说,同一实例的同一属性只会有一个副本,但多线程会缓存值,volatile 的作用就是不去缓存值。在线程安全的情况下,用 volatile 会牺牲性能。 java多线程_2020-04-25-13-50-12.png

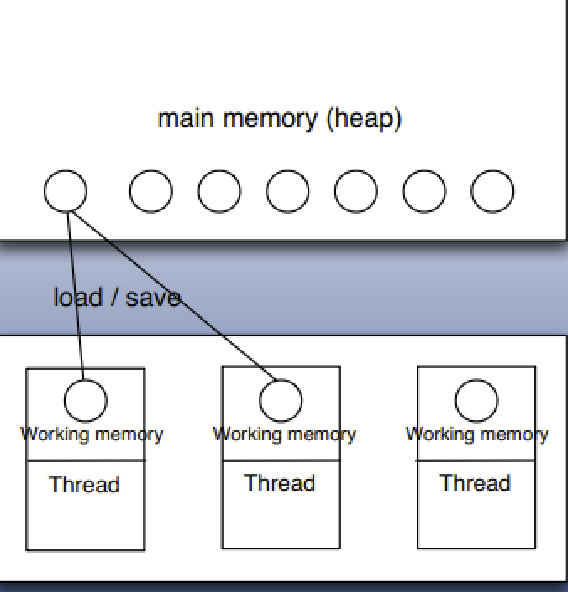
volatile 底层实现最终是加了内存屏障 java多线程_2020-04-25-13-55-07.png

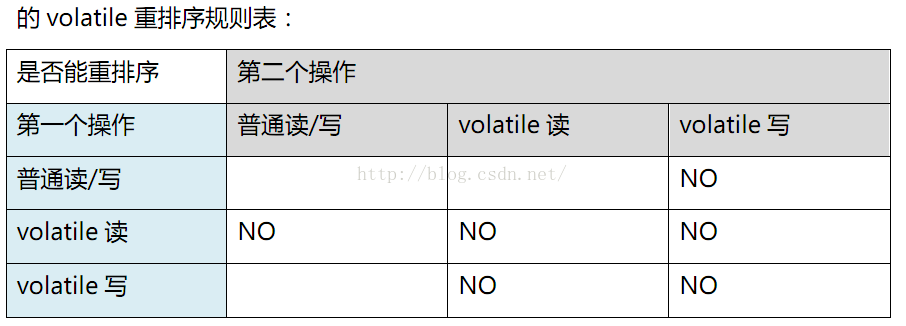
1. 保证写 volatile 变量强制把 CPU 写缓存区的数据刷新到内存
2. 读 volatile 变量时,使缓存失效,强制从内存中读取数据。
3. 由于内存屏障的作用,volatile 变量还能阻止重排序。

指令重排

现代处理器都会采用指令乱序执行(Out of Order Execution ,简称 OOE)的方法,直接运行当前有能力立即执行的后续指令,避开获取下一条指令所需数据的等待,通过乱序执行的技术,处理器可以大大提高执行效率

AS-IF-SERIAL

所有的动作(aciton)都可以为了优化而被重新排序,但是必须保证它们重新排序后的执行结果和程序代码本身应有的结果一致。Java 编译器,运行时和处理器都会保证单线程运行下的 as-if-serial 语义。为了保证这一语义,重排序不会发生在有数据依赖的操作中。

1
2
3
int a = 1;
int b = 1;
int c = a + b;

将上面的代码编译成 java 字节码或生成机器指令,可视为以下几步动作(实际可能会忽略或添加某些步骤)

对 a 赋值 1 对 b 赋值 1 取 a 值 取 b 值 取到的两值相加后赋值给 c

在上面 5 个操作,操作 1 可能和操作 2、操作 4 重排序,操作 2 可能和操作 1、操作 3 重排序,操作 3 可能和操作 2、操作 4 重排序,操作 4 可能和操作 1、操作 3 重排序。但操作 1 不能和操作 3、操作 5 重排序,操作 2 不能和操作 4、操作 5 重排序。因为它们存在数据依赖性,一旦重排序, as-if-serial 语义无法得到保证。

内存屏障

由于现代的处理器系统都是多处理器,而每一个处理器都有自己的缓存,并且这些缓存并不是实时和内存发生信息交换,这样就可能出现一个 CPU 的缓存数据和另一个 CPU 缓存数据不一致的问题。而这样在多线程开发中,就有可能造成一些异常问题。

而操作系统底层为了解决这样的问题,提供了一些内存屏障解决这些问题,目前有四种内存屏障

  1. LoadLoad 内存屏障:对于这样的语句 Load1 LoadLoad Load2 ,在 Load2 及后续操作要读取的数据被访问前,保证 Load1 要读取的数据加载完成。
  2. StoreStore 内存屏障:对于这样的语句 Store1 StoreStore Store2,在 Store2 及后续写入操作执行前,保证 Store1 的写入操作对其它处理器可见。
  3. LoadStore 内存屏障:对于这样的语句 Load1 LoadStore Store2,在 Store2 及后续写入操作执行前,保证 Load1 要读取的数据加载完成。
  4. StoreLoad 内存屏障:对于这样的语句 Store1 StoreLoad Load2,在 Load2 及后续操作要读取的数据被访问前,保证 Store1 的写入操作对其它处理器可见。

使用

  1. 通过 synchronized 关键词包含的代码区域,当线程进入该区域读取变量信息时,保证读取到的是最新的值。这是因为在同步区内的写入操作,在离开同步区时就将当前线程的数据刷新到内存中,而对数据的读取也不能从缓存中读取,只能从内存中读取,这样就保证了数据读取的有效性,这就插入了 StoreStore 内存屏障。
  2. 使用了 volatile 关键字修饰的变量,在进行写入操作时,会插入 StoreLoad 内存屏障。
  3. Unsafe.putOrderedObject 类似这样的方法,会插入 StoreStore 内存屏障
  4. Unsafe.putVolatiObject 则是插入了 StoreLoad 屏障

尾调用优化

发表于 2020-04-23 更新于 2020-06-30 分类于 tips

尾调用优化

尾调用之所以与其他调用不同,就在于它的特殊的调用位置。

我们知道,函数调用会在内存形成一个"调用记录",又称"调用帧"(call frame),保存调用位置和内部变量等信息。如果在函数 A 的内部调用函数 B,那么在 A 的调用记录上方,还会形成一个 B 的调用记录。等到 B 运行结束,将结果返回到 A,B 的调用记录才会消失。如果函数 B 内部还调用函数 C,那就还有一个 C 的调用记录栈,以此类推。所有的调用记录,就形成一个"调用栈"(call stack)。 尾调用优化_2020-04-23-17-20-39.png 
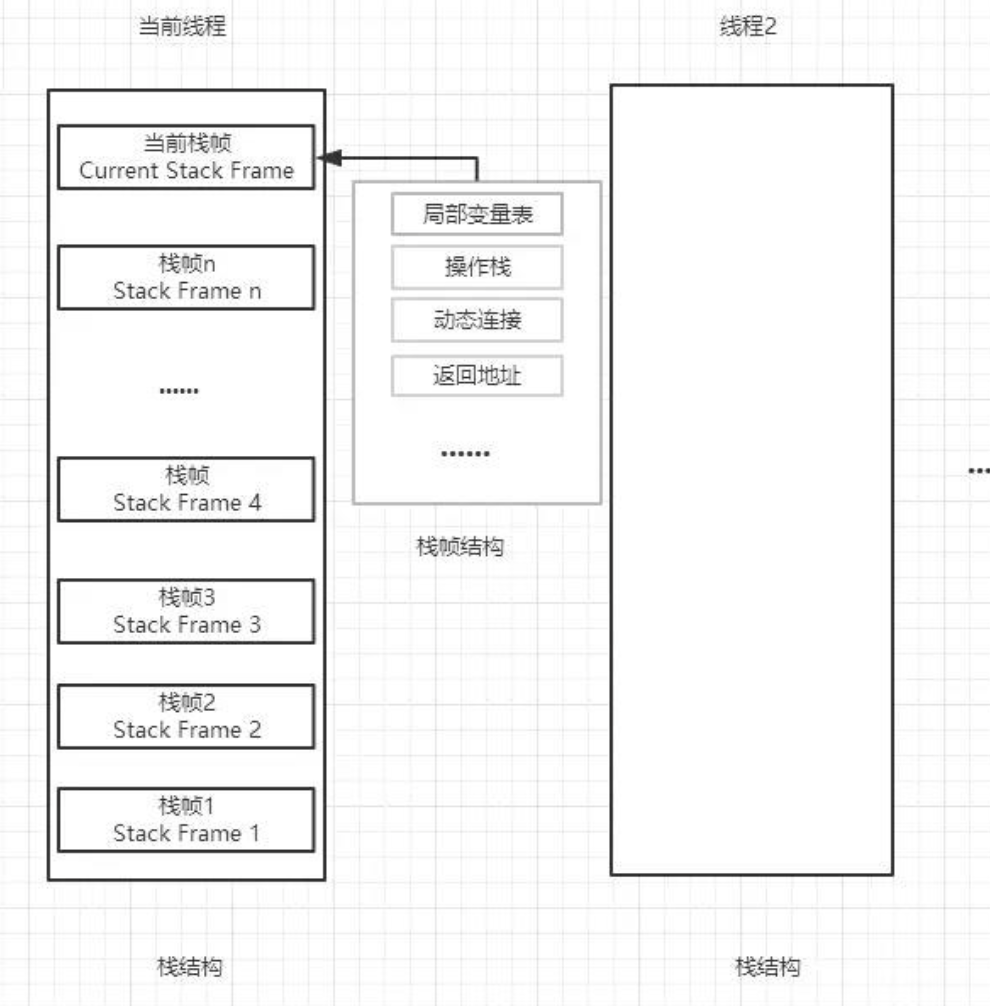
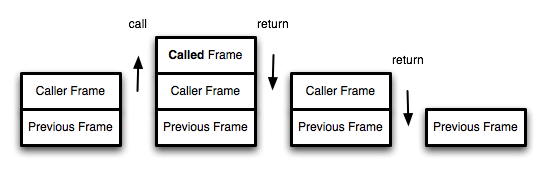
尾调用由于是函数的最后一步操作,所以不需要保留外层函数的调用记录,因为调用位置、内部变量等信息都不会再用到了,只要直接用内层函数的调用记录,取代外层函数的调用记录就可以了。

1
2
3
4
5
6
7
8
9
10
11
12
13
14
15
function f() {
let m = 1;
let n = 2;
return g(m + n);
}
f();

// 等同于
function f() {
return g(3);
}
f();

// 等同于
g(3);

上面代码中,如果函数 g 不是尾调用,函数 f 就需要保存内部变量 m 和 n 的值、g 的调用位置等信息。但由于调用 g 之后,函数 f 就结束了,所以执行到最后一步,完全可以删除 f() 的调用记录,只保留 g(3) 的调用记录。

这就叫做"尾调用优化"(Tail call optimization),即只保留内层函数的调用记录。如果所有函数都是尾调用,那么完全可以做到每次执行时,调用记录只有一项,这将大大节省内存。这就是"尾调用优化"的意义。

尾递归

函数调用自身,称为递归。如果尾调用自身,就称为尾递归。

递归非常耗费内存,因为需要同时保存成千上百个调用记录,很容易发生"栈溢出"错误(stack overflow)。但对于尾递归来说,由于只存在一个调用记录,所以永远不会发生"栈溢出"错误。

1
2
3
4
5
6
function factorial(n) {
if (n === 1) return 1;
return n * factorial(n - 1);
}

factorial(5); // 120

上面代码是一个阶乘函数,计算 n 的阶乘,最多需要保存 n 个调用记录,复杂度 O(n) 。 如果改写成尾递归,只保留一个调用记录,复杂度 O(1) 。

1
2
3
4
5
6
function factorial(n, total) {
if (n === 1) return total;
return factorial(n - 1, n * total);
}

factorial(5, 1); // 120

由此可见,"尾调用优化"对递归操作意义重大,所以一些函数式编程语言将其写入了语言规格。ES6 也是如此,第一次明确规定,所有 ECMAScript 的实现,都必须部署"尾调用优化"。这就是说,在 ES6 中,只要使用尾递归,就不会发生栈溢出,相对节省内存。 尾调用优化_2020-04-23-17-21-00.png

递归函数的改写

尾递归的实现,往往需要改写递归函数,确保最后一步只调用自身。做到这一点的方法,就是把所有用到的内部变量改写成函数的参数。比如上面的例子,阶乘函数 factorial 需要用到一个中间变量 total ,那就把这个中间变量改写成函数的参数。这样做的缺点就是不太直观,第一眼很难看出来,为什么计算 5 的阶乘,需要传入两个参数 5 和 1?

两个方法可以解决这个问题。方法一是在尾递归函数之外,再提供一个正常形式的函数。

1
2
3
4
5
6
7
8
9
10
function tailFactorial(n, total) {
if (n === 1) return total;
return tailFactorial(n - 1, n * total);
}

function factorial(n) {
return tailFactorial(n, 1);
}

factorial(5); // 120

快捷键

发表于 2020-04-23 更新于 2020-06-30 分类于 tips

safari

  1. ⌃1 #显示或隐藏收藏夹
  2. ⌃3 #切换 ipad 视图
  3. ⇧⌘D #添加当前页面到阅读列表
  4. ⌘/ #显示所有标签页
  5. ⌃f #全屏

iTerm2

切换编辑模式

1
2
3
4
5
# Emacs mode
bindkey -e

# Vi mode
bindkey -v

自动完成

iTerm2 可以自动补齐命令,输入若干字符,按 ⌘+;弹出自动补齐窗口,列出曾经使用过的命令

分屏

垂直分屏:command + d

水平分屏:command + shift + d

切换屏幕:command + option + 方向键 command + [ 或 command + ]

chrome

截图

  1. F12
  2. cmmand+shift+p
  3. 输入“capture”
  4. 选择以下任意

    1)“ capture full size screenshot”【整个网页】 2)“capture node screenshot”【节点网页】 3)“capture screenshot”【当前屏幕】

db2

发表于 2020-04-23 更新于 2020-12-02 分类于 db

导出表结构

1
2
3
4
5
#该语句会导出所有表结构
db2look -d <db> -e -a -x -i <username> -w <password> -o <file>

#导出指定表结构
db2look -d <db> -e -t <table> -o <file>
1
2
#重设自动自动起始值
alter table <table> alter column <column> restart with <num>

执行 sql 文件

1
db2 –tvf script1.sql –z script1.log  #需转化为unix格式文本

在上面的命令中,

-t 表示语句使用默认的语句终结符——分号;   -v 表示使用冗长模式,这样 DB2 会显示每一条正在执行命令的信息;   -f 表示其后就是脚本文件;   -z 表示其后的信息记录文件用于记录屏幕的输出,方便以后的分析(这是可选的,但我们建议使用该选项)。   当使用了-t 选项而没有标明语句终结符,则分号(;)会默认为语句的终结符。有时可能会出现使用另外的终结符的情况,例如用 SQL PL 编写的的脚本使用其它的符号而不是默认的分号,因为分号在 SQL PL 是用于定义数据库对象过程中的语句结束。

mysql

发表于 2020-04-23 更新于 2020-06-30 分类于 db

设定字段为一个枚举

1
2
3
create table test (
sex enum ("男","女")
)

表字段可以设置默认值,当未插入数据时用默认值

1
2
3
4
5
6
7
CREATE TABLE tb_emp1(
id int(11) AUTO_INCREMENT,
name VARCHAR(25),
deptId INT(11) DEFAULT 1234,
salary FLOAT,
PRIMARY KEY (id)
);

mysql 如何得到一条记录在所有记录的第几行

1
2
3
4
#mysql本身是没有行号的。要想得到查询语句返回的列中包含一列表示该行记录在整个结果集中的行号可以通过自定义set一个变量,然后每条记录+1的方式,返回这个变量的值。

SET @t = 0;
SELECT * FROM (SELECT (@t:=@t+1) as id,s FROM t1) AS A WHERE a.id=2 OR a.id=5;

从 dump 文件恢复数据

1
mysqldump -uroot -pPassword [database name] > [dump file]

更改编码

1
2
status;#查看编码
alter database db_name CHARACTER SET utf8;

==数据库直接操作时养成习惯不管干啥都先敲个 begin; 确认没问题了再 commit;==

查看数据库信息

1
2
show variables;
show variables like 'character%';

java类加载机制

发表于 2020-04-23 更新于 2020-06-30 分类于 java

Java 类加载器

每个 Java 文件都存储着需要执行的程序逻辑,这些 java 文件经过 Java 编译器编译成 class 文件,class 文件中保存着 JVM 虚拟机指令,当需要某个类时,虚拟机将会加载它的 class 文件,并创建对应的 class 对象,将 class 文件加载到虚拟机的内存,这个过程称为类加载。这里我们需要了解一下类加载的过程,如下: java类加载机制_2020-04-23-10-53-16.png

  1. 加载:类加载过程的一个阶段:通过一个类的全限定名查找此类字节文件,并利用字节码文件创建一个 Class 对象

  2. 验证:目的在于确保 Class 文件的字节流中包含信息符合当前虚拟机要求,不会危害虚拟机自身安全。主要包括四种验证,文件格式验证、元数据验证、字节码验证、符号引用验证。

  3. 准备:为类变量(即 static 修饰的字段变量)分配内存并且设置该类变量的初始值(如 static int i = 5;这里只讲 i 初始化为 0,至于 5 的值将在初始化时赋值),这里不包含使用 final 修饰的 static,因为 final 在编译的时候就会分配了,注意这里不会为视力变量分配初始化值,类变量会分配在方法区中,而实例变量是会随着对象一起分配到 Java 堆中。

  4. 解析:主要讲常量池中的符号引用替换为直接引用的过程。符号引用就是一组符号来描述目标,可以是任何字面量,而直接引用就是直接指向目标的指针、相对便移量或者一个间接定位到目标的句柄。有类或者接口的解析,字段解析,类方法解析,接口方法解析(这里设计到字节码变量的引用,如需详细了解,可参考《深入 Java 虚拟机》)

  5. 初始化:类加载最后阶段,若该类具有超类,则对其进行初始化,执行静态初始化器和静态初始化成员变量(如前面只初始化了默认值的 static 变量将会在这个阶段赋值,成员变量也将被初始化)

这便是类加载的 5 个过程,而类加载的任务是根据一个类的全限定名来读取此类的二进制字节流到 JVM 中,然后转换为一个与目标类对应的 java.lang.Class 对象实例,在虚拟机中提供了 3 种类加载器,启动类加载器(Bootstrap)、扩展类加载器(Extension)、系统类加载器(System 也称应用类加载器)

通过一段示例代码,我们可以看出来 java 初始化的一些过程

1
2
3
4
5
6
7
8
9
10
11
12
13
14
15
16
17
18
19
20
21
22
23
24
25
26
27
28

public class Father {
{
func();
}
public void func(){
try {
String name = (String) Son.class.getField("name").get(this);
System.out.println("name = " + name);
} catch (IllegalAccessException e) {
e.printStackTrace();
} catch (NoSuchFieldException e) {
e.printStackTrace();
}
}

}


public class Son extends Father{

public String name = "son";

public static void main(String[] args) {
Son son = new Son();
son.func();
}
}

其执行结果如下

name = null name = son

我们通过分析Son的字节码中关于构造器的片段

1
2
3
4
5
6
7
8
9
10
11
12
13
14
15
16
17
public com.leaderli.algrohtms.Son();
descriptor: ()V
flags: ACC_PUBLIC
Code:
stack=2, locals=1, args_size=1
0: aload_0
1: invokespecial #1 // Method com/leaderli/algrohtms/Father."<init>":()V
4: aload_0
5: ldc #2 // String son
7: putfield #3 // Field name:Ljava/lang/String;
10: return
LineNumberTable:
line 3: 0
line 5: 4
LocalVariableTable:
Start Length Slot Name Signature
0 11 0 this Lcom/leaderli/algrohtms/Son;

Son类我们没有显示的写构造器,但是 java 会给我生成一个默认的构造器。我们可以得出,Son的构造器一开始就会调用Father的构造器方法,而此时成员变量name还没有完成初始化过程,因此在Father类中name的值为零值,即null。在父类构造器完成后,则会开始对成员变量的值进行赋值。

启动类加载器(Bootstrap)

启动类加载器主要加载的是 JVM 自身需要的类,这个类加载使用 C++语言实现的,是虚拟机自身的一部分,它负责讲<JAVA_HOME>/lib路径下的核心类库或-Xbootclasspath参数指定的路径下的 jar 包加载到内存中,注意由于虚拟机是按照文件名识别加载 jar 包的,如 rt.jar,如果文件名不被虚拟机识别,即使把 jar 包丢到 lib 目录下也是没有作用的。(出于安全考虑,Bootstrap 启动类加载器只加载包名为 java,javax,sun 等开头的类)

扩展类加载器(Extension)

扩展类加载器是指 Sun 公司实现的sun.misc.Launcher$ExtClassLoader类,由 Java 语言实现的,是 Launcher 的静态内部类,它负责加载<JAVA_HOME>/lib/ext目录下或者由系统变量-Djava.ext.dir指定路径中的类库,开发者可以直接使用标准扩展类加载器。

1
2
3
4
5
6
7
8
9
10
11
12
13
14
15
16
17
18
//ExtClassLoader类中获取路径的代码
private static File[] getExtDirs() {
//加载<JAVA_HOME>/lib/ext目录中的类库
String s = System.getProperty("java.ext.dirs");
File[] dirs;
if (s != null) {
StringTokenizer st =
new StringTokenizer(s, File.pathSeparator);
int count = st.countTokens();
dirs = new File[count];
for (int i = 0; i < count; i++) {
dirs[i] = new File(st.nextToken());
}
} else {
dirs = new File[0];
}
return dirs;
}

###系统(System)类加载器

也称应用程序加载器是指 Sun 公司实现的sun.misc.Launcher$AppClassLoader。它负责加载系统类路径java -classpath或-D java.class.path指定路径下的类库,也就是我们经常用到的 cclasspath 路径,开发者可以直接使用系统类加载器,一般情况下该该类加载是程序中默认的类加载器,通过ClassLoader#getSystemClassLoader()方法可以获取到该类加载器。

在 Java 的日常应用程序开发中,类的加载几乎是由上述 3 种类加载器相互配合执行的,在必要时,我们还可以自定义类加载器,需要注意的是,Java 虚拟机对 class 文件采用的是按需加载的方式,也就是说当需要使用该类时才会将它的 class 文件加载到内存生成 class 对象,而且加载某个类的 class 文件时,Java 虚拟机采用的是双亲委派模式即把请求交由父类处理,它是一种任务委派模式,下面我们进一步了解它。

理解双亲委派模式

双亲委派模式工作原理

双亲委派模式要求除了顶层的启动类加载器外,其余的类加载器都应当由自己的父类加载器,请注意双亲委派模式中的父子关系并非通常所说的类继承关系,而是采用组合关系来复用父类加载器的相关代码,类加载器的关系如下: java类加载机制_2020-04-23-10-52-52.png

双亲委派模式是在 Java 1.2 后引入的,其工作原理是,如果一个类加载器收到了类加载请求,它并不会自己先去加载,而是把这个请求委托给父类的加载器去执行,如果父类加载器还存在其父类加载器,则进一步向上委托,依次递归,请求最终将到达顶层的启动类加载器,如果父类加载器可以完成类加载任务,就成功返回,倘若父类加载器无法完成加载任务,子加载器才会尝试自己去加载,这就是双亲委派模式。

双亲委派模式优势

采用双亲委派模式的优势是 Java 类随着它的类加载器一起具备了一种带有优先级的层次关系,通过这种层级关系,可以避免类的重复加载,当父类已经加载了该类时,就没有必要子类加载器再加载一次。其次是考虑到安全因素,Java 核心 api 在定义类型时不会被随意替换,假设通过网络传递一个名为java.lang.Integer的类,通过双亲委派模式传递到启动类加载器,而启动类加载器载核心 Java API 发现这个名字的类,发现该类已被加载,就不会重新加载网络传递过来的java.lang.Integer,而直接返回已加载过的Integer.class,这样便可以防止核心 API 被随意篡改。

下面我们从代码层面了解几个 Java 中定义的类加载器及其双亲委派模式的实现,他们的类图关系如下 java类加载机制_2020-04-23-10-54-17.png

从图可以看出顶层的类加载器时 ClassLoader 类,它是一个抽象类,其后所有的类加载器都继承自 ClassLoader(不包括启动类加载器),这里我们主要介绍 ClassLoader 中几个比较重要的方法。

  • loadClass(String)

    该方法加载指定名称(包括包名)的二进制类型,该方法载 JDK 1.2 之后不再建议用户重写但用户可以直接调用该方法,loadClass()方法是ClassLoader类自己实现的,该方法中的逻辑就是双亲委派模式的实现,其源码如下,loadClass(String name, boolean resolve)是一个重载方法,resolve 参数代表是否生存 class 对象的同时解析相关操作。

    1
    2
    3
    4
    5
    6
    7
    8
    9
    10
    11
    12
    13
    14
    15
    16
    17
    18
    19
    20
    21
    22
    23
    24
    25
    26
    27
    28
    29
    30
    protected Class<?> loadClass(String name, boolean resolve) throws ClassNotFoundException{
    synchronized (getClassLoadingLock(name)){
    //先从缓存查找该class对象,找到就不用重新加载
    Class<?> c = findLoadedClass(name);
    if(c == null){
    long t0 = System.nanoTime();
    try{
    if(parent !=null){
    //如果找不到,则委托给父类加载器加载
    c = parent.loadClass(name,false);
    }else{
    //如果没有父类,则委托给启动加载器去加载
    c = findBootstrapClassOrNull(name);
    }catch(ClassNotFoundException e){
    ...
    }

    if(c == null){
    //如果没有找到,则通过自定义实现的findClass去查找并加载
    c = findClass(name);
    }
    }

    if(resolve){//是否需要载加载时进行解析
    resolveClass(c);
    }
    return c;
    }
    }
    }

    正如 loadClass方法所展示的,当类加载请求到来时,先从缓存中查找该类对象,如果存在直接返回,如果不存在则交给该类加载器的父类加载器,若没有父类加载器则交给顶层启动类加载器去加载,若最后没有找到,则使用findClass()方法去加载。从loadClass实现也可以知道如果不想重新定义加载类的规则,也没有复杂的逻辑,只想在运行时加载自定指定的类,那么我们可以直接使用this.getClass().getClassLoder.loadClass("className"),这样就可以调用ClassLoader的 loadClass 方法获取到 class 对象。

  • findCLass(String)

    载 JDK1.2 之前,在自定义类加载时,总会去继承 ClassLoader 类并重写 loadClass 方法,从而实现自定义的类加载器,但是在 JDK1.2 之后已不再建议用户去覆盖loadCLass()方法,而是建议把自定义的类加载逻辑写在findClass()方法中,从前面的分析可知,findClass()方法是loadClass()方法中被调用的,当loadClass()方法中父类加载器加载失败后,则会调用自己的findClass()方法来完成类加载,这样就可以保证自定义的类加载器也符合双亲委派模式。需要注意的是ClassLoader类中并没有实现findClass()方法的具体逻辑,取而代之的是抛出ClassNotFoundException一场,同时应该知道的是`findClass方法通常是和defineClass方法一起使用的,ClassLoader类中findCLass方法源码如下

    1
    2
    3
    4
    //直接抛出异常
    protected Class<?> findClass(String name) throws ClassNotFoundException {
    throw new ClassNotFoundException(name);
    }
  • defineClass(byte[] b, int off ,int len)

    defineClass()方法是用来将 byte 字节流解析成 JVM 能够识别的 Class 对象(CLassLoader中已实现该方法逻辑),通过这个 方法不仅能够通过 class 文件实例化 class 对象,也可以通过其他方法实例化 class 对象,如果通过网络接受一个类的字节码,然后转换为 byte 字节流创建对应的 Class 对象,defineClass()方法通常与findClass()方法一起使用,一般情况下,在自定义类加载器时,会直接覆盖ClassLoader的findClass()方法并编写加载规则,取得要加载类的字节码后转化为流,然后调用defineClass()方法生成类的 Class 对象,简单例子如下:

    1
    2
    3
    4
    5
    6
    7
    8
    9
    10
    protected Class<?> findClass(String name) throws ClassNotFoundException {
    // 获取类的字节数组
    byte[] classData = getClassData(name);
    if (classData == null) {
    throw new ClassNotFoundException();
    } else {
    //使用defineClass生成class对象
    return defineClass(name, classData, 0, classData.length);
    }
    }

    需要注意的是,如果直接调用defineClass()方法生成类的 Class 对象,这个类的 Class 对象并没有解析(也可以理解为链接阶段,毕竟解析是链接的最后一步),其解析操作需要等待初始化阶段进行。

  • resolveClass(Class<?> c)

    使用该方法可以使类的 Class 对象创建完成也同时被解析。前面我们说的链接阶段主要是对字节码进行验证,为类变量分配内存并设置初始值同时将字节码文件中的符号引用转换为直接引用。

    上述 4 个方法是ClassLoader类中的比较重要的方法,也是我们可能会经常用到的方法。接着看SercureClassLoader扩展了ClassLoader,新增了几个与使用相关的代码源(对代码源的位置及证书的验证)和权限定义类验证(主要是指对 class 源码的访问权限)的方法,一般我们不会直接跟这个类打交道,更多是与它的子类URLClassLoader有所关联,前面说过,ClassLoader是一个抽象类,很多方法是空的没有实现,并新增了URLClassPath类协助取得 Class 字节码流等功能,在编写自定义类加载器时,如果没有太过于复杂的需求,可以直接集成URLClassLoader类,这样就可以避免自己去编写findClass()方法及获取字节码流的方式,使自定义类加载器编写更加简洁,下面是URLClassLoader的类图 java类加载机制_2020-04-23-10-54-38.png

java字节码

发表于 2020-04-23 更新于 2020-12-02 分类于 java

基础概念

JVM是一个基于栈的架构,每一个线程都有一个用来存储帧集(frames)的JVM 栈,每次方法被调用的时候(包含main方法),在栈上会分配一个新的帧。这个帧包含局部变量数组,操作数栈,常量池指针,程序计数器,动态链接,返回地址。 从概念来说,帧的情况如下图所示 java字节码_2020-04-25-12-51-54.png java字节码_2020-04-23-10-46-50.png

变量

局部变量

局部变量的数组也称为局部变量表,包括方法的参数,它也可以用来存储局部变量的值。首先存放的参数,从地址 0 开始编码。如果帧是一个构造器或者实例方法,this引用讲存储在地址 0 中,地址 1 存放第一个参数,地址 2 存放第二个参数,依次类推。如果帧是一个静态方法,第一个方法参数会存在地址 0 中,地址 1 存放第二个参数,依次类推。

局部变量数组的大小是在编译期决定的,它取决于局部变量和正常方法参数的数量和大小。操作栈是一个用于push 和pop 值的后进先出的栈,它的大小也是在编译器决定的。一些操作码指令将值push 到操作栈,其它的操作码从栈上获取操作数,操作它们,并将值push 回去。操作栈常用来接收方法的返回值。

局部变量可以是以下几种类型:

char long short int double float 引用 返回地址

除了long和double类型,每个变量都只占用局部变量区中的一个变量槽(slot),而long和 double只所以会占用两个变量槽(slot),因为long和double是 64 位的。

当一个新的变量创建时,操作数栈(Operand stack)会存储这个新变量的值。然后这个变量会被存储到局部变量表中对应的位置上。如果这个变量不是基础类型的话,局部变量槽存的就是一个引用,这个引用指向堆中的一个对象。

比如

1
int i = 5;

编译后就变成了

1
2
0: bipush      5 //用来将一个字节作为整型数字压入操作数栈中,在这里5就会被压入操作数栈上。
2: istore_0 //这是istore_这组指令集(译注:严格来说,这个应该叫做操作码,opcode ,指令是指操作码加上对应的操作数,oprand。不过操作码一般作为指令的助记符,这里统称为指令)中的一条,这组指令是将一个整型数字存储到局部变量中。n代表的是局部变量区中的位置,并且只能是0,1,2,3。再多的话只能用另一条指令istore了,这条指令会接受一个操作数,对应的是局部变量区中的位置信息。

这条指令执行的时候,内存布局是这样的: java字节码_2020-04-23-10-47-55.png

每个方法都包含一个局部变量表,如果这段代码在一个方法里面的话,你会在方法的局部变量表中发现如下信息 java字节码_2020-04-23-10-48-09.png

类字段

java 类里面的字段作为类对象实例的一部分,存储在堆里(类变量存储在对应类对象里)。关于字段的信息会添加到类的field_info 数组里,像下面这样

java字节码_2020-04-23-10-48-26.png

另外如果变量被初始化了,那么初始化的字节码会添加到构造方法里。 下面这段代码编译之后:

1
2
3
public class SimpleClass {
public int simpleField = 100;
}

如果你用 javap 进行反编译,这个被添加到了 field_info 数组里的字段就会多了一段描述:

1
2
3
public int simpleField;
Signature: I
flags: ACC_PUBLIC

初始化变量的字节码会被加到构造方法里,像下面这样:

1
2
3
4
5
6
7
8
9
10
11
public SimpleClass();
Signature: ()V
flags: ACC_PUBLIC
Code:
stack=2, locals=1, args_size=1
0: aload_0
1: invokespecial #1 // Method java/lang/Object."<init>":()V
4: aload_0
5: bipush 100
7: putfield #2 // Field simpleField:I
10: return

上述代码执行的时候内存里面是这样的: java字节码_2020-04-23-10-48-45.png

这里的 putfield 指令的操作数引用的常量池里的第二个位置,JVM 会为每个类型维护一个常量池,运行时的数据结构有点类似一个符号表,尽管它包含的信息更多。java 的字节码操作需要对应的数据,但是这些数据太大了,存储在字节码里不合适,它们都被存储在常量池里,而字节码包含一个常量池的引用,当类文件生成的时候,其中一块就是常量池

1
2
3
4
5
6
7
8
9
10
11
12
13
14
15
16
17
18
19
20
Constant pool:
#1 = Methodref #4.#16 // java/lang/Object."<init>":()V
#2 = Fieldref #3.#17 // SimpleClass.simpleField:I
#3 = Class #13 // SimpleClass
#4 = Class #19 // java/lang/Object
#5 = Utf8 simpleField
#6 = Utf8 I
#7 = Utf8 <init>
#8 = Utf8 ()V
#9 = Utf8 Code
#10 = Utf8 LineNumberTable
#11 = Utf8 LocalVariableTable
#12 = Utf8 this
#13 = Utf8 SimpleClass
#14 = Utf8 SourceFile
#15 = Utf8 SimpleClass.java
#16 = NameAndType #7:#8 // "<init>":()V
#17 = NameAndType #5:#6 // simpleField:I
#18 = Utf8 LSimpleClass;
#19 = Utf8 java/lang/Object

常量字段(类常量)

带有final标记的常量字段在class文件里会被标记成ACC_FINAL.

1
2
3
public class SimpleClass {
public int simpleField = 100;
}

字段的描述信息会标记成ACC_FINAL:

1
2
3
4
public static final int simpleField = 100;
Signature: I
flags: ACC_PUBLIC, ACC_FINAL
ConstantValue: int 100

对应的初始化代码并不变:

1
2
3
4: aload_0
5: bipush 100
7: putfield #2 // Field simpleField:I

静态变量

带有static修饰符的静态变量则会被标记成ACC_STATIC:

1
2
3
public static int simpleField;
Signature: I
flags: ACC_PUBLIC, ACC_STATIC

不过在实例的构造方法中却再也找不到对应的初始化代码了。因为static变量会在类的构造方法中进行初始化,并且它用的是putstatic指令而不是putfiled。

1
2
3
4
5
6
7
8
static {};
Signature: ()V
flags: ACC_STATIC
Code:
stack=1, locals=0, args_size=0
0: bipush 100
2: putstatic #2 // Field simpleField:I
5: return

动态链接

每个栈帧都包含一个指向运行时常量池中该栈帧所属方法的引用,持有该引用是为了支持方法调用过程中的动态连接。

动态分派在 Java 中被大量使用,使用频率及其高,如果在每次动态分派的过程中都要重新在类的方法元数据中搜索合适的目标的话就可能影响到执行效率,因此 JVM 在类的方法区中建立虚方法表(virtual method table)来提高性能。每个类中都有一个虚方法表,表中存放着各个方法的实际入口。如果某个方法在子类中没有被重写,那子类的虚方法表中该方法的地址入口和父类该方法的地址入口一样,即子类的方法入口指向父类的方法入口。如果子类重写父类的方法,那么子类的虚方法表中该方法的实际入口将会被替换为指向子类实现版本的入口地址。
那么虚方法表什么时候被创建?虚方法表会在类加载的连接阶段被创建并开始初始化,类的变量初始值准备完成之后,JVM 会把该类的方法表也初始化完毕。

程序计数器

决定当前执行的指令

示例

对于一个简单的类我们分析一下其字节码

1
2
3
4
5
6
7
public class Test {
private String employeeName;

public String employeeName(){
return this.employeeName;
}
}

查看其字节码

1
2
3
4
5
6
7
8
9
10
11
12
13
14
15
16
17
18
19
20
21
22
23
24
25
26
27
28
29
30
31
32
33
34
35
36
37
38
39
40
41
42
43
44
45
46
47
48
49
50
51
52
53
54
55
Classfile /Users/li/Downloads/Test.class
Last modified Mar 15, 2018; size 309 bytes
MD5 checksum 4553b41dee731dd099687198deb75de7
Compiled from "Test.java"
public class Test
minor version: 0
major version: 52
flags: ACC_PUBLIC, ACC_SUPER
Constant pool:
#1 = Methodref #4.#15 // java/lang/Object."<init>":()V
#2 = Fieldref #3.#16 // Test.name:Ljava/lang/String;
#3 = Class #17 // Test
#4 = Class #18 // java/lang/Object
#5 = Utf8 name
#6 = Utf8 Ljava/lang/String;
#7 = Utf8 <init>
#8 = Utf8 ()V
#9 = Utf8 Code
#10 = Utf8 LineNumberTable
#11 = Utf8 employeeName
#12 = Utf8 ()Ljava/lang/String;
#13 = Utf8 SourceFile
#14 = Utf8 Test.java
#15 = NameAndType #7:#8 // "<init>":()V
#16 = NameAndType #5:#6 // name:Ljava/lang/String;
#17 = Utf8 Test
#18 = Utf8 java/lang/Object
{
java.lang.String name;
descriptor: Ljava/lang/String;
flags:

public Test();
descriptor: ()V
flags: ACC_PUBLIC
Code:
stack=1, locals=1, args_size=1
0: aload_0
1: invokespecial #1 // Method java/lang/Object."<init>":()V
4: return
LineNumberTable:
line 1: 0

public java.lang.String employeeName();
descriptor: ()Ljava/lang/String;
flags: ACC_PUBLIC
Code:
stack=1, locals=1, args_size=1
0: aload_0
1: getfield #2 // Field name:Ljava/lang/String;
4: areturn
LineNumberTable:
line 4: 0
}
SourceFile: "Test.java"

这个方法(line 44)的字节码有三个操作码组成。

  1. 第一个操作码 aload_0,用于将局部变量表中索引为 0 的变量的值推送到操作栈上。前面提到过,局部变量表可以用来为方法传递参数的,构造器和实例方法的 this 引用总是存放在局部变量表的地址 0 处,this 引用必须入栈,因为方法需要访问实例的数据,名称和类。
  2. 第二个操作码 getfield,用于从对象中提取字段。当该操作码执行的时候,操作栈顶的值就会弹出(pop),然后#2 就用来在类运行时常量池中构建一个用于存放字段 name 引用地址的索引,当这个引用被提取时,它会被推送到操作栈上。
  3. 第三个操作码 areturn,返回一个来自方法的引用。比较特殊的是,areturn 的执行会导致操作栈顶的值,name 字段的 引用都会被弹出,然后推送到调用方法的操作栈。

employeeName 的方法相当简单,在考虑一个更复杂的例子之前,我们需要检查每一个操作码左边的值。在 employeeName 的方法的字节码中,这些值是 0,1,4。每个方法都有一个对应的字节码数组。这些值对应每个操作码和它们在参数数组的索引,一些操作码含有参数,这些参数会占据字节数组的空间。aload_0 没有参数,自然而然就占据一个字节,因此,下一个操作码 getfield,就在位置 1 上,然而 areturn 在位置 4 上,因为 getfield 操作码和他的参数占据了位置 1,2,3。位置 1 被操作码 getfield 使用,位置 2,3 被用于存放参数,这些参数用于构成在类运行时常量池中存放值的地方的一个索引。下面的图,展示了 employeeName 的方法的字节码数数组看起来的样子 java字节码_2020-04-23-10-50-00.png 
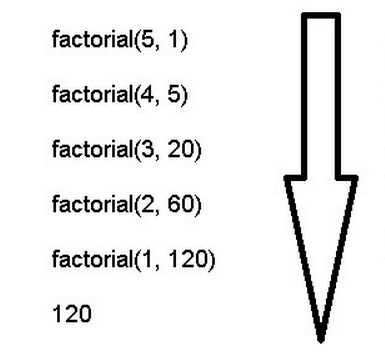
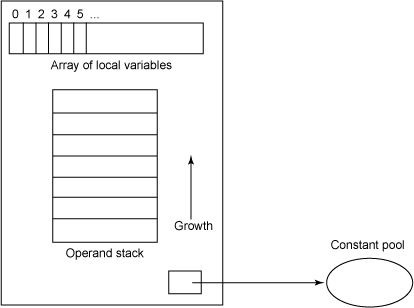
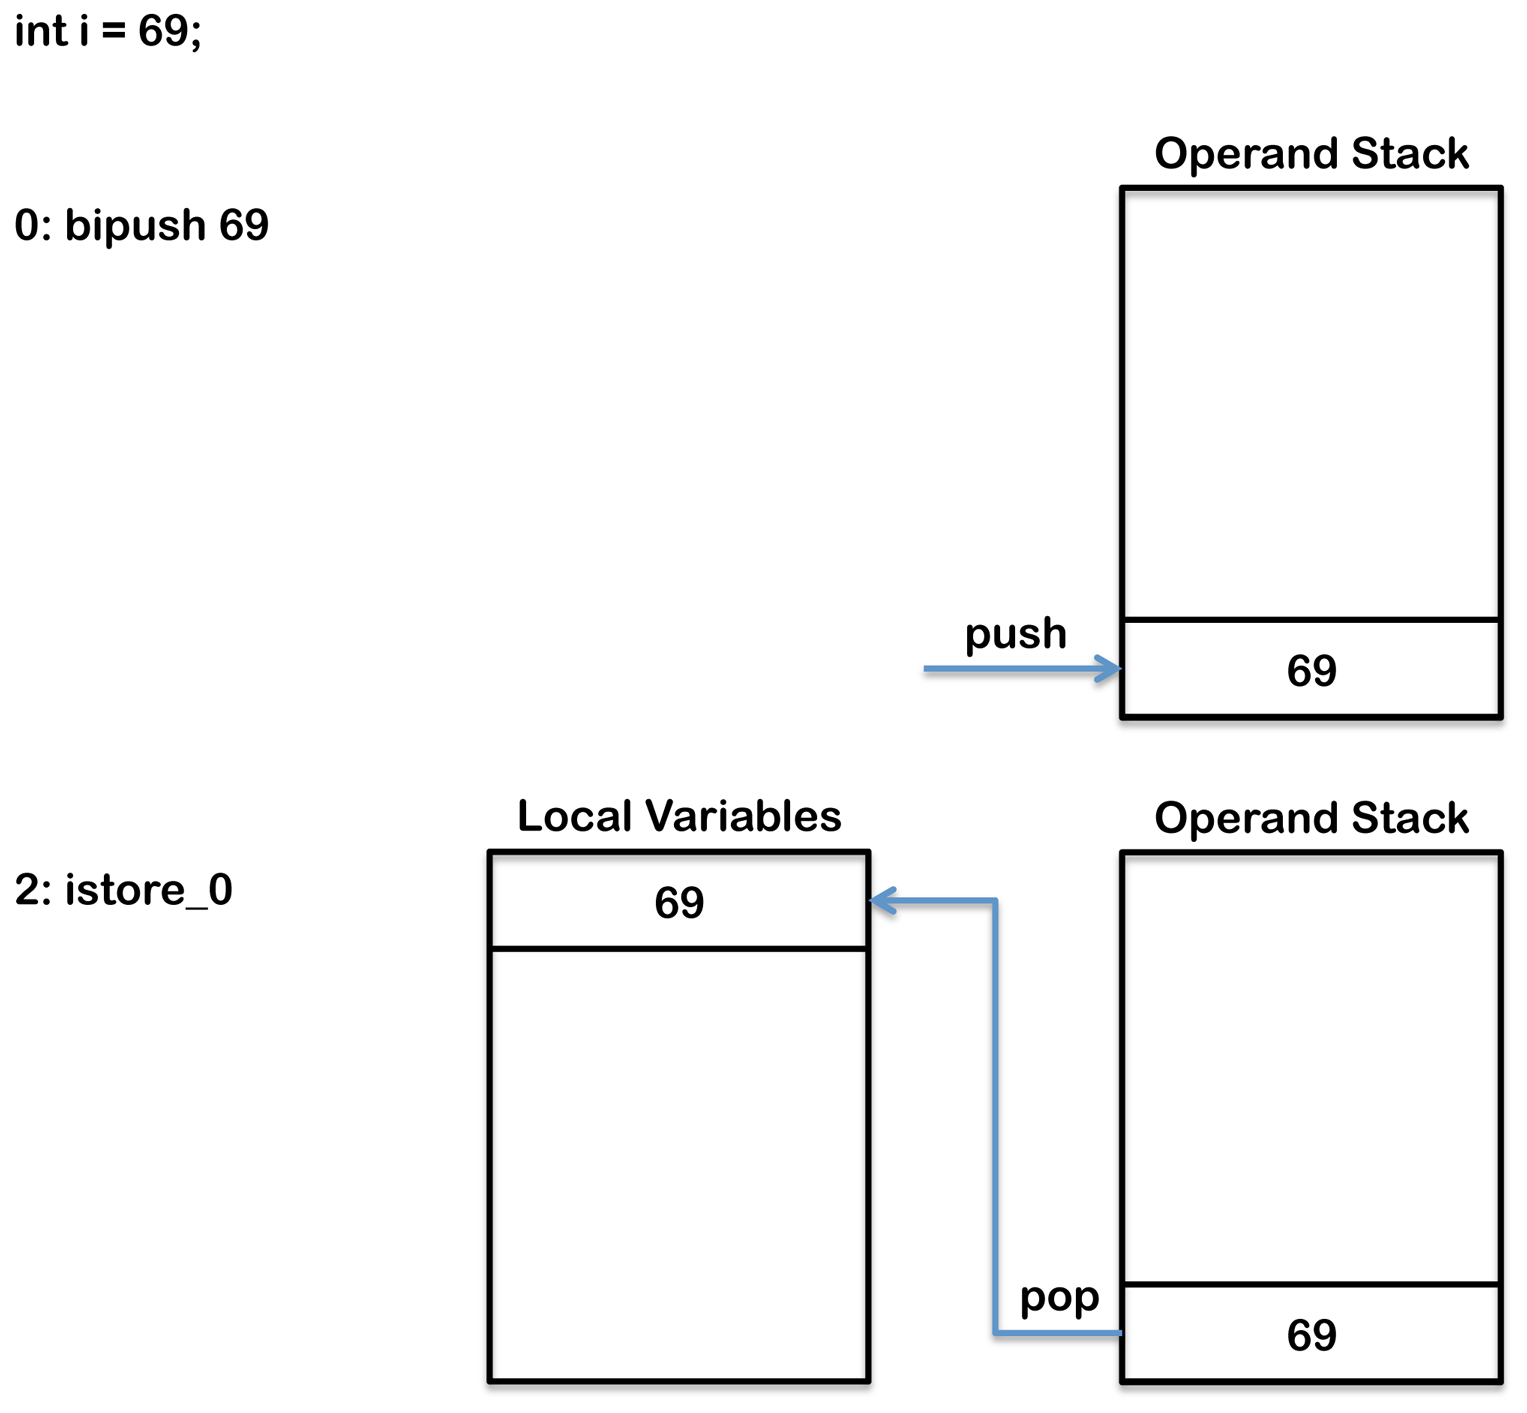
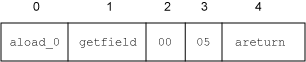
实际上,字节码数组包含代表指令的字节。使用一个 16 进制的编辑器查看 class 文件,可能看到字节码数组中有下面的值 java字节码_2020-04-23-10-50-44.png

通过字节码分析synchronized方法和synchronized代码块的区别

1
2
3
4
5
6
7
8
9
10
public synchronized int top1()
{
return intArr[0];
}
public int top2()
{
synchronized (this) {
return intArr[0];
}
}
1
2
3
4
5
6
7
8
9
10
11
12
13
14
15
16
17
18
19
20
21
22
23
24
25
26
27
28
29
30
31
32
33
34
35
36
37
38
39
40
41
42
43
44
45
46
47
48
49
Method int top1()
0 aload_0 //将局部变量表中索引为0的对象引用this入栈。

1 getfield #6 <Field int intArr[]>
//弹出对象引用this,将访问常量池的intArr对象引用入栈。

4 iconst_0 //将0入栈。
5 iaload //弹出栈顶的两个值,将intArr中索引为0的值入栈。

6 ireturn //弹出栈顶的值,将其压入调用方法的操作栈,并退出。


Method int top2()
0 aload_0 //将局部变量表中索引为0的对象引用this入栈。
1 astore_2 //弹出this引用,存放到局部变量表中索引为2的地方。
2 aload_2 //将this引用入栈。
3 monitorenter //弹出this引用,获取对象的监视器。

4 aload_0 //开始进入同步块。将this引用压入局部变量表索引为0的地方。

5 getfield #6 <Field int intArr[]>
//弹出this引用,压入访问常量池的intArr引用。

8 iconst_0 //压入0。
9 iaload //弹出顶部的两个值,压入intArr索引为0的值。

10 istore_1 //弹出值,将它存放到局部变量表索引为1的地方。

11 jsr 19 //压入下一个操作码(14)的地址,并跳转到位置19。
14 iload_1 //压入局部变量表中索引为1的值。

15 ireturn //弹出顶部的值,并将其压入到调用方法的操作栈中,退出。

16 aload_2 //同步块结束。将this引用压入到局部变量表索引为2的地方。

17 monitorexit //弹出this引用,退出监视器。

18 athrow //弹出this引用,抛出异常。

19 astore_3 //弹出返回地址(14),并将其存放到局部变量表索引为3的地方。

20 aload_2 //将this引用压入到局部变量索引为2的地方。

21 monitorexit //弹出this引用,并退出监视器。

22 ret 3 //从局部变量表索引为3的值(14)指示的地方返回。
Exception table: //如果在位置4(包括4)和位置16(排除16)中出现异常,则跳转到位置16.
from to target type
4 16 16 any

top2 比 top1 大,执行还慢,是因为 top2 采取的同步和异常处理方式。注意到 top1 采用 synchronized 方法修饰符,这不会产生额外的字节码。相反 top2 在方法体内使用 synchronized 同步代码块,会产生 monitorenter 和 monitorexit 操作码的字节码,还有额外的用于处理异常的字节码。如果执行到一个同步锁的块(一个监视器)内部时,抛出了一个异常,这个锁要保证在退出同步代码块前被释放。top1 的实现要比 top2 的效率高一些,这能获取一丁点的性能提升。

当 synchronized 方法修饰符出现的时候,锁的获取和释放不是通过 monitorenter 和 monitorexit 操作码来实现的,而是在 JVM 调用一个方法时,它检查 ACC_SYNCHRONIZED 属性的标识。如果有这个标识,正在执行的线程将会先获取一个锁,调用方法然后在方法返回时释放锁。如果同步方法抛出异常,在异常离开方法前会自动释放锁。

常用字节码指令集

Note that any referenced "value" refers to a 32-bit int as per the Java instruction set.

Mnemonic Opcode (in hex) Opcode (in binary) Other bytes [count]: [operand labels] Stack [before]→[after] Description
(no name) cb-fd these values are currently unassigned for opcodes and are reserved for future use
aaload 32 0011 0010 arrayref, index → value load onto the stack a reference from an array
aastore 53 0101 0011 arrayref, index, value → store into a reference in an array
aconst_null 01 0000 0001 → null push a null reference onto the stack
aload 19 0001 1001 1: index → objectref load a reference onto the stack from a local variable #index
aload_0 2a 0010 1010 → objectref load a reference onto the stack from local variable 0
aload_1 2b 0010 1011 → objectref load a reference onto the stack from local variable 1
aload_2 2c 0010 1100 → objectref load a reference onto the stack from local variable 2
aload_3 2d 0010 1101 → objectref load a reference onto the stack from local variable 3
anewarray bd 1011 1101 2: indexbyte1, indexbyte2 count → arrayref create a new array of references of length count and component type identified by the class reference index (indexbyte1 << 8 + indexbyte2) in the constant pool
areturn b0 1011 0000 objectref → [empty] return a reference from a method
arraylength be 1011 1110 arrayref → length get the length of an array
astore 3a 0011 1010 1: index objectref → store a reference into a local variable #index
astore_0 4b 0100 1011 objectref → store a reference into local variable 0
astore_1 4c 0100 1100 objectref → store a reference into local variable 1
astore_2 4d 0100 1101 objectref → store a reference into local variable 2
astore_3 4e 0100 1110 objectref → store a reference into local variable 3
athrow bf 1011 1111 objectref → [empty], objectref throws an error or exception (notice that the rest of the stack is cleared, leaving only a reference to the Throwable)
baload 33 0011 0011 arrayref, index → value load a byte or Boolean value from an array
bastore 54 0101 0100 arrayref, index, value → store a byte or Boolean value into an array
bipush 10 0001 0000 1: byte → value push a byte onto the stack as an integer value
breakpoint ca 1100 1010 reserved for breakpoints in Java debuggers; should not appear in any class file
caload 34 0011 0100 arrayref, index → value load a char from an array
castore 55 0101 0101 arrayref, index, value → store a char into an array
checkcast c0 1100 0000 2: indexbyte1, indexbyte2 objectref → objectref checks whether an objectref is of a certain type, the class reference of which is in the constant pool at index (indexbyte1 << 8 + indexbyte2)
d2f 90 1001 0000 value → result convert a double to a float
d2i 8e 1000 1110 value → result convert a double to an int
d2l 8f 1000 1111 value → result convert a double to a long
dadd 63 0110 0011 value1, value2 → result add two doubles
daload 31 0011 0001 arrayref, index → value load a double from an array
dastore 52 0101 0010 arrayref, index, value → store a double into an array
dcmpg 98 1001 1000 value1, value2 → result compare two doubles
dcmpl 97 1001 0111 value1, value2 → result compare two doubles
dconst_0 0e 0000 1110 → 0.0 push the constant 0.0 (a double) onto the stack
dconst_1 0f 0000 1111 → 1.0 push the constant 1.0 (a double) onto the stack
ddiv 6f 0110 1111 value1, value2 → result divide two doubles
dload 18 0001 1000 1: index → value load a double value from a local variable #index
dload_0 26 0010 0110 → value load a double from local variable 0
dload_1 27 0010 0111 → value load a double from local variable 1
dload_2 28 0010 1000 → value load a double from local variable 2
dload_3 29 0010 1001 → value load a double from local variable 3
dmul 6b 0110 1011 value1, value2 → result multiply two doubles
dneg 77 0111 0111 value → result negate a double
drem 73 0111 0011 value1, value2 → result get the remainder from a division between two doubles
dreturn af 1010 1111 value → [empty] return a double from a method
dstore 39 0011 1001 1: index value → store a double value into a local variable #index
dstore_0 47 0100 0111 value → store a double into local variable 0
dstore_1 48 0100 1000 value → store a double into local variable 1
dstore_2 49 0100 1001 value → store a double into local variable 2
dstore_3 4a 0100 1010 value → store a double into local variable 3
dsub 67 0110 0111 value1, value2 → result subtract a double from another
dup 59 0101 1001 value → value, value duplicate the value on top of the stack
dup2 5c 0101 1100 {value2, value1} → {value2, value1}, {value2, value1} duplicate top two stack words (two values, if value1 is not double nor long; a single value, if value1 is double or long)
dup2_x1 5d 0101 1101 value3, {value2, value1} → {value2, value1}, value3, {value2, value1} duplicate two words and insert beneath third word (see explanation above)
dup2_x2 5e 0101 1110 {value4, value3}, {value2, value1} → {value2, value1}, {value4, value3}, {value2, value1} duplicate two words and insert beneath fourth word
dup_x1 5a 0101 1010 value2, value1 → value1, value2, value1 insert a copy of the top value into the stack two values from the top. value1 and value2 must not be of the type double or long.
dup_x2 5b 0101 1011 value3, value2, value1 → value1, value3, value2, value1 insert a copy of the top value into the stack two (if value2 is double or long it takes up the entry of value3, too) or three values (if value2 is neither double nor long) from the top
f2d 8d 1000 1101 value → result convert a float to a double
f2i 8b 1000 1011 value → result convert a float to an int
f2l 8c 1000 1100 value → result convert a float to a long
fadd 62 0110 0010 value1, value2 → result add two floats
faload 30 0011 0000 arrayref, index → value load a float from an array
fastore 51 0101 0001 arrayref, index, value → store a float in an array
fcmpg 96 1001 0110 value1, value2 → result compare two floats
fcmpl 95 1001 0101 value1, value2 → result compare two floats
fconst_0 0b 0000 1011 → 0.0f push 0.0f on the stack
fconst_1 0c 0000 1100 → 1.0f push 1.0f on the stack
fconst_2 0d 0000 1101 → 2.0f push 2.0f on the stack
fdiv 6e 0110 1110 value1, value2 → result divide two floats
fload 17 0001 0111 1: index → value load a float value from a local variable #index
fload_0 22 0010 0010 → value load a float value from local variable 0
fload_1 23 0010 0011 → value load a float value from local variable 1
fload_2 24 0010 0100 → value load a float value from local variable 2
fload_3 25 0010 0101 → value load a float value from local variable 3
fmul 6a 0110 1010 value1, value2 → result multiply two floats
fneg 76 0111 0110 value → result negate a float
frem 72 0111 0010 value1, value2 → result get the remainder from a division between two floats
freturn ae 1010 1110 value → [empty] return a float
fstore 38 0011 1000 1: index value → store a float value into a local variable #index
fstore_0 43 0100 0011 value → store a float value into local variable 0
fstore_1 44 0100 0100 value → store a float value into local variable 1
fstore_2 45 0100 0101 value → store a float value into local variable 2
fstore_3 46 0100 0110 value → store a float value into local variable 3
fsub 66 0110 0110 value1, value2 → result subtract two floats
getfield b4 1011 0100 2: indexbyte1, indexbyte2 objectref → value get a field value of an object objectref, where the field is identified by field reference in the constant pool index (indexbyte1 << 8 + indexbyte2)
getstatic b2 1011 0010 2: indexbyte1, indexbyte2 → value get a static field value of a class, where the field is identified by field reference in the constant pool index (indexbyte1 << 8 + indexbyte2)
goto a7 1010 0111 2: branchbyte1, branchbyte2 [no change] goes to another instruction at branchoffset (signed short constructed from unsigned bytes branchbyte1 << 8 + branchbyte2)
goto_w c8 1100 1000 4: branchbyte1, branchbyte2, branchbyte3, branchbyte4 [no change] goes to another instruction at branchoffset (signed int constructed from unsigned bytes branchbyte1 << 24 + branchbyte2 << 16 + branchbyte3 << 8 + branchbyte4)
i2b 91 1001 0001 value → result convert an int into a byte
i2c 92 1001 0010 value → result convert an int into a character
i2d 87 1000 0111 value → result convert an int into a double
i2f 86 1000 0110 value → result convert an int into a float
i2l 85 1000 0101 value → result convert an int into a long
i2s 93 1001 0011 value → result convert an int into a short
iadd 60 0110 0000 value1, value2 → result add two ints
iaload 2e 0010 1110 arrayref, index → value load an int from an array
iand 7e 0111 1110 value1, value2 → result perform a bitwise AND on two integers
iastore 4f 0100 1111 arrayref, index, value → store an int into an array
iconst_0 03 0000 0011 → 0 load the int value 0 onto the stack
iconst_1 04 0000 0100 → 1 load the int value 1 onto the stack
iconst_2 05 0000 0101 → 2 load the int value 2 onto the stack
iconst_3 06 0000 0110 → 3 load the int value 3 onto the stack
iconst_4 07 0000 0111 → 4 load the int value 4 onto the stack
iconst_5 08 0000 1000 → 5 load the int value 5 onto the stack
iconst_m1 02 0000 0010 → -1 load the int value −1 onto the stack
idiv 6c 0110 1100 value1, value2 → result divide two integers
if_acmpeq a5 1010 0101 2: branchbyte1, branchbyte2 value1, value2 → if references are equal, branch to instruction at branchoffset (signed short constructed from unsigned bytes branchbyte1 << 8 + branchbyte2)
if_acmpne a6 1010 0110 2: branchbyte1, branchbyte2 value1, value2 → if references are not equal, branch to instruction at branchoffset(signed short constructed from unsigned bytes branchbyte1 << 8 + branchbyte2)
if_icmpeq 9f 1001 1111 2: branchbyte1, branchbyte2 value1, value2 → if ints are equal, branch to instruction at branchoffset (signed short constructed from unsigned bytes branchbyte1 << 8 + branchbyte2)
if_icmpge a2 1010 0010 2: branchbyte1, branchbyte2 value1, value2 → if value1 is greater than or equal to value2, branch to instruction at branchoffset (signed short constructed from unsigned bytes branchbyte1 << 8 + branchbyte2)
if_icmpgt a3 1010 0011 2: branchbyte1, branchbyte2 value1, value2 → if value1 is greater than value2, branch to instruction at branchoffset(signed short constructed from unsigned bytes branchbyte1 << 8 + branchbyte2)
if_icmple a4 1010 0100 2: branchbyte1, branchbyte2 value1, value2 → if value1 is less than or equal to value2, branch to instruction at branchoffset (signed short constructed from unsigned bytes branchbyte1 << 8 + branchbyte2)
if_icmplt a1 1010 0001 2: branchbyte1, branchbyte2 value1, value2 → if value1 is less than value2, branch to instruction at branchoffset(signed short constructed from unsigned bytes branchbyte1 << 8 + branchbyte2)
if_icmpne a0 1010 0000 2: branchbyte1, branchbyte2 value1, value2 → if ints are not equal, branch to instruction at branchoffset (signed short constructed from unsigned bytes branchbyte1 << 8 + branchbyte2)
ifeq 99 1001 1001 2: branchbyte1, branchbyte2 value → if value is 0, branch to instruction at branchoffset (signed short constructed from unsigned bytes branchbyte1 << 8 + branchbyte2)
ifge 9c 1001 1100 2: branchbyte1, branchbyte2 value → if value is greater than or equal to 0, branch to instruction at branchoffset (signed short constructed from unsigned bytes branchbyte1 << 8 + branchbyte2)
ifgt 9d 1001 1101 2: branchbyte1, branchbyte2 value → if value is greater than 0, branch to instruction at branchoffset (signed short constructed from unsigned bytes branchbyte1 << 8 + branchbyte2)
ifle 9e 1001 1110 2: branchbyte1, branchbyte2 value → if value is less than or equal to 0, branch to instruction at branchoffset(signed short constructed from unsigned bytes branchbyte1 << 8 + branchbyte2)
iflt 9b 1001 1011 2: branchbyte1, branchbyte2 value → if value is less than 0, branch to instruction at branchoffset (signed short constructed from unsigned bytes branchbyte1 << 8 + branchbyte2)
ifne 9a 1001 1010 2: branchbyte1, branchbyte2 value → if value is not 0, branch to instruction at branchoffset (signed short constructed from unsigned bytes branchbyte1 << 8 + branchbyte2)
ifnonnull c7 1100 0111 2: branchbyte1, branchbyte2 value → if value is not null, branch to instruction at branchoffset (signed short constructed from unsigned bytes branchbyte1 << 8 + branchbyte2)
ifnull c6 1100 0110 2: branchbyte1, branchbyte2 value → if value is null, branch to instruction at branchoffset (signed short constructed from unsigned bytes branchbyte1 << 8 + branchbyte2)
iinc 84 1000 0100 2: index, const [No change] increment local variable #index by signed byte const
iload 15 0001 0101 1: index → value load an int value from a local variable #index
iload_0 1a 0001 1010 → value load an int value from local variable 0
iload_1 1b 0001 1011 → value load an int value from local variable 1
iload_2 1c 0001 1100 → value load an int value from local variable 2
iload_3 1d 0001 1101 → value load an int value from local variable 3
impdep1 fe 1111 1110 reserved for implementation-dependent operations within debuggers; should not appear in any class file
impdep2 ff 1111 1111 reserved for implementation-dependent operations within debuggers; should not appear in any class file
imul 68 0110 1000 value1, value2 → result multiply two integers
ineg 74 0111 0100 value → result negate int
instanceof c1 1100 0001 2: indexbyte1, indexbyte2 objectref → result determines if an object objectref is of a given type, identified by class reference index in constant pool (indexbyte1 << 8 + indexbyte2)
invokedynamic ba 1011 1010 4: indexbyte1, indexbyte2, 0, 0 [arg1, [arg2 ...]] → result invokes a dynamic method and puts the result on the stack (might be void); the method is identified by method reference index in constant pool (indexbyte1 << 8 + indexbyte2)
invokeinterface b9 1011 1001 4: indexbyte1, indexbyte2, count, 0 objectref, [arg1, arg2, ...] → result invokes an interface method on object objectref and puts the result on the stack (might be void); the interface method is identified by method reference index in constant pool (indexbyte1 << 8 + indexbyte2)
invokespecial b7 1011 0111 2: indexbyte1, indexbyte2 objectref, [arg1, arg2, ...] → result invoke instance method on object objectref and puts the result on the stack (might be void); the method is identified by method reference index in constant pool (indexbyte1 << 8 + indexbyte2)
invokestatic b8 1011 1000 2: indexbyte1, indexbyte2 [arg1, arg2, ...] → result invoke a static method and puts the result on the stack (might be void); the method is identified by method reference index in constant pool (indexbyte1 << 8 + indexbyte2)
invokevirtual b6 1011 0110 2: indexbyte1, indexbyte2 objectref, [arg1, arg2, ...] → result invoke virtual method on object objectref and puts the result on the stack (might be void); the method is identified by method reference index in constant pool (indexbyte1 << 8 + indexbyte2)
ior 80 1000 0000 value1, value2 → result bitwise int OR
irem 70 0111 0000 value1, value2 → result logical int remainder
ireturn ac 1010 1100 value → [empty] return an integer from a method
ishl 78 0111 1000 value1, value2 → result int shift left
ishr 7a 0111 1010 value1, value2 → result int arithmetic shift right
istore 36 0011 0110 1: index value → store int value into variable #index
istore_0 3b 0011 1011 value → store int value into variable 0
istore_1 3c 0011 1100 value → store int value into variable 1
istore_2 3d 0011 1101 value → store int value into variable 2
istore_3 3e 0011 1110 value → store int value into variable 3
isub 64 0110 0100 value1, value2 → result int subtract
iushr 7c 0111 1100 value1, value2 → result int logical shift right
ixor 82 1000 0010 value1, value2 → result int xor
jsr a8 1010 1000 2: branchbyte1, branchbyte2 → address jump to subroutine at branchoffset (signed short constructed from unsigned bytes branchbyte1 << 8 + branchbyte2) and place the return address on the stack
jsr_w c9 1100 1001 4: branchbyte1, branchbyte2, branchbyte3, branchbyte4 → address jump to subroutine at branchoffset (signed int constructed from unsigned bytes branchbyte1 << 24 + branchbyte2 << 16 + branchbyte3 << 8 + branchbyte4) and place the return address on the stack
l2d 8a 1000 1010 value → result convert a long to a double
l2f 89 1000 1001 value → result convert a long to a float
l2i 88 1000 1000 value → result convert a long to a int
ladd 61 0110 0001 value1, value2 → result add two longs
laload 2f 0010 1111 arrayref, index → value load a long from an array
land 7f 0111 1111 value1, value2 → result bitwise AND of two longs
lastore 50 0101 0000 arrayref, index, value → store a long to an array
lcmp 94 1001 0100 value1, value2 → result push 0 if the two longs are the same, 1 if value1 is greater than value2, -1 otherwise
lconst_0 09 0000 1001 → 0L push 0L (the number zero with type long) onto the stack
lconst_1 0a 0000 1010 → 1L push 1L (the number one with type long) onto the stack
ldc 12 0001 0010 1: index → value push a constant #index from a constant pool (String, int, float, Class, java.lang.invoke.MethodType, or java.lang.invoke.MethodHandle) onto the stack
ldc2_w 14 0001 0100 2: indexbyte1, indexbyte2 → value push a constant #index from a constant pool (double or long) onto the stack (wide index is constructed as indexbyte1 << 8 + indexbyte2)
ldc_w 13 0001 0011 2: indexbyte1, indexbyte2 → value push a constant #index from a constant pool (String, int, float, Class, java.lang.invoke.MethodType, or java.lang.invoke.MethodHandle) onto the stack (wide index is constructed as indexbyte1 << 8 + indexbyte2)
ldiv 6d 0110 1101 value1, value2 → result divide two longs
lload 16 0001 0110 1: index → value load a long value from a local variable #index
lload_0 1e 0001 1110 → value load a long value from a local variable 0
lload_1 1f 0001 1111 → value load a long value from a local variable 1
lload_2 20 0010 0000 → value load a long value from a local variable 2
lload_3 21 0010 0001 → value load a long value from a local variable 3
lmul 69 0110 1001 value1, value2 → result multiply two longs
lneg 75 0111 0101 value → result negate a long
lookupswitch ab 1010 1011 8+: <0–3 bytes padding>, defaultbyte1, defaultbyte2, defaultbyte3, defaultbyte4, npairs1, npairs2, npairs3, npairs4, match-offset pairs... key → a target address is looked up from a table using a key and execution continues from the instruction at that address
lor 81 1000 0001 value1, value2 → result bitwise OR of two longs
lrem 71 0111 0001 value1, value2 → result remainder of division of two longs
lreturn ad 1010 1101 value → [empty] return a long value
lshl 79 0111 1001 value1, value2 → result bitwise shift left of a long value1 by int value2 positions
lshr 7b 0111 1011 value1, value2 → result bitwise shift right of a long value1 by int value2 positions
lstore 37 0011 0111 1: index value → store a long value in a local variable #index
lstore_0 3f 0011 1111 value → store a long value in a local variable 0
lstore_1 40 0100 0000 value → store a long value in a local variable 1
lstore_2 41 0100 0001 value → store a long value in a local variable 2
lstore_3 42 0100 0010 value → store a long value in a local variable 3
lsub 65 0110 0101 value1, value2 → result subtract two longs
lushr 7d 0111 1101 value1, value2 → result bitwise shift right of a long value1 by int value2 positions, unsigned
lxor 83 1000 0011 value1, value2 → result bitwise XOR of two longs
monitorenter c2 1100 0010 objectref → enter monitor for object ("grab the lock" – start of synchronized() section)
monitorexit c3 1100 0011 objectref → exit monitor for object ("release the lock" – end of synchronized() section)
multianewarray c5 1100 0101 3: indexbyte1, indexbyte2, dimensions count1, [count2,...] → arrayref create a new array of dimensions dimensions of type identified by class reference in constant pool index (indexbyte1 << 8 + indexbyte2); the sizes of each dimension is identified by count1, [count2, etc.]
new bb 1011 1011 2: indexbyte1, indexbyte2 → objectref create new object of type identified by class reference in constant pool index (indexbyte1 << 8 + indexbyte2)
newarray bc 1011 1100 1: atype count → arrayref create new array with count elements of primitive type identified by atype
nop 00 0000 0000 [No change] perform no operation
pop 57 0101 0111 value → discard the top value on the stack
pop2 58 0101 1000 {value2, value1} → discard the top two values on the stack (or one value, if it is a double or long)
putfield b5 1011 0101 2: indexbyte1, indexbyte2 objectref, value → set field to value in an object objectref, where the field is identified by a field reference index in constant pool (indexbyte1 << 8 + indexbyte2)
putstatic b3 1011 0011 2: indexbyte1, indexbyte2 value → set static field to value in a class, where the field is identified by a field reference index in constant pool (indexbyte1 << 8 + indexbyte2)
ret a9 1010 1001 1: index [No change] continue execution from address taken from a local variable #index(the asymmetry with jsr is intentional)
return b1 1011 0001 → [empty] return void from method
saload 35 0011 0101 arrayref, index → value load short from array
sastore 56 0101 0110 arrayref, index, value → store short to array
sipush 11 0001 0001 2: byte1, byte2 → value push a short onto the stack as an integer value
swap 5f 0101 1111 value2, value1 → value1, value2 swaps two top words on the stack (note that value1 and value2 must not be double or long)
tableswitch aa 1010 1010 16+: [0–3 bytes padding], defaultbyte1, defaultbyte2, defaultbyte3, defaultbyte4, lowbyte1, lowbyte2, lowbyte3, lowbyte4, highbyte1, highbyte2, highbyte3, highbyte4, jump offsets... index → continue execution from an address in the table at offset index
wide c4 1100 0100 3/5: opcode, indexbyte1, indexbyte2 or iinc, indexbyte1, indexbyte2, countbyte1, countbyte2 [same as for corresponding instructions] execute opcode, where opcode is either iload, fload, aload, lload, dload, istore, fstore, astore, lstore, dstore, or ret, but assume the indexis 16 bit; or execute iinc, where the index is 16 bits and the constant to increment by is a signed 16 bit short

描述符

描述符的作用是用来描述字段的数据类型、方法的参数列表(包括数量、类型以及顺序)和返回值。根据描述符规则,基本数据类型(byte、char、double、float、int、long、short、boolean)以及代表无返回值的 void 类型都用一个大写字符来表示,而对象类型则用字符 L 加对象的全限定名来表示,详见下表:

标志符 含义
B 基本数据类型 byte
C 基本数据类型 char
D 基本数据类型 double
F 基本数据类型 float
I 基本数据类型 int
J 基本数据类型 long
S 基本数据类型 short
Z 基本数据类型 boolean
V 基本数据类型 void
L 对象类型,如 Ljava/lang/Object
[* 数组类型,如 [Ljava/lang/Object

大学计算机笔记

发表于 2020-04-18 更新于 2020-06-30 分类于 计算机基础

运算减法(补码反码)

对于十二刻时的时钟来说,它的一个周期为 12 个小时,我们称之为模。9-3即从 9 点向后拨 3 个小时,那么就是 6 点,同时我们也可以向前拨 9 个小时,那么也是 6 点。也就是说减法可以通过与模来变换成加法。对于时钟来说模R = 12,-3与模相差9。那么-3等同于+9。这个可以通过如下公式来证明

a−b=a−b+R=a+(R−b) a-b=a-b+R=a+(R-b) a−b=a−b+R=a+(R−b)

对于一个n位的二进制来说,它的模 R = 2n2^n2n,它的减法可以用以下公式来换算

a−b=a−b+2n=a+(2n−b)=a+(2n−1+1−b)=a+((2n−1)−b)+1 a-b=a-b+2^n=a+(2^n-b)=a+(2^n-1+1-b)=a+((2^n-1)-b)+1 a−b=a−b+2n=a+(2n−b)=a+(2n−1+1−b)=a+((2n−1)−b)+1

2n−12^n-12n−1用二进制表达就是 n 位 1,(2n−1)−b(2^n-1) - b(2n−1)−b其实就是计算-b的补码所以上述表示式最终可以表现为a+b‾+1a+\overline{b}+1a+b+1,这个就是俗称的反码

与非门实现真值表达式

大学计算机笔记_2020-04-18-17-50-17.png 大学计算机笔记_2020-04-18-17-51-41.png

中文ASCII码

html中以&#x开头的特殊字符

spring配置类加载yaml配置项的模拟实现

发表于 2020-03-16 更新于 2020-06-30 分类于 spring

核心思路就是自定义一个注解用以Spring启动过程中,将其手动注入到Spring容器中,并干预该类的实例化过程

1
2
3
4
5
6
@Target({ElementType.TYPE})
@Retention(RetentionPolicy.RUNTIME)
@Documented
public @interface YamlBean {
String value();
}
1
2
3
4
5
6
7
8
9
10
11
12
13
14
15
16
17
18
19
20
21
22
23
24
25
26
27
import org.springframework.beans.factory.support.BeanDefinitionRegistry;
import org.springframework.context.annotation.ClassPathScanningCandidateComponentProvider;
import org.springframework.context.annotation.ImportBeanDefinitionRegistrar;
import org.springframework.core.type.AnnotationMetadata;
import org.springframework.core.type.filter.AnnotationTypeFilter;

import java.util.Objects;

public class YamlBeanRegistrar implements ImportBeanDefinitionRegistrar {
public void registerBeanDefinitions(AnnotationMetadata importingClassMetadata, BeanDefinitionRegistry registry) {
createComponentScanner().findCandidateComponents("com.leaderli.yaml").forEach(beanDefinition -> {
System.out.println("beanDefinition = " + beanDefinition);
beanDefinition.getConstructorArgumentValues().addGenericArgumentValue(Objects.requireNonNull(beanDefinition.getBeanClassName()));
beanDefinition.setBeanClassName(ProxyFactoryBean.class.getName()); //指定该类的生成工厂类
registry.registerBeanDefinition(Objects.requireNonNull(beanDefinition.getBeanClassName()), beanDefinition);
});

}

private ClassPathScanningCandidateComponentProvider createComponentScanner() {
// 扫描YamlBean注解的类
ClassPathScanningCandidateComponentProvider provider
= new ClassPathScanningCandidateComponentProvider(false);
provider.addIncludeFilter(new AnnotationTypeFilter(YamlBean.class));
return provider;
}
}
1
2
3
4
5
6
7
8
9
10
11
12
13
14
15
16
17
18
19
20
21
22
23
24
25
26
27
28
29
30
31
32
33
34
35
36
37
38
39
40
41
42
43
44
45
46
47
48
49

import org.springframework.beans.factory.FactoryBean;
import org.yaml.snakeyaml.Yaml;

import java.io.IOException;
import java.io.InputStream;
import java.util.Map;

public class ProxyFactoryBean<T> implements FactoryBean<T> {
private Class<T> interfaceClass;

public ProxyFactoryBean(Class<T> interfaceClass) {
this.interfaceClass = interfaceClass;
}

public T getObject() throws IOException {
YamlBean annotation = interfaceClass.getAnnotation(YamlBean.class);

InputStream inputStream = ClassLoader.getSystemResourceAsStream("bean.yml");
Yaml yaml = new Yaml();
Map<String,Object> load = yaml.load(inputStream);

String prefix = annotation.value();
System.out.println("prefix = " + prefix);

for (String key : prefix.split("\\.")) {
load= (Map<String, Object>) load.get(key);
System.out.println("load = " + load);

}
yaml = new Yaml();
String dump = yaml.dump(load);
System.out.println("dump = " + dump);

T bean = yaml.loadAs(dump, interfaceClass);
System.out.println("bean = " + bean);
return bean;


}

public Class<?> getObjectType() {
return interfaceClass;
}

public boolean isSingleton() {
return false;
}
}

在Spring的配置类将扫描器导入

1
2
3
4
@Configuration
@Import(YamlBeanRegistrar.class)
public class SpringConfig {
}

gitlab

发表于 2020-01-14 更新于 2020-12-02 分类于 tips

初始密码 qwer1234

api

gitlab 提供了一系列 API 用于访问或操作 gitlab

例如,查询所有项目

1
curl "https://gitlab.example.com/api/v4/projects"

一般情况下,有些 API 可能涉及到权限问题,我们可以在 gitlab 上个人设置界面,新增一个用于 WEP API 的 token,然后我们在进行 api 请求时,可将 token 带上

1
2
3
4
5
6
7

# 通过请求参数
curl "https://gitlab.example.com/api/v4/projects?private_token=<your_access_token>"


# 通过请求头
curl --header "PRIVATE-TOKEN: <your_access_token>" "https://gitlab.example.com/api/v4/projects"

有些请求 API 包含一个 path 参数,它们以:开头,例如

1
DELETE /projects/:id/share/:group_id

:id就是项目创建时的唯一 id :gourp_id就是组创建时的唯一 id

默认情况下,最多返回前 20 条数据

可通过参数per_page(默认 20,最大 100)和page(默认为 1),访问指定位置的数据,我们可以通过指定参数pagination=keyset,这样返回报文的报文头的 link 字段,将会包含一个ref='next'的指向下一页的链接

1
2
3
4
5
6
7
8
curl --request GET --header "PRIVATE-TOKEN: <your_access_token>" "https://gitlab.example.com/api/v4/projects?pagination=keyset&per_page=50&order_by=id&sort=asc"

HTTP/1.1 200 OK
...
Links: <https://gitlab.example.com/api/v4/projects?pagination=keyset&per_page=50&order_by=id&sort=asc&id_after=42>; rel="next"
Link: <https://gitlab.example.com/api/v4/projects?pagination=keyset&per_page=50&order_by=id&sort=asc&id_after=42>; rel="next"
Status: 200 OK
...

我们可以通过正则表达式,取出 next 代表的链接地址,递归请求直到没有 next

常用的 API 示例

  1. 查看所有项目 GET /projects

    • owned 是否仅展示属于当前用户的项目,默认为 false
  2. 查看一个项目的所有 tag GET /projects/:id/repository/tags

1…789…15

lijun

与其感慨路难行,不如马上就出发
145 日志
30 分类
117 标签
© 2019 – 2020 lijun